...
...
...
...
Sablefish and Halibut Pot Gear Landing with Max-Out Pounds:
Go to: http://elandingst.alaska.gov/elandings/Login
Enter the following User ID and password:
User ID | Password |
|---|---|
| DVARDEN | D_varden |
...
Sablefish Pot Gear Landing Report
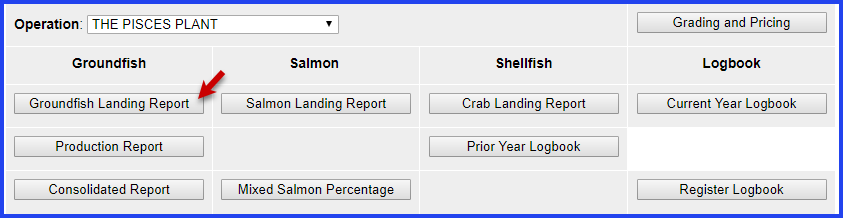
On the main reports page of eLandings, you should see The Pisces Plant in the Operation field
...
Create a new landing report by logging in and choosing the operation called The Pisces Plant, then click on the Groundfish Landing Report button.
...
Enter the
...
following vessel information, feel free to change the dates
Vessel ADF&GADF&G Gear CodeCrew SizeNumber of Observers14796 91 4 0 Date Fishing Began Days Fished Date of Landing Discard Report 07/xx/
...
2019 6 07/xx/
...
2019 Not
...
Received - Leave the rest of the fields with their default values.
...

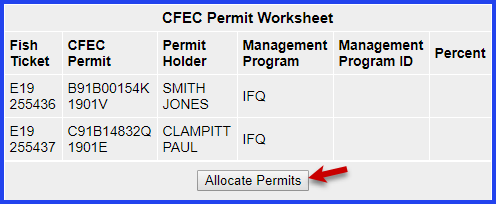
- Scroll down to the CFEC Permit worksheet and fill in the following
...
- value
| CFEC |
|---|
...
| Permit |
|---|
...
| Management Program |
|---|
...
...
| NMFS ID | IFQ Permit | Species | Area/Fishery | Lbs |
|---|
...
| to Max |
|---|
...
| Out | ||||||
|---|---|---|---|---|---|---|
| B91B 00154K 1901V | IFQ | 980038 | 980025 | 200 | 2C | |
| C91B 14832Q 1901E | IFQ | 980039 | 980004 | 710 | SE | 225 |
| 980000 | 710 | SE |
...
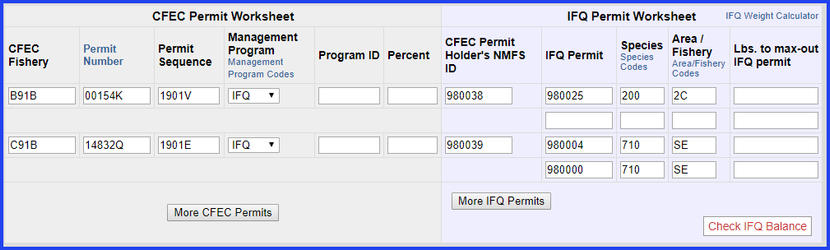
- Once the CFEC Permit Worksheet and the IFQ Permit Worksheet are filled out, continue to scroll down to the stat area worksheet.
...
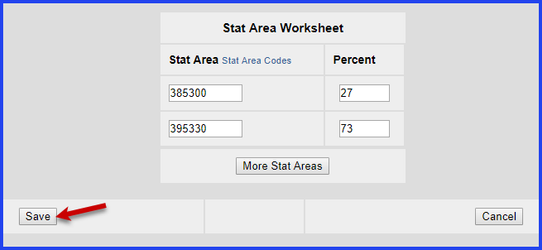
- Enter the following State statistical areas and percentages and then Click Save.
Stat Area | Percent |
|---|---|
| 385300 | 27 |
| 395330 | 73 |
...
...
Adding Catch Information
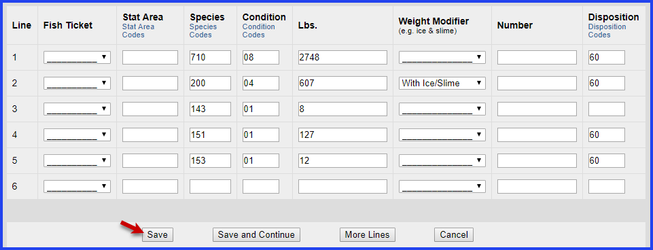
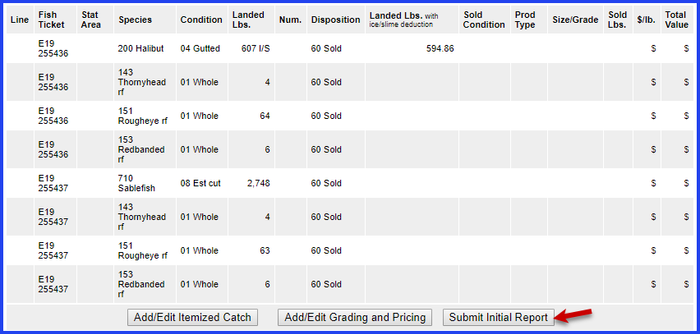
- Click on the Add/Edit Itemized Catch button
...

You do not need to select the fish ticket number at this point; you can use the Allocate Permits function after you save your catch information.
Enter the following species, condition codes, weights, and disposition codes. Click Save.
SpeciesConditionLbs.Weight ModifierDisposition710 08 2748 N/A 60 200 04 607 With Ice/Slime 60 143 01 8 N/A 60 151 01 127 N/A 60 153 01 12 N/A 60
...
- You will be directed back to the main Landing Report page. Scroll down until you see the CFEC Permit Worksheet section, then click on the Allocate Permits button in the CFEC Permit Worksheet window.
...
- Next, click on the Submit Initial Report button
...
- Once you click on the Submit Initial Report button, the page will reload and a green message will let you know you have successfully submitted your initial report.
...
...
IFQ Reports
- Scroll down to the bottom of the screen and click on the Generate IFQ Reports button.
...
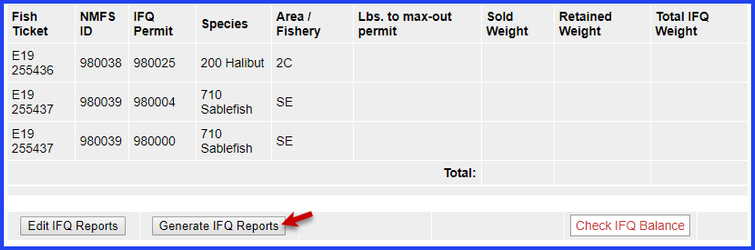
- The IFQ Report will generate.
...
- In this scenario we used the max-out pounds feature, and we can see that the program allocated all the pounds correctly.
...
- Verify that your IFQ information is correct and then click on the Submit IFQ Reports button.
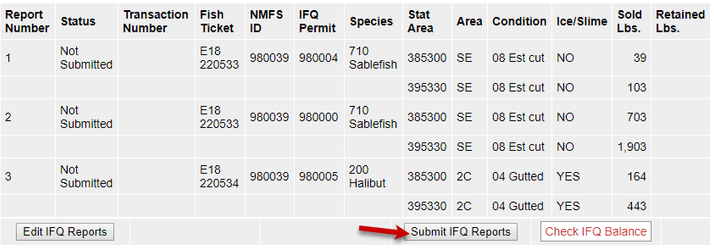
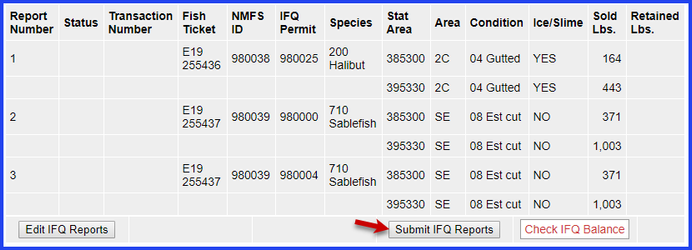
- NOTE: In the training environment you will always get a red line error telling you to contact NMFS Enforcement, disregard in this instance.
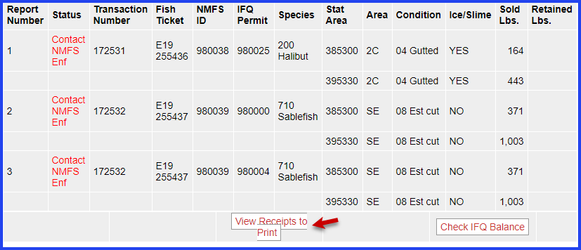
- At the top of the Groundfish Report Display screen you should see an information message that states "IFQ reports submitted".
...
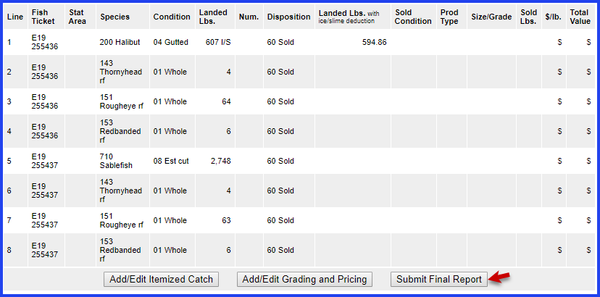
- At this time you can edit your grading and price, or submit the final report.
- To submit the final report, scroll down, and click Submit Final Report.
...
Now that you have Final Submitted your report, you only have a few things left to do.
1) Print your landing receipt by click on the View Receipts to Print button at the bottom of the reports page
...
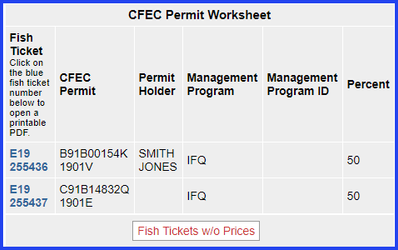
2) Print your fish ticket by locating the CFEC Permit Worksheet box and clicking on the fish ticket number in blue text
...
3) Print your Observer Fee PDF by clicking on the View Observer PDF button
...
