User ID and Password to Use for this Exercise
User ID: sfish
Password: sockeye1
To complete this exercise, you will need:
To complete this exercise you will need to have the Processor Tender Interface, 2019 TRAINING 2019 tLandings Processor Tender Interface (PTI) Installer Download downloaded to your workstation or laptop and one unformatted (empty) tLandings thumb drive inserted into a USB port.
Scenario
You are the fish ticket front office person for King Crab Processing. In this practice exercise you will prepare a thumb drive for the eLandings tender CHINIAK, ADF&G 00013. As part of the configuration you will create a configuration profile for tenders that do not price the product delivered. You will also establish the species and delivery conditions used by your company. The configuration profile you create will be saved and available for selection and use in the future.
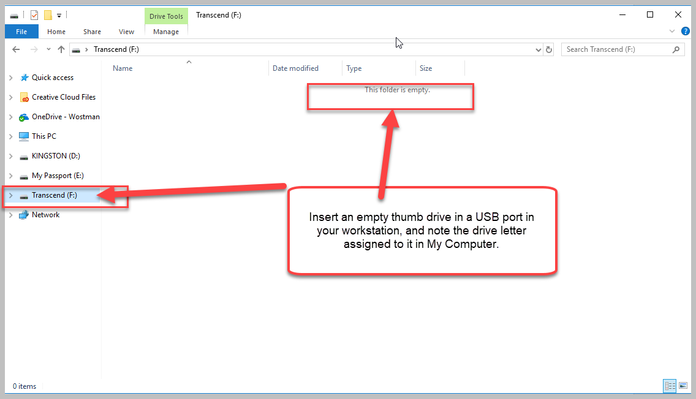
Insert an empty thumb drive in a USB port in your workstation, and note the drive letter assigned to it in My Computer.
Locate the Processor Tender Interface (PTI) from the icon on your desktop. When you download and install the PTI, an icon will be placed on your desktop.
Please use the PTI Training application for the current year.
LOGIN
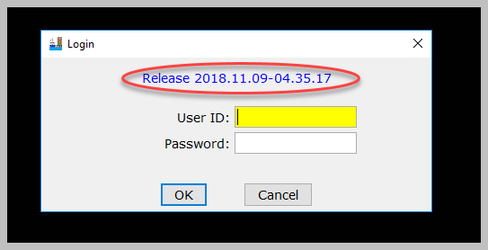
Double click the icon to open up the Training PTI. Notice the Release number. Login as sfish, password sockeye1.
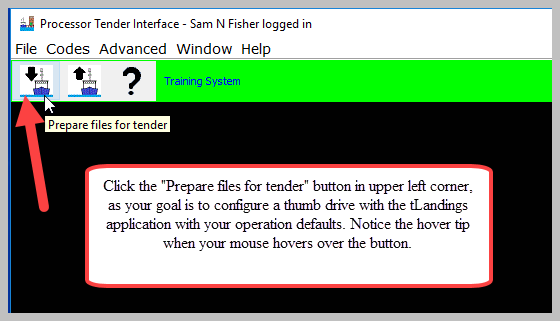
Prepare Files for Tender
Click the "Prepare files for tender" button in upper left corner, as your goal is to configure a thumb drive with the tLandings application with your operation defaults. Notice the hover tip when your mouse hovers over the button.
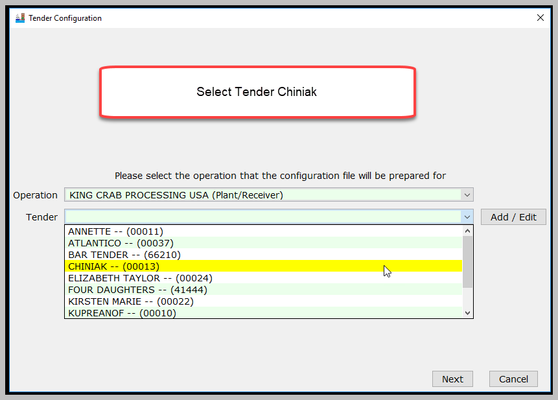
The PTI operates as a wizard, guiding you through the steps to configure the thumb drive, screen by screen. Most prompts will be NEXT buttons in the lower right-hand corner. When you click on the down arrow boat icon (Prepare files for tender), a dialog box, Tender Configuration, opens with a list of all operations associated with your eLandings user account. You may only have one operation to select.
Once you select the operation, select the tender to begin the configuration process.
Select King Crab Processing Plant from the drop down list of operations
NOTE: As you review the Operations, you will see listed plant/receiver facilities, buying station, and custom processing relationships.
If you select a buying station, no tenders are listed. Configure the thumb drive with the selected buying station only. If you have a custom processing relationship with another facility (operation) and it includes tenders, these will be listed.
If your operation shares tenders with another plant operation (sister facility), when you select the operation, the tenders associated with that operation will be listed. Tenders shared with another plant operation will be listed if they have been added to your operation. Tender operations can also be managed from the eLandings web application, under Administer Operations.

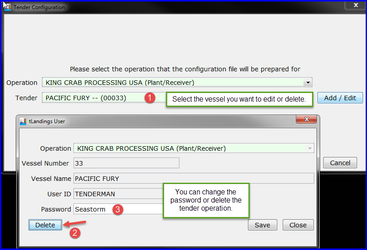
Select the tender, Chiniak (00013).
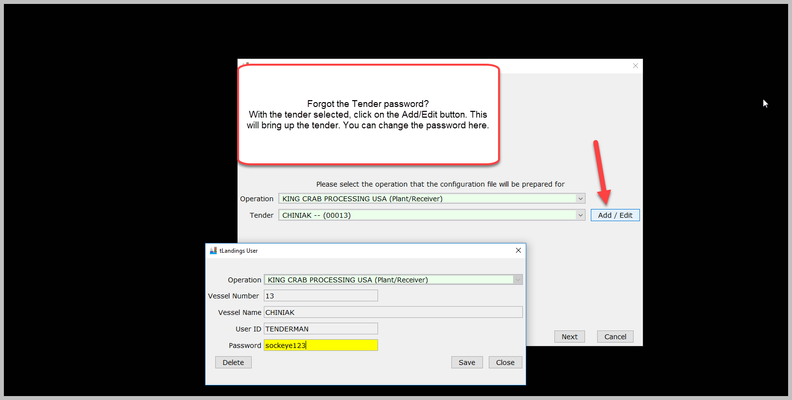
Forgot the Tender password?
If you forgot the tender password, on this screen, with the tender selected, click on the Add/Edit button.
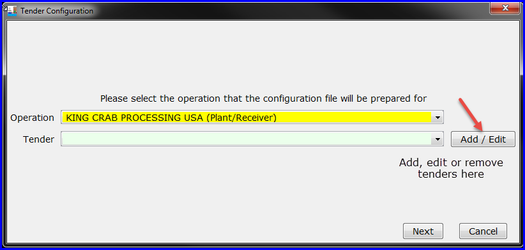
Want to Add a Tender?
Click on the Add/Edit button. Note the highlighted yellow field. This is a standard navigation tool within the PTI and tLandings telling you that this is the cursor focus – ready for typing or selection.
If you select a tender and then click on Add/Edit, you will be able to change the password or delete the tender operation.
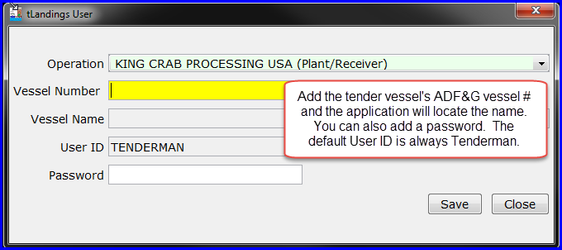
Manage tLandings User Passwords
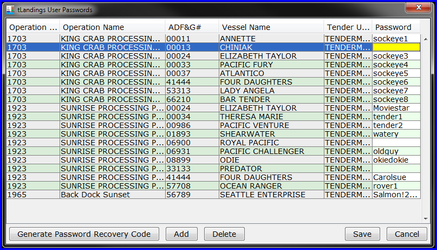
Another resource for both tender and tender password management is the Manage tLandings User Passwords, located under the Advanced menu.
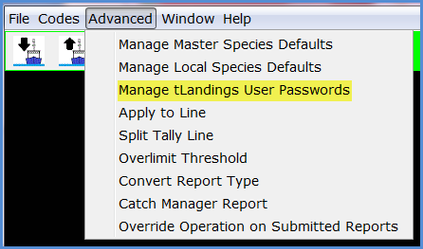
This dialog box allows you to add or delete tenders and manage tender passwords.
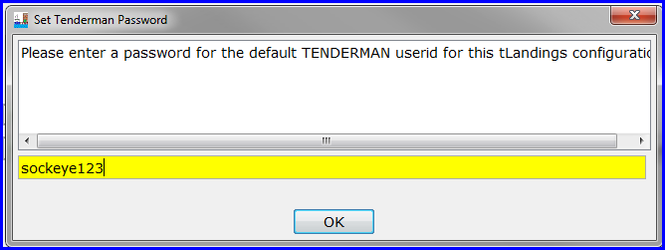
I have not set up a password for a specific tender operator, so a dialog box opens and asks for a password. Please remember that passwords are case sensitive.
The tender is called Chiniak and I give the tender operator the password: sockeye123 and click OK.
I have my Operation and Tender Selected!
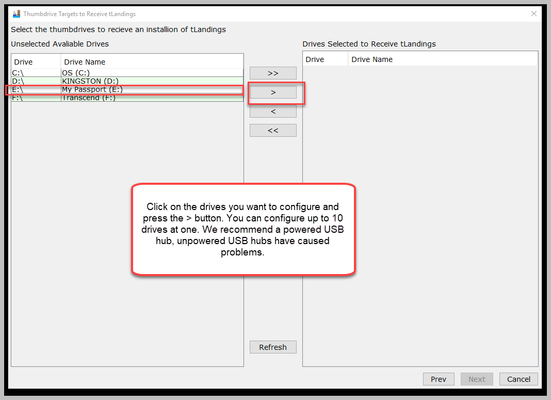
With the operation and tender selected, click on the Next button in the lower right hand corner.Select the USB drive letter for the thumb drive(s) and click the right arrow button to add it to the list of target drive(s) names. Click Next to continue.
Select the USB port(s) and then click the > arrow. You can configure up to 10 drives at once, so you can select more than one USB port.
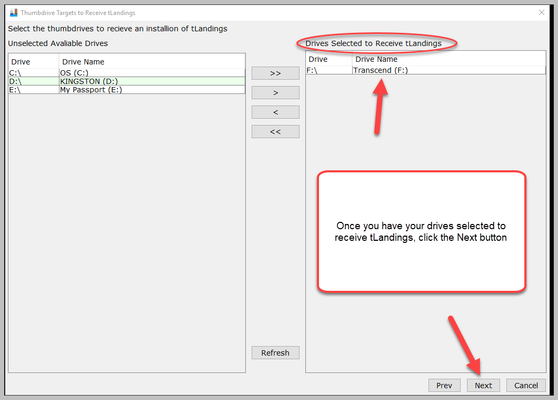
Once you've selected your drives to receive tLandings, click the Next button.
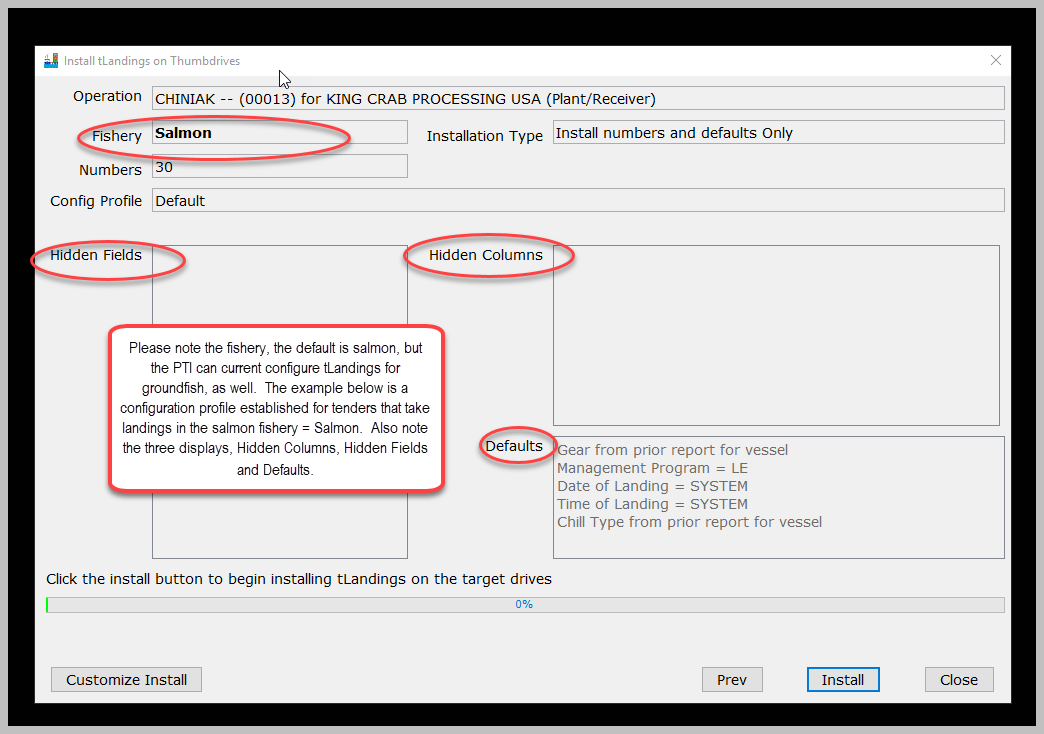
Install tLandings on Thumbdrives
This will bring you to the Install tLandings on Thumbdrives window. Please note the fishery, the default is salmon, but the PTI can current configure tLandings for groundfish, as well. The example below is a configuration profile established for tenders that take landings in the salmon fishery = Salmon. Also note the three displays, Hidden Columns, Hidden Fields and Defaults. We will review how these tables are used in this exercise.
Customizing the Installation of tLandings with tLandings Profiles
At the beginning of the season you can create several thumb drive configuration profiles and save/store for use throughout the current and future seasons. Customized Configuration Profiles are available for both groundfish and salmon. You will need to complete a Customize Install to create a configuration profile. Profiles are stored and can be edited or deleted at any time.
When you click the Customize Install button, a new dialog box opens, Thumb drive Installation Configuration. Please take a minute to review this box and note the Number of Reports/Fish Tickets. In the example the default number is 30, but you may need to install many more unique fish ticket/landing report numbers.
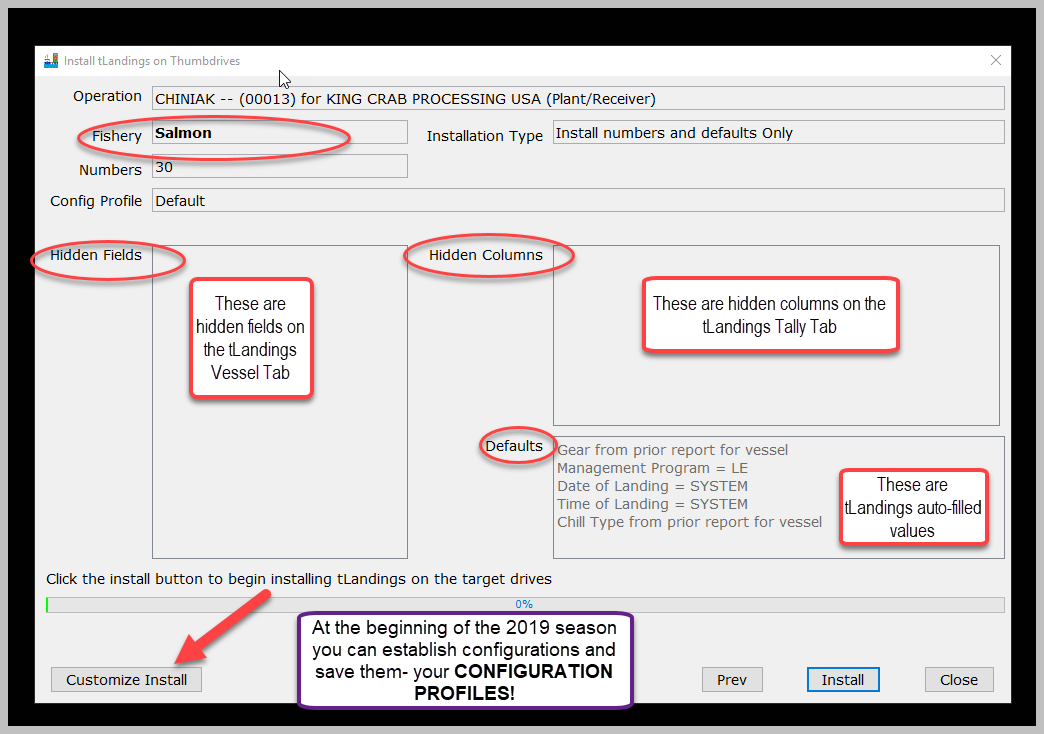
We're going to customize this installation for a tablet, so click on the Customize Install button. When you click on the Customize Install button, the Thumbdrive Installation Configuration window will popup.

The configuration proles is set to Default. Click on the Configuration Profile dropdown arrow to see all the established Configuration Profiles.
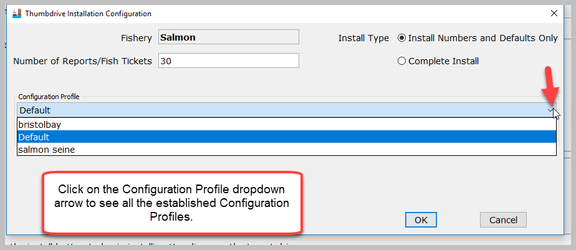
The most recently used profile displays first, which here is bristolbay. I have two other profiles, Default and Salmon Seine. Yours might be different depending on who was last using this training login.
Each profile can contain the follow customizations:
- Customized hidden fields (Vessel Tab)
- Customized hidden columns (Tally Tab)
- Unique species lists for salmon and groundfish, as well as salmon troll.
- Default values can be establish with any profile, but should be used very carefully.
- Default values from the prior landing report can also be established in the profile.
- The number of reports/Fish Tickets can be defaulted to a specific number or modified with each thumb drive configuration.
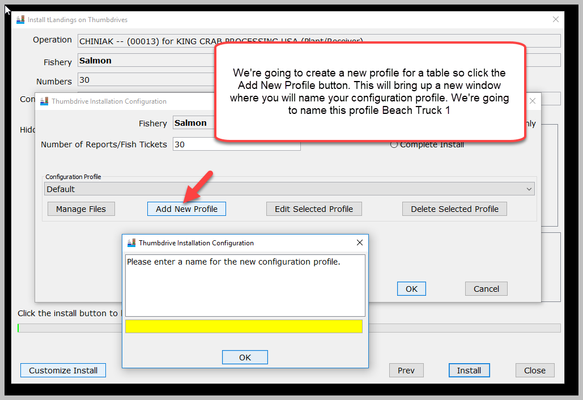
For this training scenario you will select the button titled: ADD NEW PROFILE.
CONFIGURATION OF A THUMB DRIVE FOR A TABLET DEVICE
Tablet devices, by design, have a smaller display screen. They are well suited to simpler fisheries, such as set gillnet and drift gillnet fisheries, with fewer statistical areas, fewer lines of itemized catch and no pricing.
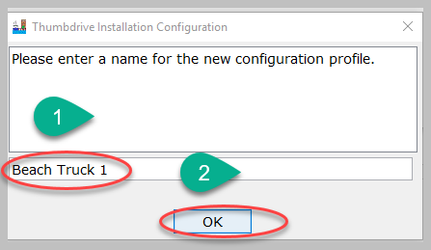
We're going to create a new profile for a table so click the Add New Profile button. This will bring up a new window where you will name your configuration profile. We're going to name this profile "Beach Truck 1"
Enter the name Beach Truck 1 and hit the OK button.
This will bring up the Settings window.
The Settings window with seven tabs will display. We will review each tab.
Configuration Tab
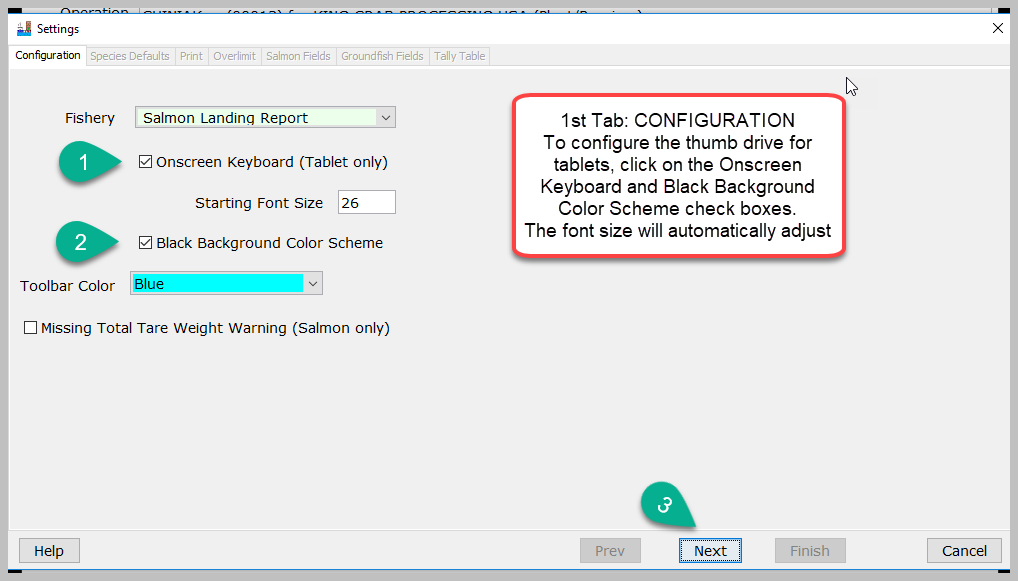
1. Configuration – allows you to select the fishery – salmon or groundfish and the reporting platform – laptop or tablet. The default font size for the laptop is 14. You can also change the toolbar color and if a Bristol Bay fishery, check the Missing Total Tare Weight Warning. The Black background color scheme is only recommended if you use a tablet. You can change the Toolbar Color as well here. Above, we have it changed to Blue.
The Starting Font Size for the tablet configuration is 26. If you are using a Mobil Demand tablet, this font size is correct. If using a BAC USA tablet, adjust the Starting Font Size to 22.
Once you've checked the boxes, click the next button to move onto the second tab, Species Defaults.
Species Defaults Tab
2. Species Defaults – allows you to manage species lists customized for specific fisheries and store unique species lists.