eLandings User Manual
How to Create a Groundfish Landing Report with the tLandings Tender Workstation
Scenario
I am the skipper of a tender buying Pacific Cod for a shorebased processor. The processor's office manager has already configured this thumbrive with the tLandings application for groundfish landings.
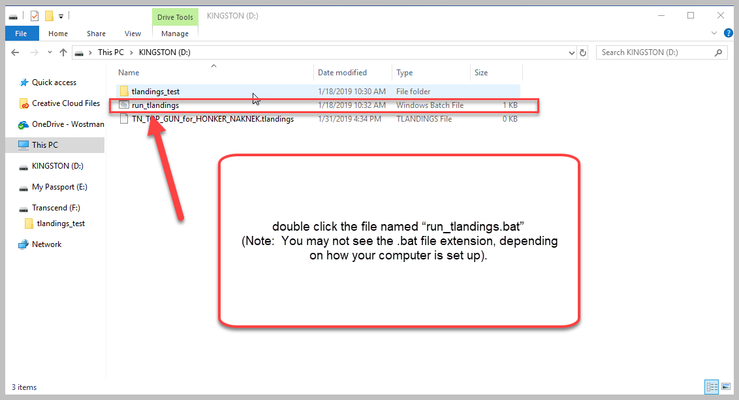
I insert the thumb drive in a USB port, and note the drive letter assigned to it using My Computer or other file Explorer window.
I. Open tLandings Application
I double click the file named “run_tlandings.bat” (Note: You may not see the .bat file extension, depending on how your computer is set up) to open up the tLandings applicaiton.
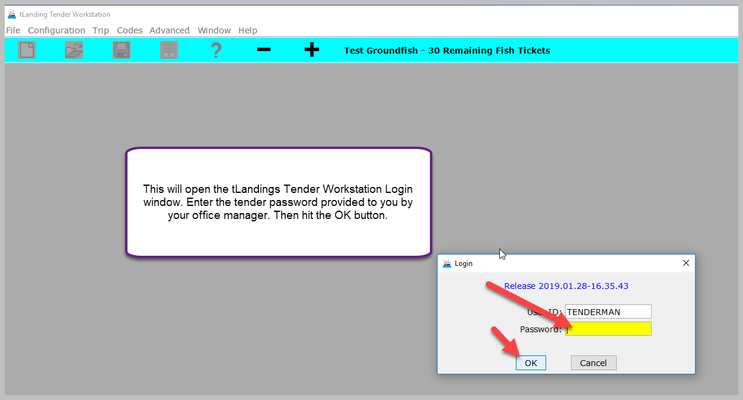
II. Log Into tLandings
This will open the tLandings Tender Workstation Login window. Enter the tender password provided to you by your office manager. Then hit the OK button.
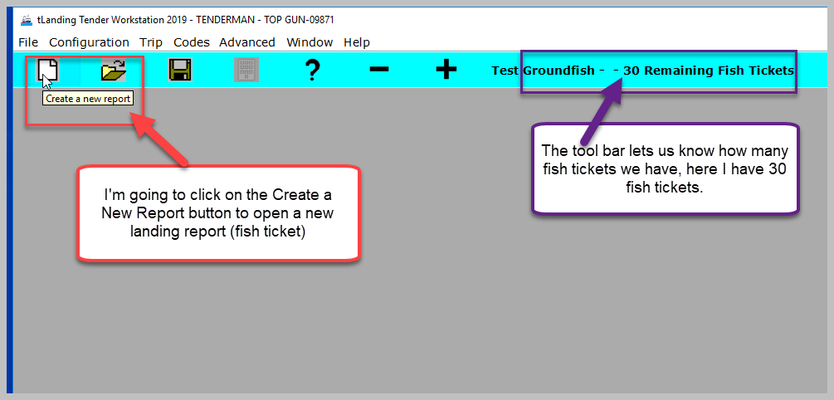
III. Create a New Landing Report (Fish Ticket)
Once you've logged in and hit OK the login window will disappear. I will click on the Create a new report button (that looks like a piece of paper) in the upper left hand corner.
This will bring up the New Report window where I will swipe the CFEC permit card in my mag stripe reader.
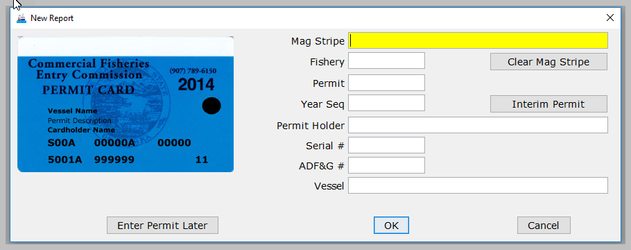
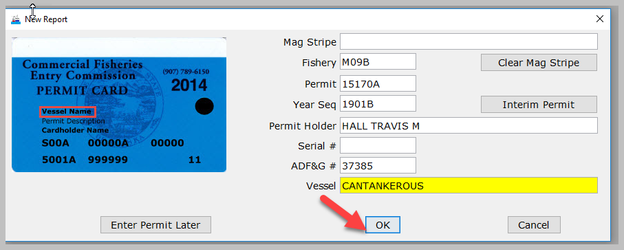
The card is swiped and the data will populate. Then click on the OK button.
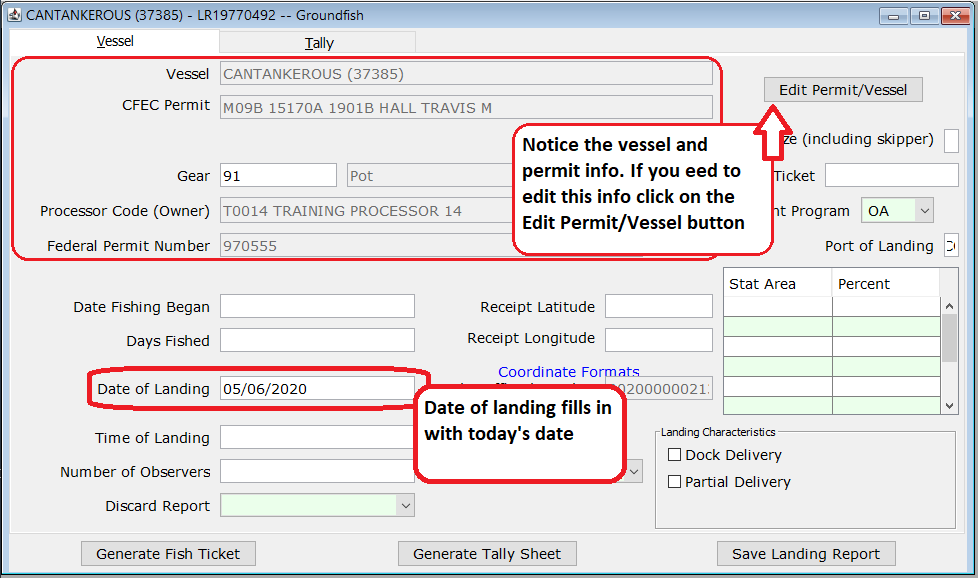
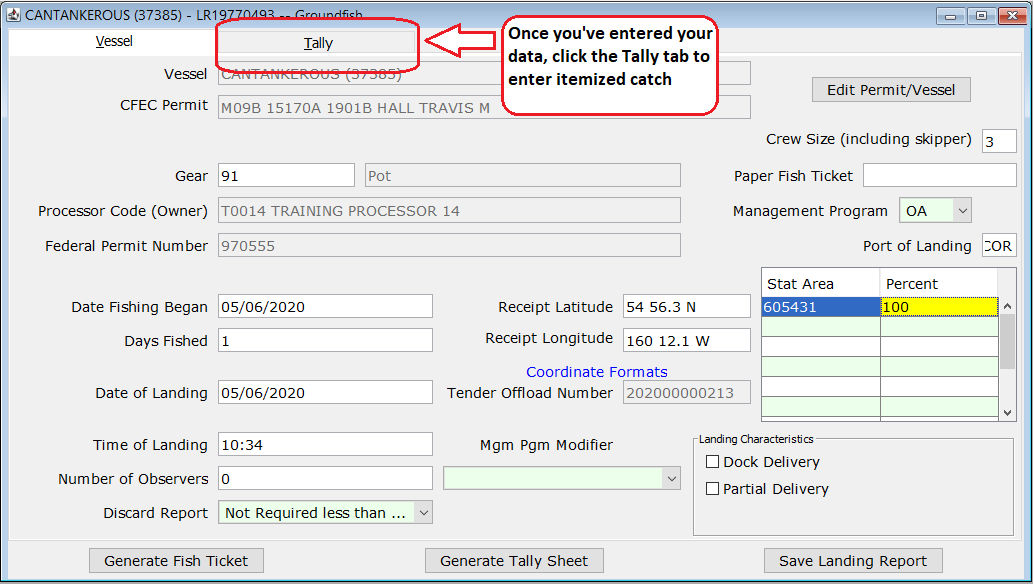
The landing report window will open onto the vessel tab. If you need to edit the vessel or permit information click on the Edit/Permit Vessel button. Notice the Date of Landing fills in with today's date.
I am going to fill in the following fields:
- Date Fishing Began: when the gear was deployed in the water to begin fishing.
- Days Fished: when the gear was being fished. This number does not include traveling to and from the fishing grounds, or weather delays.
- Time of Landing: asldf
- Date of Landing: when the landing was completed.
- Number of Observers: The number of observers. An observer is a shore-based or on-board biologist that monitors the legal compliance of commercial fishing activity. Observers collect catch composition data by sampling a portion of the catch and recording information such as fish or shellfish age, length and weight. Observers also record fishing effort and location as well as condition information from delivered products. Observer duties vary between fisheries as well as within fisheries based on the operation or vessel type. National Marine Fisheries Service certify contract employees as groundfish employees.
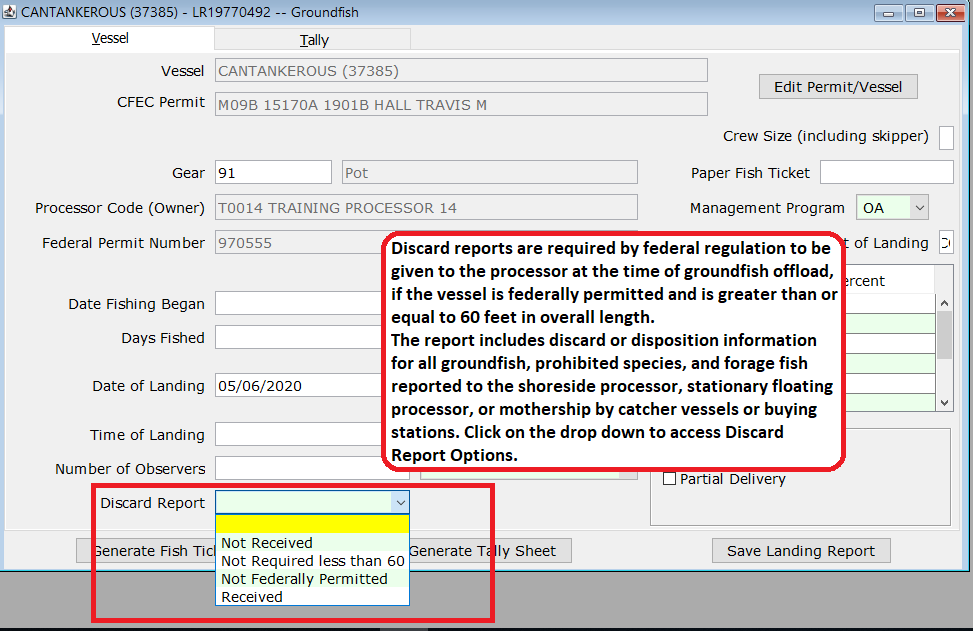
- Discard Report: Discard reports are required by federal regulation to be given to the processor at the time of a groundfish offload if the vessel is federally permitted and is greater than or equal to 60 feet in overall length. The report includes discard or disposition information for all groundfish, prohibited species, and forage fish reported to the shoreside processor, stationary floating processor, or mothership by catcher vessels or buying stations.
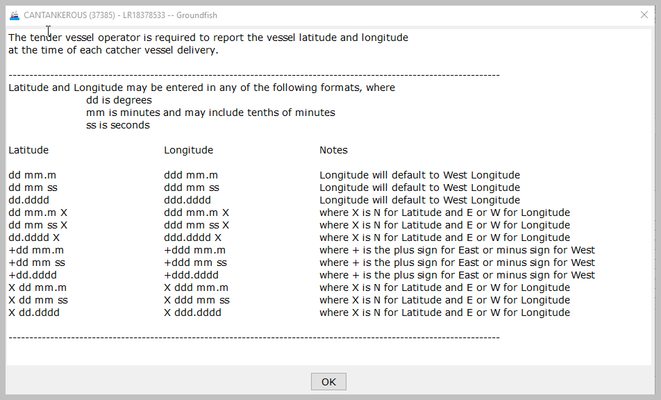
- Receipt Latitude and Receipt Longitude: The receipt laitude and logitude are required. You can click on the blue link Coordinate Formats to view the accepatable formats window.
- Crew Size (including skipper): The number of crew members on the boat.
- Paper Fish TIcket: Enter only if you're entering in a paper fish ticket.
- Management Program:A unique fishery program with specific management strategies and/or allocation. Management programs that must be identified in the eLandings System include: IFQ, Adak crab and groundfish, CDQ (and specific ID number), AFA (and specific ID number), state managed groundfish, etc. OA- Open Access
- Port of Landing: location where the landing occurred. This value is auto-filled from your User Agreement registration. You can modify this value to indicate the correct location for this landing. You can click on the Port Codes link under the Port of Landing area for a list of port codes.
- Partial Delivery: check if, Yes, the vessel has made deliveries to other operations or processors from this fishing trip, in other words, deliveries elsewhere, or if the delivery to your operation is only a portion of the catch. If you created more than one landing report for a delivery, you should also check the PartialDelivery box, to indicate Yes.
- Dock Delivery: check if this is delivery made to a dock.
- Stat Area: Referred to as the Stat Area Worksheet, this is the area to record the ADF&G statistical area denoting the actual area of catch.
STAT AREA WORKSHEET NOTES
- This worksheet may be used to document a single statistical area, with 100%, or multiple statistical areas.
- The recording of multiple statistical areas in the worksheet requires that the species that are caught and discarded are equally distributed across all statistical areas fished; and all statistical areas fished are open to the species fished.
- If the criteria are met, enter all of the statistical areas that were fished in the field labeled Stat Area and enter the percentage of the catch taken in the area in the area labeled Percent.
- If all of the species recorded on the ticket were from a single statistical area, enter the Stat Area and 100%.
- If you use the Stat Area Worksheet, there is no need to enter the statistical area code and percent anywhere else on the landing report.
- If one or more species are not harvested in a manner that is equally distributed across all statistical areas fished, the catch must be recorded in the Add/Edit Itemized Catch section of the eLandings landing report.
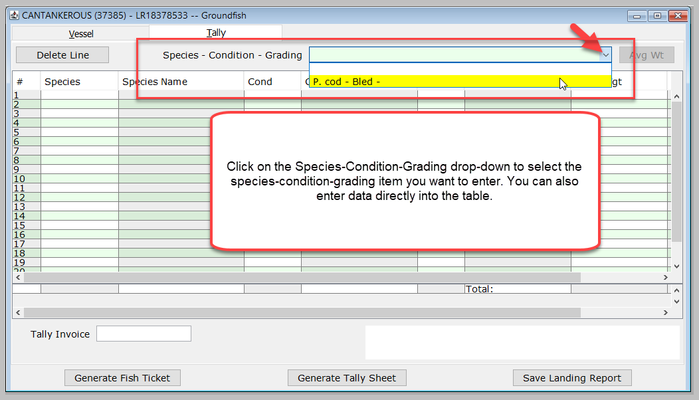
Once I've entered my data into the Vessel tab, I click on the Tally tab to enter my itemized catch.
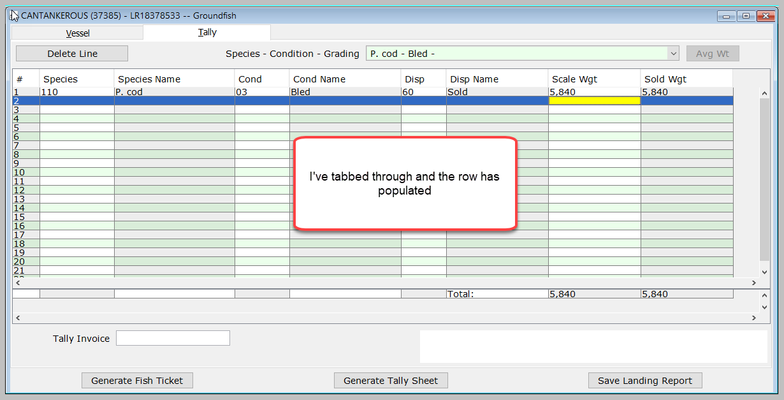
The tally tab is similar to an Excel spreadsheet, you can adjust the column widths and tab through. To begin, click on the Species-Condition-Grading drop-down to select the species-condition-grading item you want to enter. You can also enter data directly into the table.
Once you've selected the Species-Condition-Grading, the Scale Wgt field will highlight yellow. Enter in the scale weight and then hit the tab key until you get to the next row. This will populate the species, species name, cond, cond name, disp, and disp name.
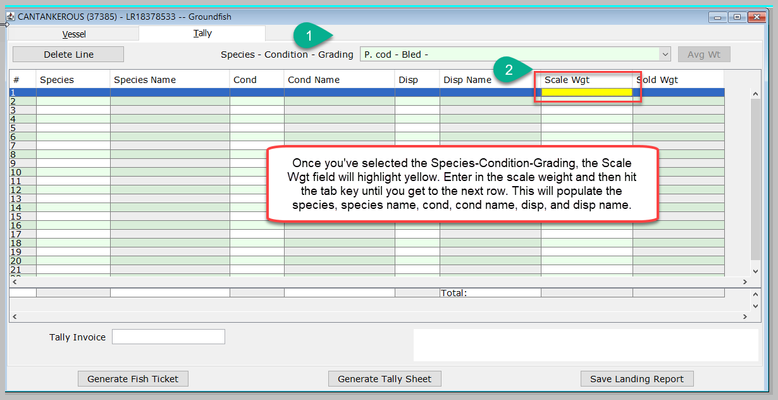
I've tabbed through and the row has populated.
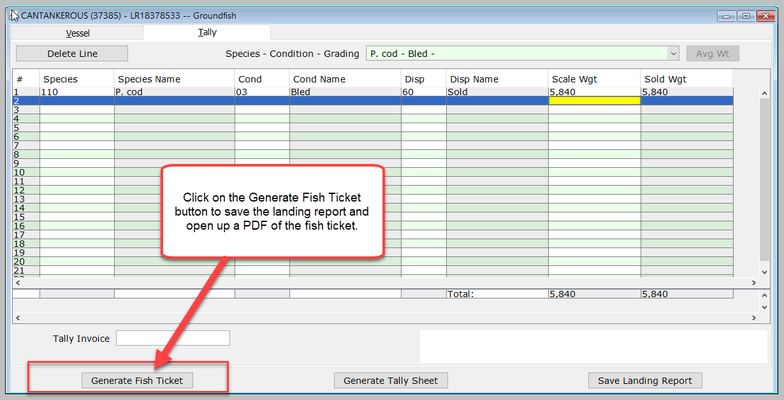
This is all the delivery was made so I'm going to click on the Generate Fish Ticket button.
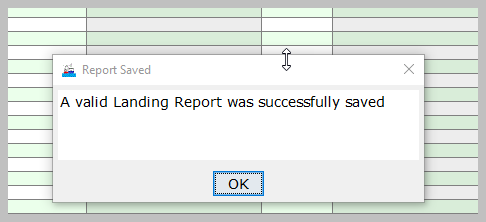
When I click on Generate Fish Ticket button. A Report Saved window will pop up letting you know that a valid landing report was successfully saved. Click on the OK button to close the window.
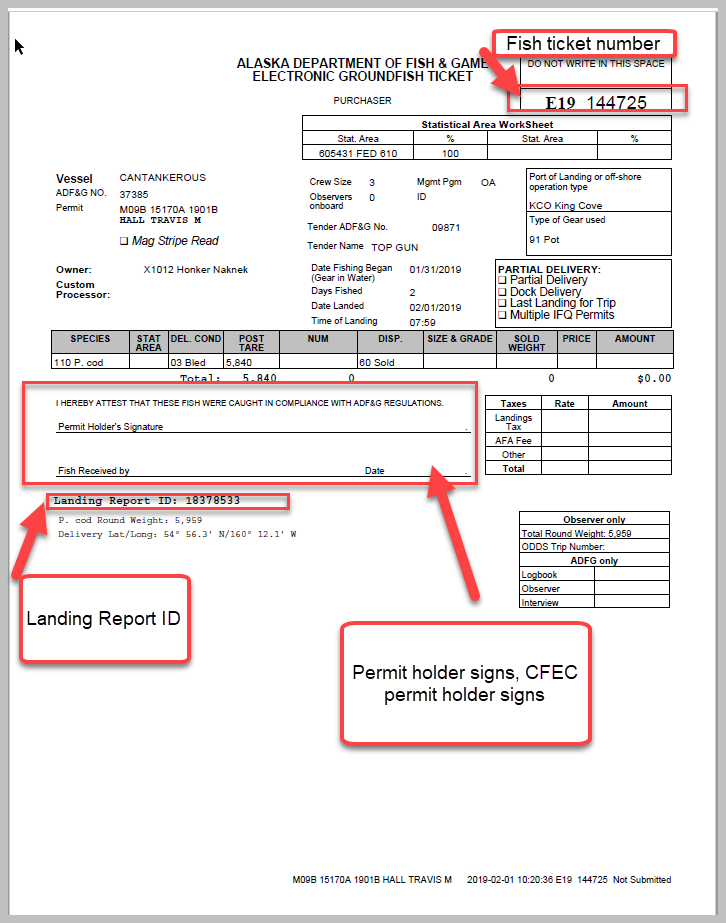
The tLandings application automatically creates a .PDF file of the fish ticket, and opens it in an Adobe Acrobat Reader window. Two tickets will automatically be created ready for printing. You can print or review this fish ticket, and even generate it again after editing the landing if needed. The default will be to have two copies of the fish ticket printed, one for the purchaser and one for the seller (CFEC permit holder). Give a signed copy to the seller (CFEC permit holder) and retain one to bring back to your office manager which will be delivered to ADF&G within seven days of landing. If you have nay questions on record keeping and recording please contact your local ADF&G office. As of 2020, fish tickets generated in tLandings will begin with the letter D.
Once printed you can close out of the PDF and close out of the landing report by clicking on the red X in the upper right hand corner.
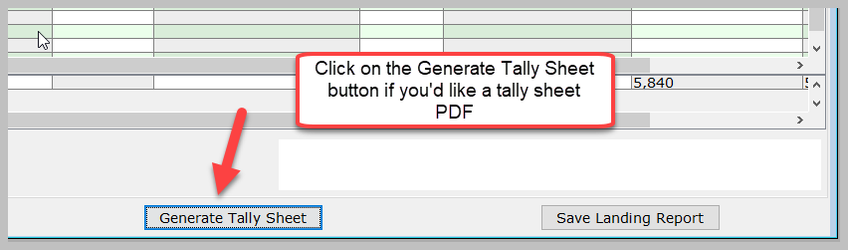
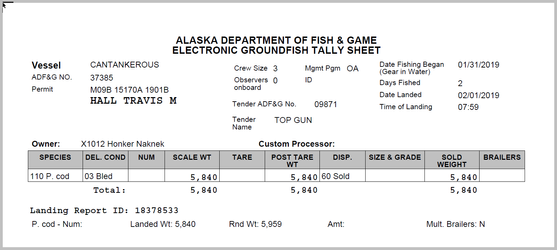
If your seafood processor provides the vessel skipper with a tally sheet, this can be printed, as well.
Review the fish ticket and the tally sheet. If changes need to be made, it is simply to do. With the landing report still open, change any field needing to be corrected, save the report and re-print the fish ticket.
You are now ready for your next landing.
If you have completed the landing report, please do not minimize the report (s) – just close. You can close out of the landing report by clicking on the red X in the upper right hand corner. When you minimize a large number of reports, the application performance is slowed.

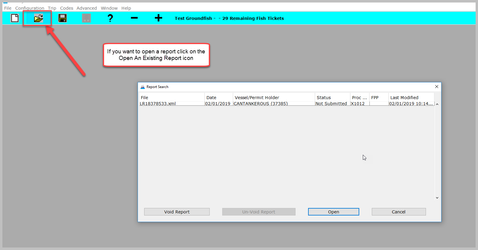
Once a landing report is saved, it can always be reopened and edited using the Open An Existing Report icon.