eLandings User Manual
Installing seaLandings on Windows 7 Machines
seaLandings_Installing_Windows7_OS.docx
Step 1.
- Insert the cd or thumb drive into your computer. The program will not be brought up automatically, you will need to go to your Computer and locate the cd or thumb drive in the directory and then double click on it.
- You will see the sealandings Installer folder in the folder, for optimal performance, you should Copy and Paste the installer folder to another folder on your computer that is easy to find.
Step 2.
- Now you will want to open the installer folder and right click on the install.bat file and select Run as administrator from the pop-up menu.
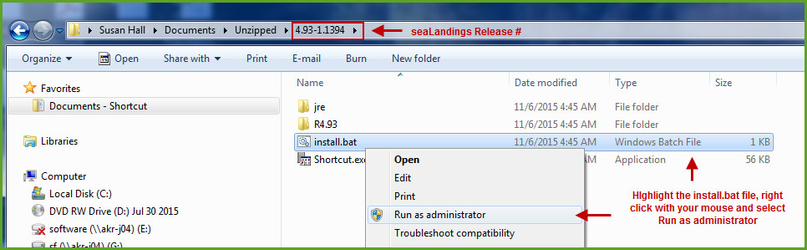
- A black dos window will pop up - do not close this window as it will cancel the installation process!!!!
- The sealandings Installer dialog box will pop up and request specific information about your operation as shown below.
Step 3.
- Select the Transmit type
- File method - creates a zip file of your report which is saved in your transmissions folder and then attached to an email addressed to elecrep@noaa.gov, requires processing of return receipt.
- Direct method - transmits and processes your report via the internet behind the scenes. No email transmission is required!
- User ID - this is the ID entered when the operation was originally created.
- Password/Confirm Password - this is the password used in conjunction with the User ID that was entered when the operation was created.
- Type of Installation - Production is the selection you want to go with.
- Software - If you use sealandings to submit daily production and landing reports then select Sealandings.
- if you only wish to use the sealandings reporting system for the electronic logbook, select Logbook only.
- Archive old reports? - This feature will move everything in your current Reports folder to the Archive folder (C:\ProgramData\sealandings\archive) - this includes your Legacy Logbook.
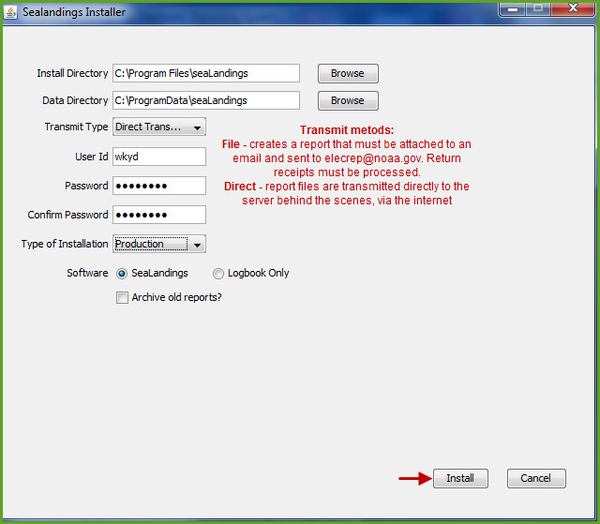
- Click on the Install button.
- The sealandings Installer window will turn green after completing file uploads. This indicates that you have successfully installed the software and provide you with a remider to send an initial transmission file once you have logged into sealandings to request a User Authentication and report numbers.
- Click on Finish to complete the process.
- A sealandings Icon should have been created on your desktop, this is your shortcut to opening the seaLandings program.
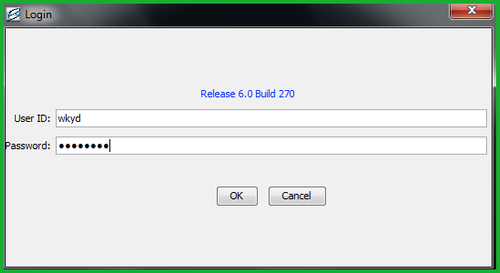
Step 4.
- Locate and double click on this icon to open the login dialog box.

- Enter your UserID and Password and click on OK to login into seaLandings.
Step 5.
- Go to Reporting...Transmit Reports.... to request a User Authentication and your report numbers.
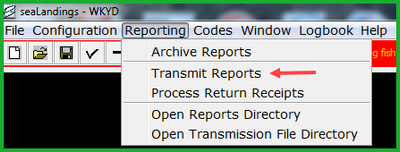
- If you are using Direct transmission, your User Authentication and report numbers will automatically be returned.
- If you are using File transmission, you will need to attach the zip file to an email addressed to elecrep@noaa.gov and process the return receipt you receive.
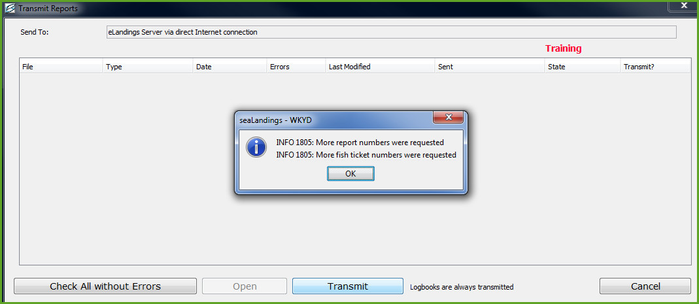
- You should see a message similar to the one in the screen-shot letting you know report and fish ticket numbers were received.
- Now you're ready to create reports!
NOTE - If you go to File > New and do not see your Operation displayed in the Operation field, you neglected to do Step 5.
If you have any questions email elandings@alaska.gov