...
To create a groundfish or crab landing report, you will need to login to the eLandings web interface which can be found here: https://elandings.alaska.gov/elandings/Login.
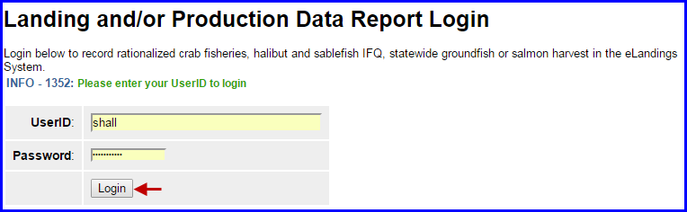
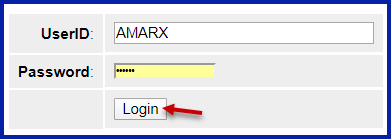
- Enter your User ID and your Password.
...
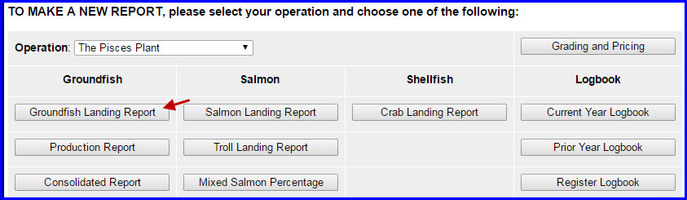
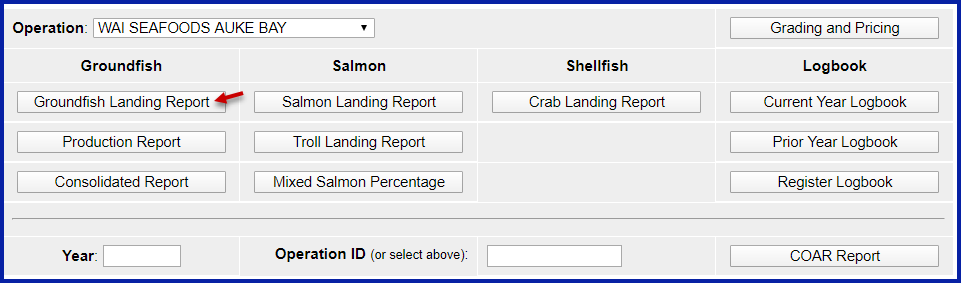
To create a new landing report, simply click on the selection button for the report you would like to create.
The landing report is divided into several web pages that you will move through in sequential order:
...
- A CFEC permit is required for all vessel operators and they must be appropriate for their applicable fishery. They are also required for any individual(s) who will be fishing and selling seafood product as an IFQ shareholder, or on behalf of the actual IFQ permit holder.
- To swipe a permit card, with the CFEC Fishery box active, swipe the permit card. Text will appear in the box that looks like: %BB09B 00155X^SMITTY FISHY ^1801QISLANDER ?;00155180100008139275?
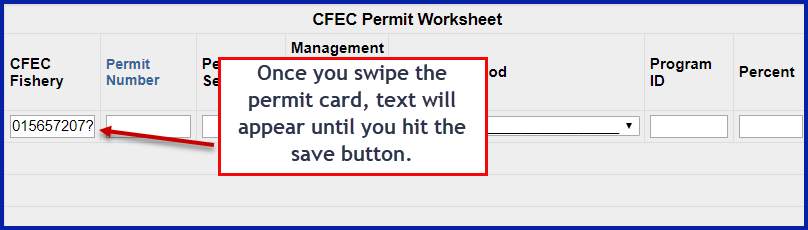

- Once you hit the save button the permit information will populate into the landing report.
...
- CFEC Fishery > Permit Number > Permit Sequence
- Management Program > Program ID (CDQ, AFA, RPP)
- Percentage - when there are multiple permit holders, this field can be used to allocate catch percentages among them
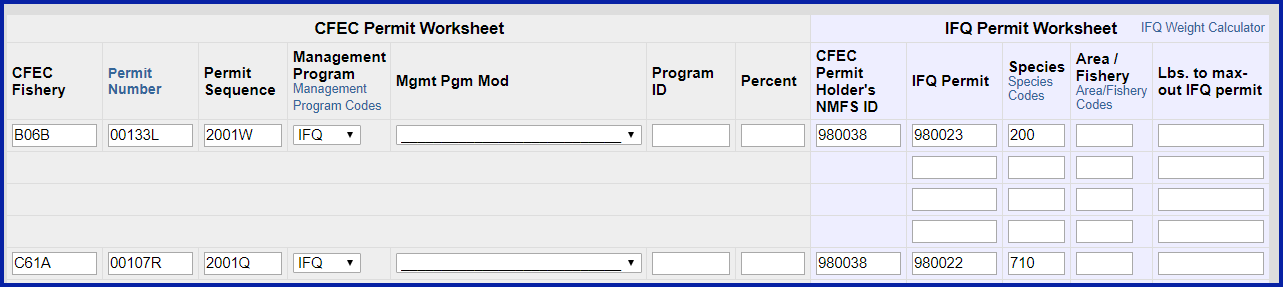

- The eLandings application can accommodate an unlimited number of CFEC permits and IFQ permits for each of these requisite CFEC permits.
- We recommend you collect all IFQ permits, Hired Master permits, and CDQ permits (as applicable) prior to beginning the reporting process.
...
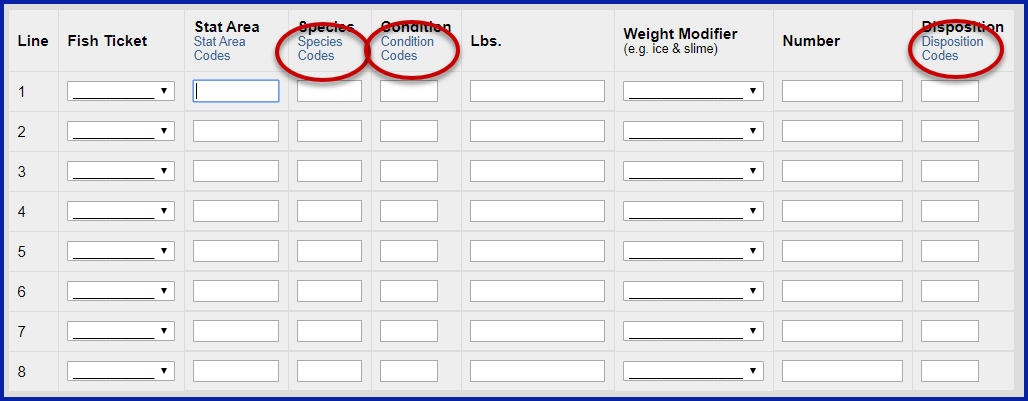
Referred to as the Stat Area Worksheet, this is the area of the Vessel, Permit, and Location Information of the landing report to record the six-digit ADF&G statistical area denoting the actual area of catch.
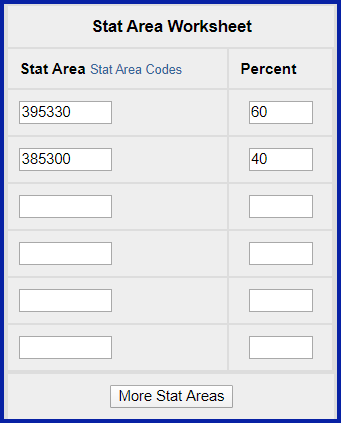

Groundfish/shellfish statistical area charts may be obtained from your local ADF&G office, or at http://www.cf.adfg.state.ak.us/geninfo/maps.php#shellfish.
...
- The 'header' information can be saved as an unsubmitted report.
- After the vessel off-load is complete and the tally sheet completed, the itemized catch and price information can be recorded and saved.
- This activity creates an Initial Report that must be submitted.

Stacked Permits
...
When you save the 'header' information of the landing report - the Vessel, Permit and Location Information section, a fish ticket number is automatically assigned. If more than one CFEC permit is recorded in the eLandings System, a unique fish ticket number is assigned for each CFEC permit. IFQ harvest can be automatically assigned to the itemized catch - line item(s),and it can also be selected from the Fish Ticket drop-down menu. This drop-down field lists any and all fish ticket numbers associated with this specific landing report.


When you have completed recording the itemized catch select SAVE. The application will message back if the itemized catch was successfully saved.


General Guidelines for Reporting Pounds on Groundfish Fish Tickets
...
- In each of these situations, a separate line item must be recorded in the application. Poundage for each unique category must be recorded.
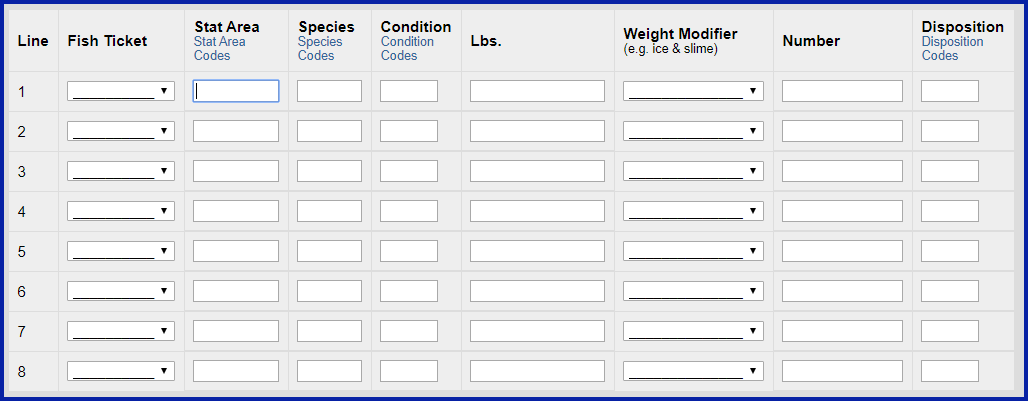

Enter the codes for the following:
...
Stat Area, Species, Condition, and Disposition codes are linked and easily referenced.

Weight Modifier
- The eLandings Groundfish Report allows users to record landings of IFQ species "with ice and slime".
- When the weight modifier "With Ice/Slime" is selected, a two (2%) percent reduction in the recorded scale weight is automatically configured by the system.


- In limited situations, a processor may take possession of Pollock or flatfish, but be unable to immediately weigh the product, or sort by species and weigh the product, while the vessel operator is still present.
- The processor can select "estimated" for Pollock - code 270 or general flatfish -code 120, only.
- The report can be submitted as an initial report, allowing the fish ticket to be created, printed and signatures obtained.
- The final weights, and specific species must be recorded for this landing report, within 72 hours of the submission of the initial report.
- Again, the use of estimated weight is available for groundfish species Pollock and general flatfish species only.
- When all itemized catch by category are documented, select save.
...
- Review the allocated catch, by fish ticket number.
- If the allocation is not acceptable, or incorrect, select the Undo Allocation button.
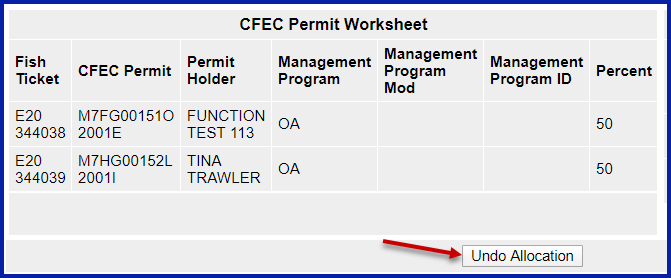

- This will allow you to redistribute the harvest until acceptable to all stakeholders.
- The eLandings System provides a listing of all items by fish ticket number and a summary by species, by fish ticket number.
- These should be reviewed prior to the submission of the landing report.
...
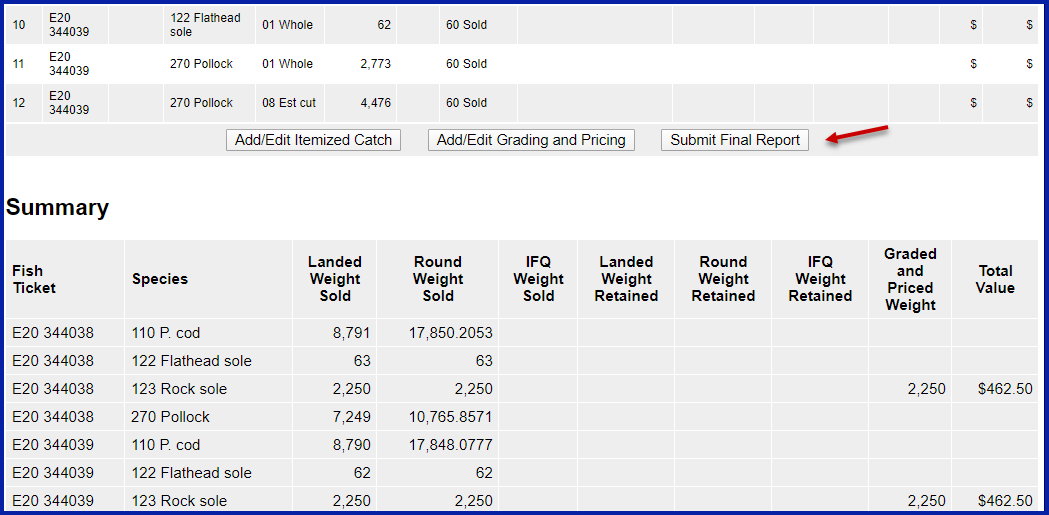
- If you have determined the price of the itemized catch at the conclusion of the off-load, and have completed grading/sizing, you can complete this portion of the report.
- If you do not have this information completed, or it will occur at a later point in time, proceed with the initial submission of the landing report.
- In the illustration below, size and price information are added to the itemized catch.
- Additional grade/size and price categories are available by selecting, More Lines.
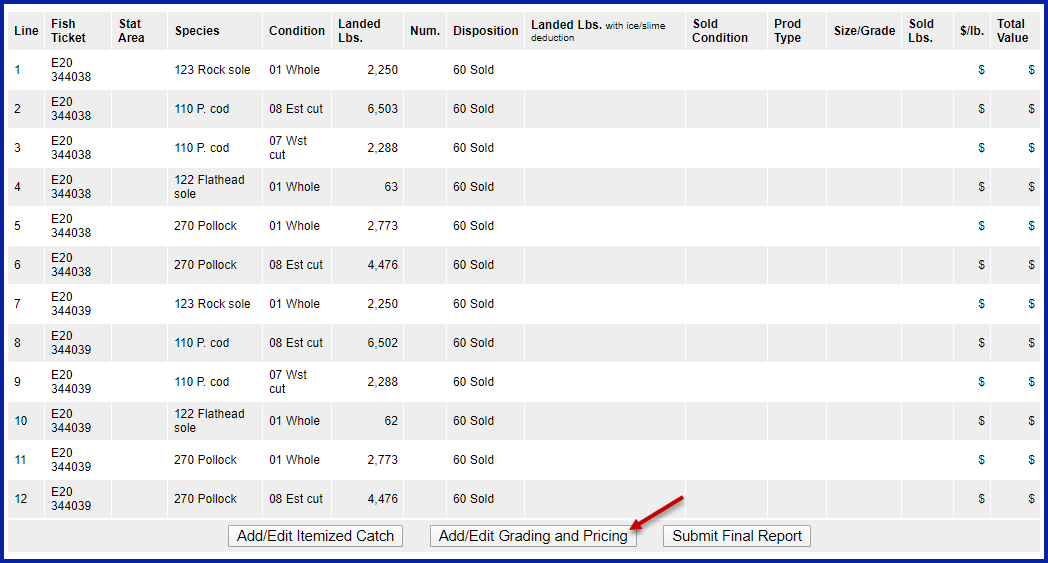


- When saved, the amount is calculated for each price category.
- A total value by price category is displayed. The landing report also displays a Summary with total value by species, below the itemized catch section of the landing report.

...
Generate, Edit & Submit IFQ Report
...
If you use this method, you will enter all of the IFQinformation IFQ information yourself and the eLandings program will not do any calculations (if you want to use the automatic calculations, see the 'Generating IFQ Report' section). Once the initial report has been submitted, go to the bottom of the Report Display and click on the Edit IFQ Reports button.

This screen allows you to fill in all the data without any automated calculations (again, if you want to use the automatic calculations, see the 'Generating IFQ Report' section). The edit page works like the itemized catch page. It will prevent you from saving data inconsistent with data entered elsewhere on the Landing Report (Fish Ticket, Permit Worksheet, etc.) and illogical data (like alphabetic characters in numeric fields).
You are allowed to save partially complete data, although unbalanced data cannot be successfully submitted.
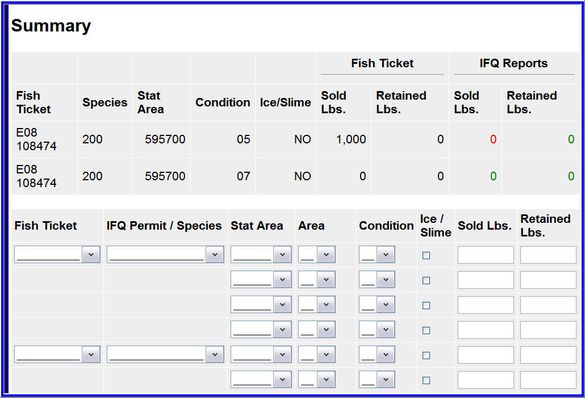

This is the blank IFQ page where you can enter the IFQ information manually.
...
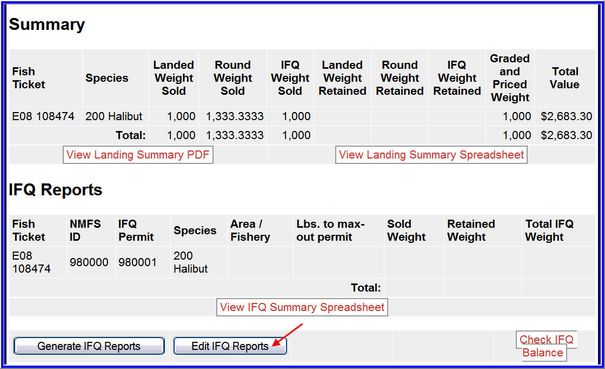
- Even after you have submitted the Initial Report, you may go back and finalize the pricing and grading information for the fish ticket.
- To generate the IFQ Report, go to the bottom of the Report Display page.
- In the IFQ Summary section, you can click on the Generate IFQ Reports button.
- Generating the reports does not submit them!
- You will still have an opportunity to review and edit the reports before you submit them.
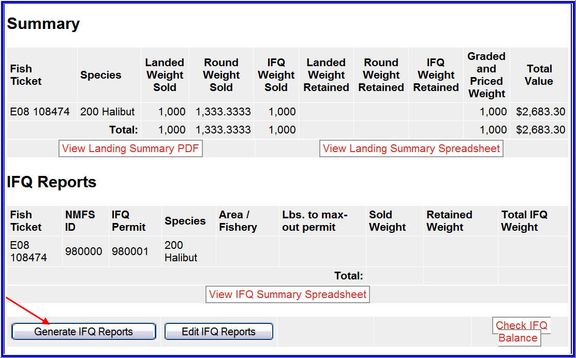

- A message will tell you how many IFQ Reports were generated.


- Now you can scroll down to the IFQ Summary section and review the IFQ reports.

NOTE: If you are creating a crab landing report, another method of generating IFQ reports is available and is discussed in the section called Generating IFQ using IFQ Report Builder. The IFQ Report Builder is an alternate method that distributes catch by disposition among different permits.

Editing the IFQ Report
...
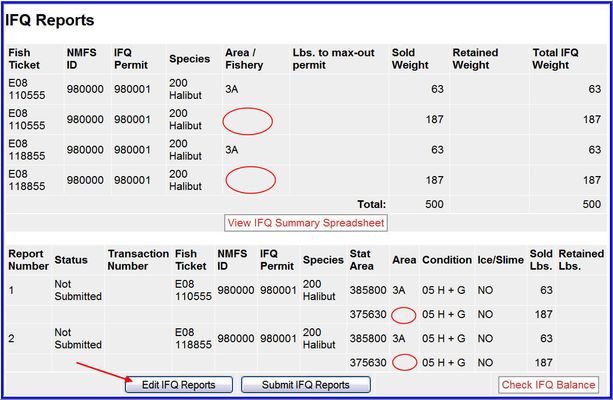
Note, you can only edit the IFQ Report until it issubmittedis submitted. Once the IFQ report has been submitted, the IFQ account will be debited and you cannot edit it. Any further changes have to be made through the NMFS Data Clerks. The Data Clerks are available from 6 a.m. to midnight at: 1-800-304-4846, option #1.
Scroll down to the bottom of the Report Display page and click on the Edit IFQ Reports button.
![]()

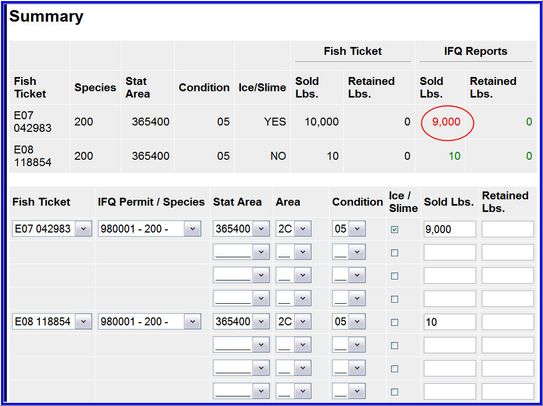
The edit IFQ page allows you to make changes to all the fields in each of the IFQ Reports. Keep in mind that the program will prevent you from saving data inconsistent with data entered elsewhere on the Landing Report (Fish Ticket, Permit Worksheet, etc.). So if there are small errors in the number of pounds on an IFQ Report due to rounding, for example, then you may make these edits.
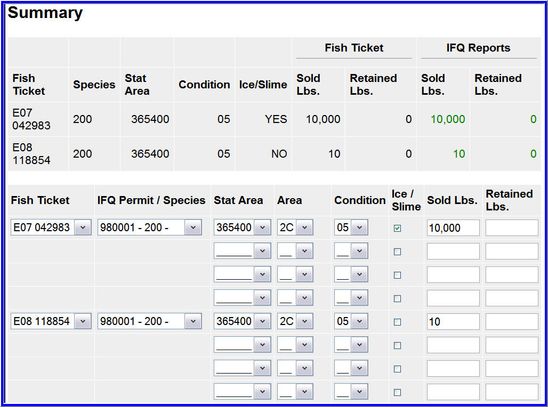

If you make changes, click on the Save and Continue button. This will save your changes and bring you back to the Edit IFQ page so you can review your edits. As long as the pounds in the Summary section are green in color then your IFQ Report and fish ticket are "in balance" if the pounds are in RED then you are out of balance and the eLandings program will not allow you to submit the IFQ report.

If you need to make major edits to the IFQ report and the pounds keep getting out of balance, you need to go back to the itemized catch section of the landing report to make changes. If so, first remove the unsubmitted IFQ Reports before you make edits to the itemized catch. Then, once you have made your edits, you will be able to generate the IFQ Reports a second time.
...
- If you generated the IFQ report, but then ended up doing a manual landing via the Data Clerks. In this case, you cannot Finalize your landing report until you delete the unsubmitted IFQ repots.
- You need to edit the itemized catch or stat area worksheet on your landing report. In this case you need to remove the unsubmitted IFQ report, make your edits, and then re-generate the IFQ report for the second time.
- To remove the report, first go to the Edit IFQ Reports page:
![]()

- Then click on the Remove Unsubmitted Reports button:
![]()

Submitting the IFQ Report & Printing Receipts
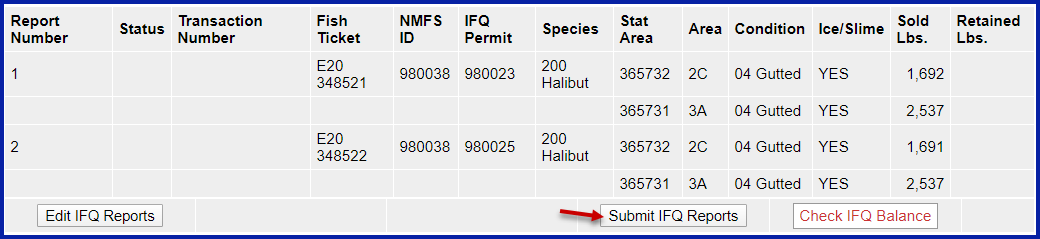
- Once you have created and reviewed the IFQ Reports and everything looks good, then you can submit them.
- Click on the Submit IFQ Reports button.
![]()
- Once you successfully submit your IFQ Report, an eLandings message will inform you that they were submitted.
...
- Scroll down to the IFQ section of the Report Display page and in the IFQ Reports section check that status of your reports now says "Submitted."
- Notice that you also have a transaction number which means that the IFQ account was debited in the database.
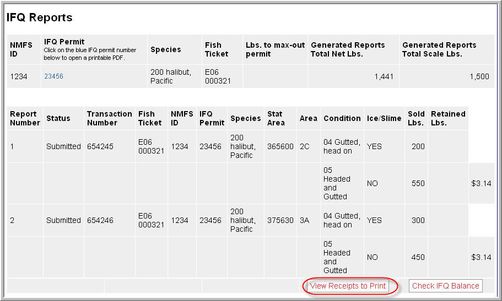

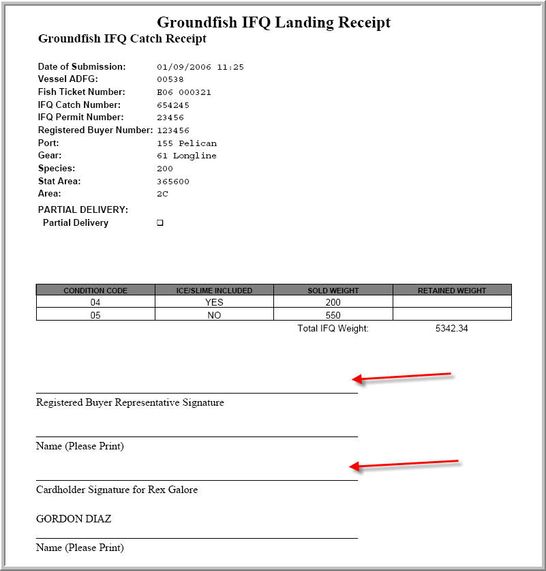
The Next step is to View and Print the IFQ Receipts. Simply click on the View Receipts to Print button and a pdf file will open in a new browser window.
- Print all of the receipts.
- The Registered Buyer and the IFQ Holder need to sign each of the receipts.

"Red Line" Errors on an IFQ Report
If you submit your IFQ Reports and in the status column there is a message in red text that says "Contact NMFS Enf" this is referred to as a 'red line' error.
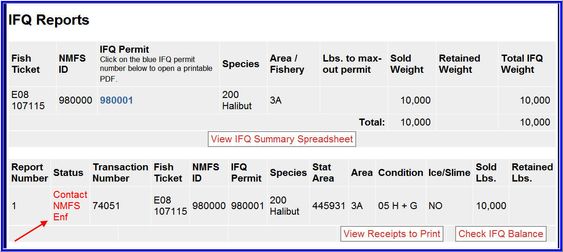

There are many reasons that you could have received this error, but whatever the reason, you must contact NMFS Enforcement.
...