eLandings User Manual
Creating a Salmon Landing Report in eLandings
- Jennifer Womack - NOAA Affiliate (Unlicensed)
- Sara Villafuerte - NOAA Affiliate
- David Loomis
https://elandingst.alaska.gov/webMake Sure You Have an eLandings Operation Registered!
To create a salmon landing report in eLandings first make sure you have registered your operation in eLandings. If you need more information on registering a new operation, please see: How to Register a New Operation in eLandings.
Log Into eLandings
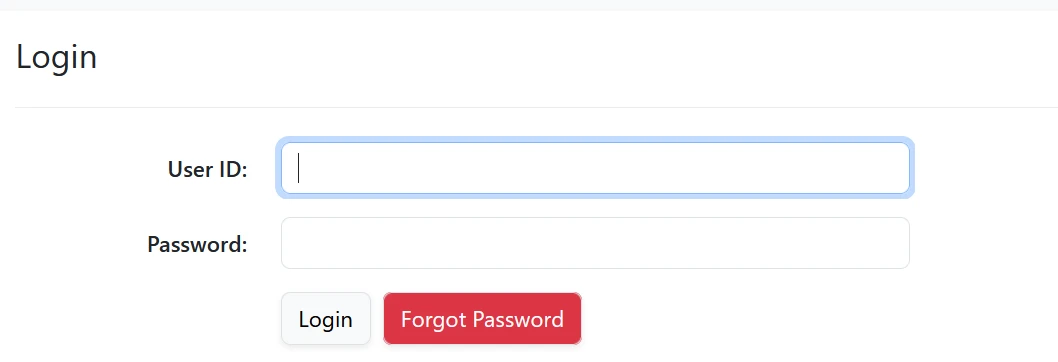
Go to the eLandings Login page: https://elandings.alaska.gov/web/ . Enter your UserID and Password then hit the Login button.
eLandings Reports Menu

Once you are logged into the eLandings website, the Reports Menu will come up. If you notice under the title bar there are links to different eLandings pages and features.
- Reports Menu: Will bring you back to the Report Menu.
- Reports tab: drop down options to view and create landing and production reports, the COAR reporting page, or for importing reports. Importing Reports to eLandings
- Admin tab: Operation Administrations page where you add custom processing, tenders, and users. For more information please see: Operations Administration. Under this drop down you will also find the features to: Emergency Fish Ticket Numbers, Override Operations on Unsubmitted Reports, and Importable Fish Ticket Numbers.
- Tools/Queries: many useful features. Some used frequently with salmon reporting and report editing.
- Generate Reports: eLandings System Generated Reports
- Mixed Salmon Percentage Mass Change
- Landing Report Extract (Report Extract Tool)
- Production Report Extract (Report Extract Tool)
- IFQ Weight Calculator: IFQ Weight for halibut and sablefish
Check IFQ Balance
- Codes: Will display all the codes needed for creating reports within the eLandings system, such as delivery, disposition, stat area, and production codes.
- Help
- User Name drop down: User Profile, Change Password, Logout.
Select an Operation
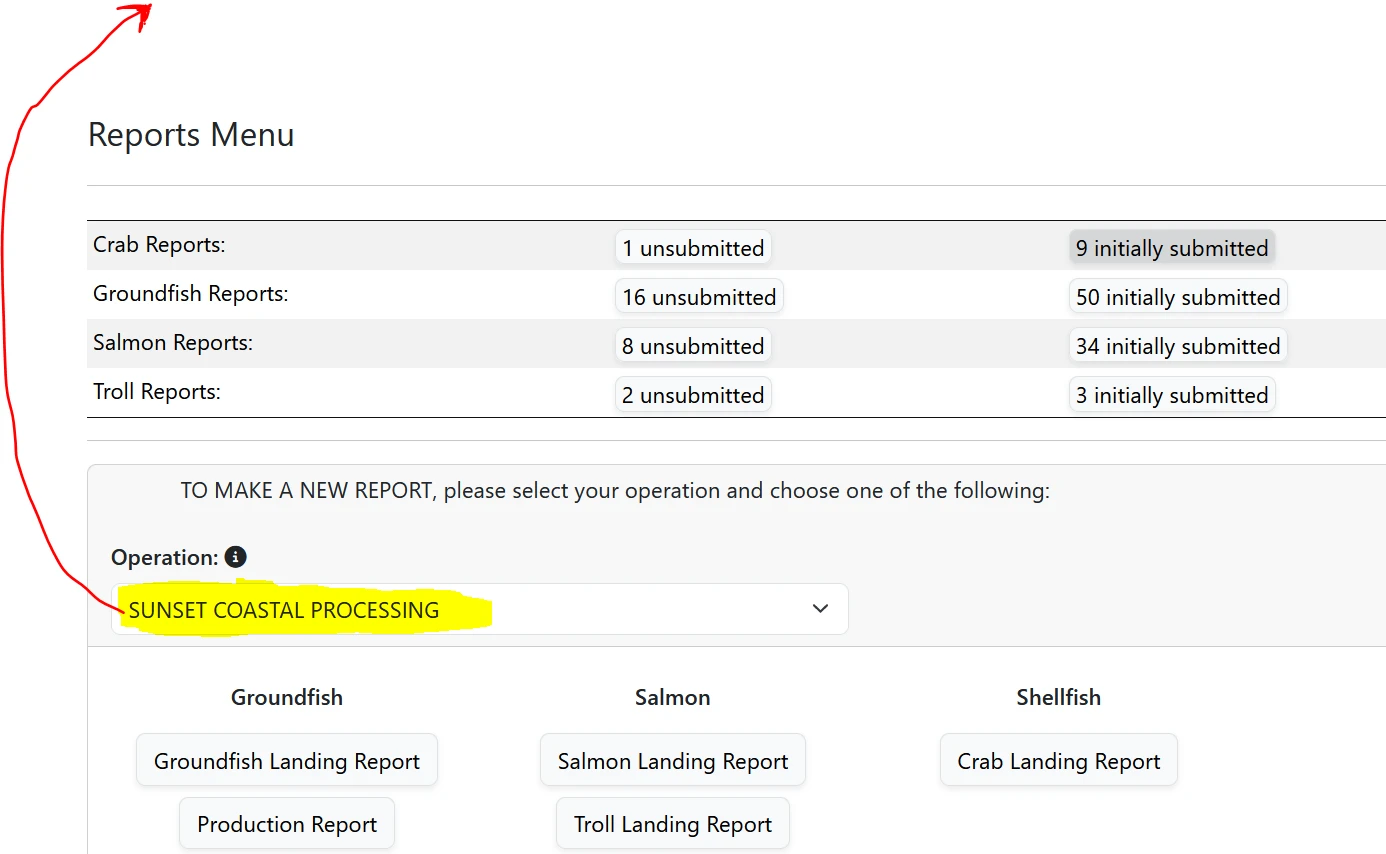
From Reports Menu page you can create a new salmon landing report. You can also create a new report from the Landing Report page accessed under the Landing Report tab up in the title bar banner.
- Individual users can be associated with one or more Operations.
- For example, a business manager might be associated with three Operations - Big Fish Inc, WAI Processing, and the stationary floating processor, The Happy Lady. Each of these operations is unique, and the user is authorized for each operation.
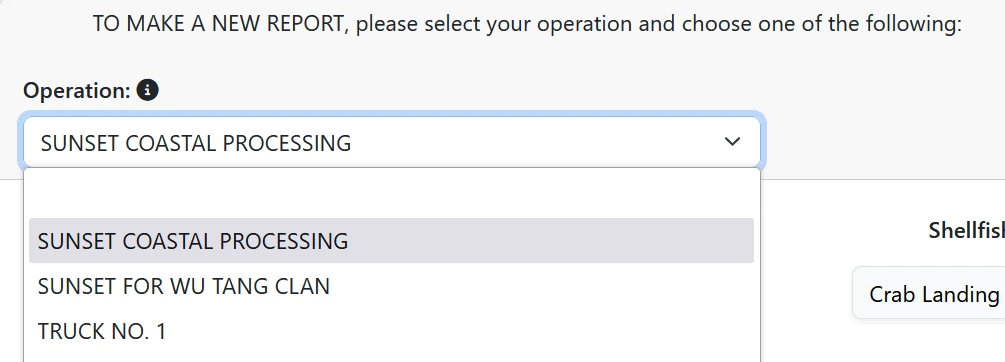
- When the user logs into the eLandings system, he/she must designate the Operation that will be used to record landing information. The default operation set in your user profile will always be selected if you do not choose a different operation.
- While most users are associated with only one Operation, if your business buys and processes, and/or performs custom processing for another Operation, there will be more than one listed under your User Account.
- Once the Operation has been chosen, you can click on the Troll Landing Report button to open the form.
- While most users are associated with only one Operation, if your business buys and processes, and/or performs custom processing for another Operation, there will be more than one listed under your User Account.
Landing Report Page
The landing report is divided into several sections and entry modals that you will move through in sequential order:
- The vessel and Location Information
- Permit Worksheet
- Itemized Catch
- Grading & Pricing
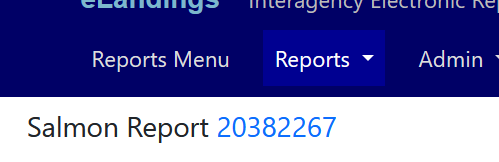
Notice that the Landing Report Number is located at the top of the new report. Here the number is 20382267. The Landing Report Number is a unique number generated by the eLandings System to identify the report. If you need to go and edit a report, the Landing Report number is what you will use to locate the report.
Landing Report - Vessel and Location Information
- This is the first screen that is displayed when creating a new landing report. Note that some of the required information about your operation is auto-filled based on your processor user account.
- The eLandings System auto-fills your Port of Landing, and ADF&G Processor Code.
- You should note that a unique Landing Report number is generated each time you initiate a landing report. In the above picture it is Landing Report number 20382267.
When you established your User Account and Operation, you entered all of the federal and state permits associated with your operation.
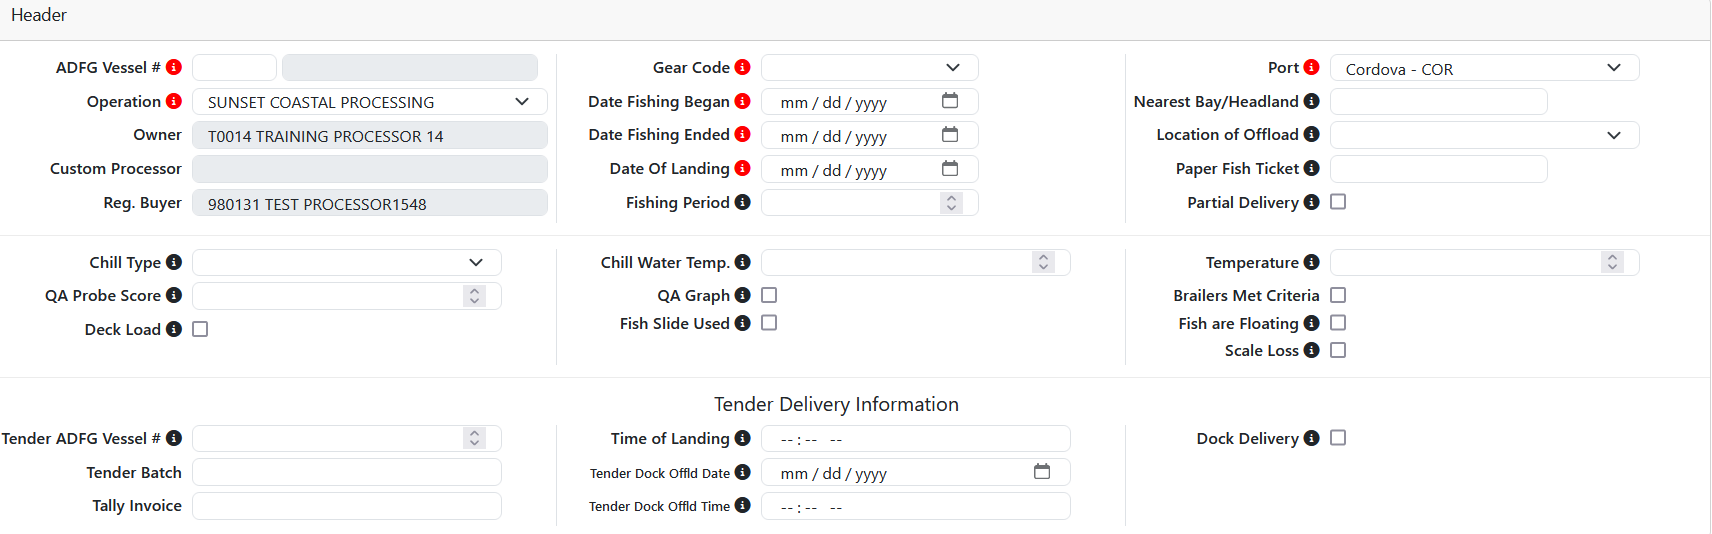
Vessel & Fishing Information
- ADF&G Vessel Number: this is the five digit number permanently assigned by the Commercial Fishery Entry Commission (CFEC).
- ADF&G Gear Code: this is the two digit numeric code used to identify the gear used to harvest the catch. These gear codes can be viewed by clicking on the Gear Codes link. For salmon troll this will be either 15 for Power Troll or 05 for Hand Troll.
- Date Fishing Began: when the gear was deployed in the water to begin fishing.
- Date Fishing Ended: when the gear was taken out of the water.
- Days Fished: when the gear was being fished. This number does not include traveling to and from the fishing grounds, or weather delays.
- Date of Landing: when the landing was completed.
- Entered From Paper FT: If you are entering a paper fish ticket into eLandings or a ticket from tLandings that was unable to upload into eLandings, please enter the paper fish ticket number (i.e., E18 123456) so that the two fish tickets can be associated together. For more information please see Entering Paper Fish Tickets into eLandings.
- Port of Landing: location where the landing occurred. This value is auto-filled from your User Agreement registration. You can modify this value to indicate the correct location for this landing. You can click on the Port Codes link under the Port of Landing area for a list of port codes.
- Nearest Bay or Headland: Site description of where fishing actually occurred designated by the nearest bay or headland's name. Example designations are "Icy Point" or "Cape Cross". If you have a question please ask your local area ADF&G office. Note: For Salmon Troll, this is required.
- Partial Delivery: check if, Yes, the vessel has made deliveries to other operations or processors from this fishing trip, in other words, deliveries elsewhere, or if the delivery to your operation is only a portion of the catch.
- If you created more than one landing report for a delivery, you should also check the Partial Delivery box, to indicate Yes.
- ADF&G Processor Code: the owner of the product that has just been purchased - the purchaser. This value is auto-filled from your User Agreement registration. This value is auto-filled from your User Agreement registration. Select the correct number if one than one RCR is associated with your User Agreement.
- ADF&G Processor Code (Custom Processor): applicable only if the product is being received or processed by a third party - not the purchaser.
Optional Fields
- Chill Type: Refrigeration system used to keep fish cold in the vessel hold. It is generally used in conjunction with Temperature. This is a courtesy field provided to Processors at their request to help track quality of catch. This is not a required field.
- Chill Water Temp: Chill Water temperature in degrees Fahrenheit. This is a courtesy field provided to Processors at their request to help track quality of catch. This is not a required field.
- Temperature (in F): Temperature in degrees Fahrenheit. This is a courtesy field provided to Processors at their request to help track quality of catch. This is not a required field.
- QA Probe Score: This is a courtesy field provided to Processors at their request to help track quality of catch. This is not a required field.
Tender Worksheet

If you are editing a ticket that has been created using tLandings or entering a paper fish ticket you will need to fill in or ensure the validity of the following fields:
- Time of Landing: The time fish or shellfish are off-loaded or trans-shipped from the catcher vessel to the first purchaser. The time of landing is the day off-load is completed. For tender deliveries the time landed is when the catcher vessel offloads their product to the tender vessel. If using tLandings, this time is automatically recorded when the landing report is created with that application and brought into eLandings when the landing report is imported with the PTI. The time can be edited. For catcher-processors the time landed is the time the product is caught and brought on board. For catcher-seller vessels the land date time is the time the product is initially brought into port.
- Tender Dock Offload Date and Time: These fields are often not used for troll harvest but can be used to document when the tender delivered to the processor.
- Tender ADF&G vessel number: The ADF&G vessel number assigned to an acting tender vessel. A tender is a vessel that is attendant to other vessels and is used to transport or ferry unprocessed fish or shellfish received from another vessel to a shoreside processor or mothership. Tender vessels operate, in most circumstances, as an agent for a specific processor and take deliveries from harvesting vessels.
- Tender Batch: Is the batch number assigned by the processor user when uploading a batch of tickets from tLandings/PTI to eLandings.
- Tally Invoice: Tally sheet is provided in tLandings and provides a summary of all items recorded in a landing.
- Dock Delivery: Only check this if delivering to a tender tied to the processor docks. More common during peak salmon season with large volumes delivered daily. Rarely used for troll deliveries.
Permit Worksheet
- A CFEC permit is required for all vessel operators and they must be appropriate for their applicable fishery
- Click on the pencil icon to the right of any section to open it for entering data.
 This will ope the Permit Entry Modal
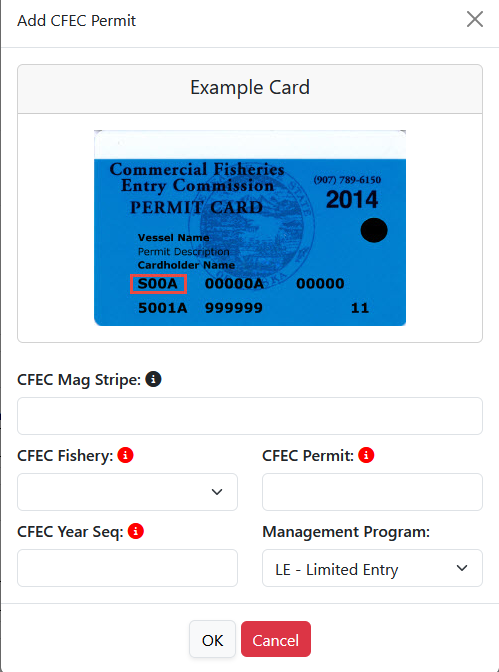
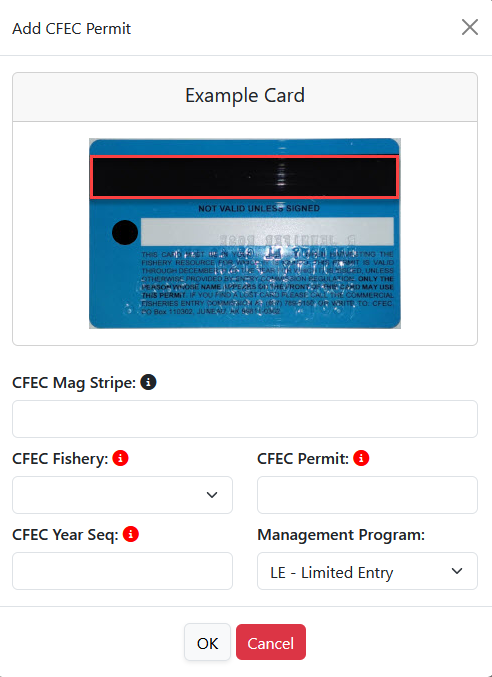
- Place the cursor in the CFEC Mag Stripe field and click in that area to activate the mag stripe read feature. The image of the card will change to the back of the card showing the mag stripe.
- Swipe the troll permit card and the permit values will populate for you.
- You may manually enter the CFEC permit values if a card reader is not available.
- Note: If a magnetic stripe reader is not used, an imprint of the CFEC permit card or legibly handwritten permit values is required to be recorded on the fish ticket after it is printed.
- Once you hit the save button the permit information will populate into the landing report.
- Note: the permit holder name will not display until you save the report. Only the fish ticket numbers and permit values show after saving input to the permit entry modal.

- The CFEC permit must be valid for the calendar year and valid for the fishery (species, gear, management area).
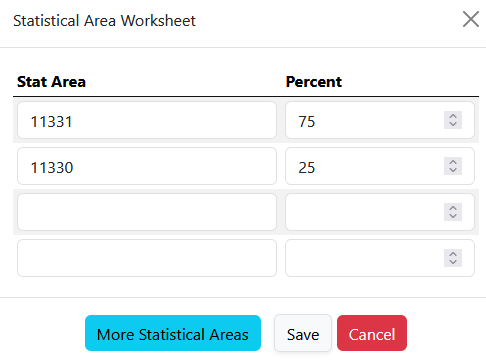
Statistical Area Worksheet
Statistical Area Worksheet
Referred to as the Stat Area Worksheet, this is the area of the Vessel, Permit, and Location Information of the landing report to record the five-digit salmon ADF&G statistical area denoting the actual area of catch.
- Click on the pencil icon to open the worksheet.
Report the five-digit salmon statistical area(s) and percentage for salmon harvest in the Stat Area Worksheet.

Salmon statistical area charts may be obtained from your local ADF&G office, or at Southeast Salmon Maps ADF&G
Stat Area Worksheet Notes
STAT AREA WORKSHEET NOTES
- This worksheet may be used to document a single statistical area, with 100%, or multiple statistical areas.
- The recording of multiple statistical areas in the worksheet requires that the species that are caught and discarded are equally distributed across all statistical areas fished; and all statistical areas fished are open to the species fished.
- If the criteria are met, enter all of the statistical areas that were fished in the field labeled Stat Area and enter the percentage of the catch taken in the area in the area labeled Percent.
- If all of the species recorded on the ticket were from a single statistical area, enter the Stat Area and 100%.
- If you use the Stat Area Worksheet, there is no need to enter the statistical area code and percent anywhere else on the landing report.
- If one or more species are not harvested in a manner that is equally distributed across all statistical areas fished, the catch must be recorded in the Add/Edit Itemized Catch section of the eLandings landing report.
Save Your Report!
Upon the completion of the header and permit sections of the landing report, you can save. select SAVE near the bottom of the screen.
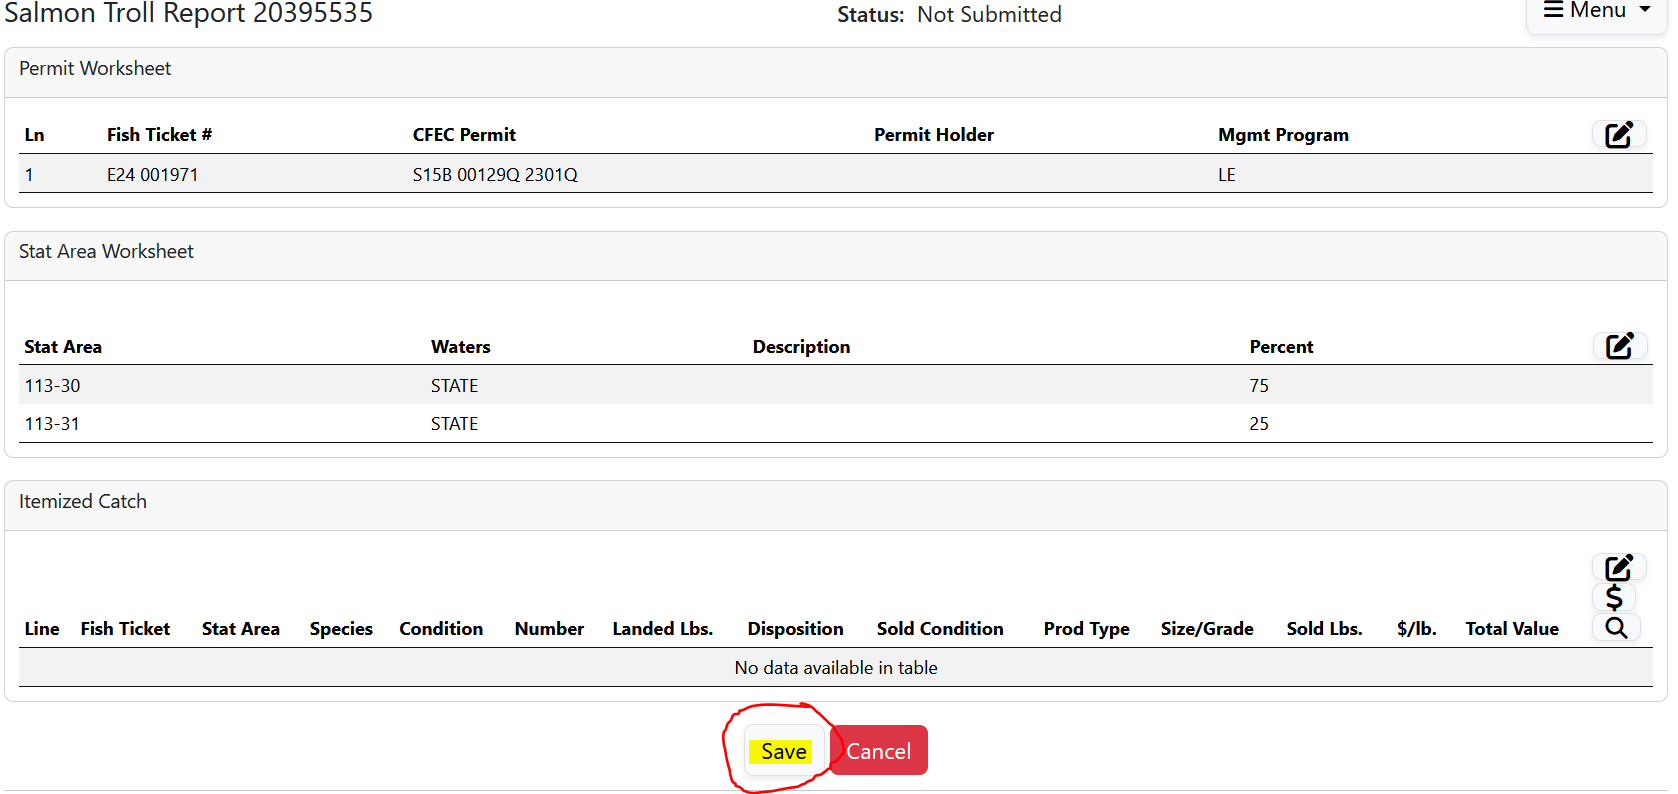
It is not necessary to save the report at this point if you wish to continue on the the itemized catch. However, the data that you submit to the repository database is validated for accuracy when saved and creates an unsubmitted report that you can return to for additional work at a later time. The program will return a message indicating whether the save was successful or if corrective action must take place.
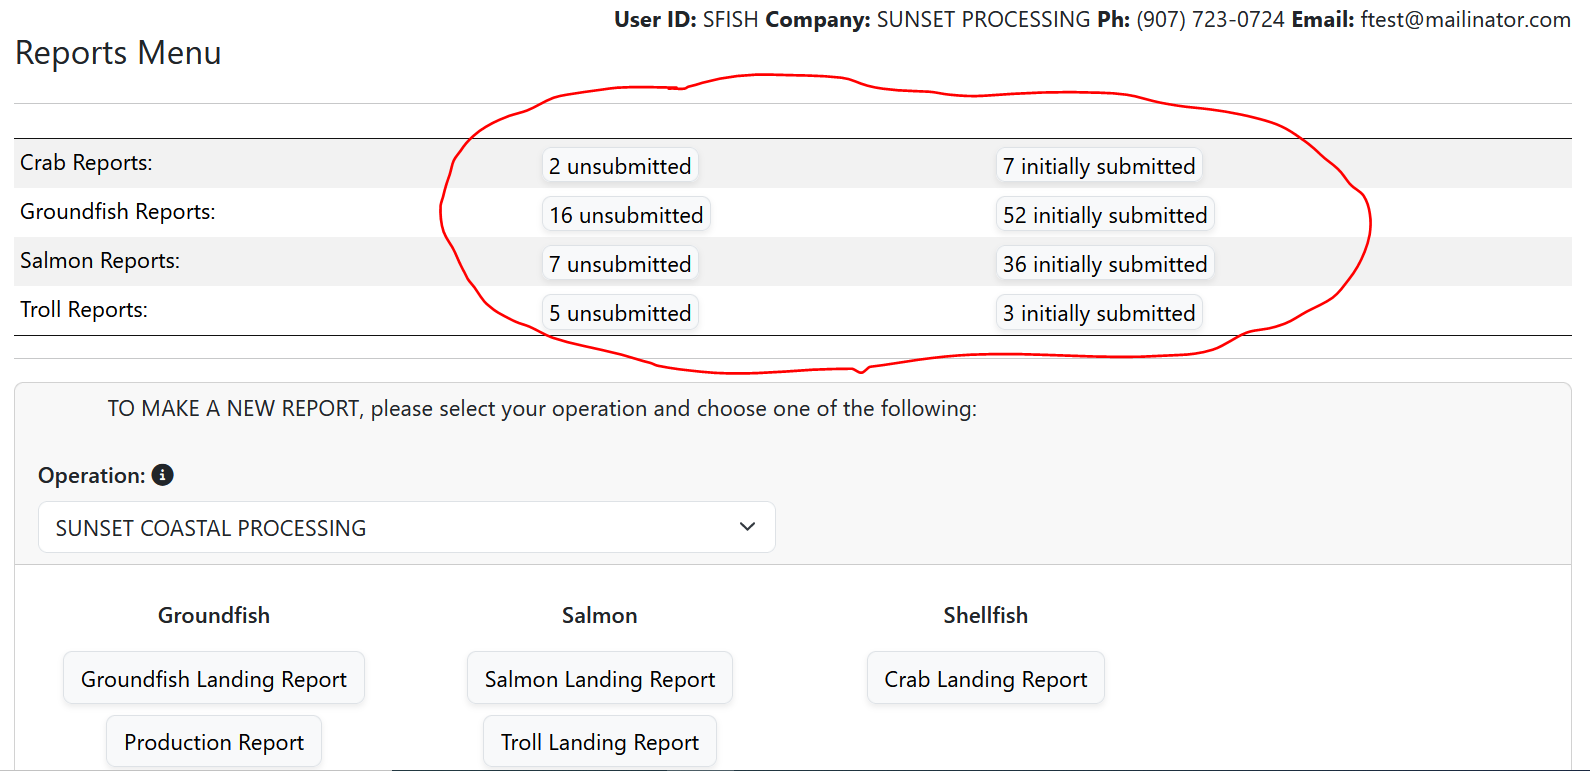
Incomplete Reports
The eLandings System allows you to initially create an unsubmitted report with values only entered in the 'header' and 'permit' sections.
- The header and permit information can be saved as an unsubmitted report.
- The number of unsubmitted and initially submitted reports will show on the Reports Menu page.
- After the vessel off-load is complete and the tally sheet completed, the itemized catch and price information can be recorded and saved.
- This activity creates an Initial Report that must be submitted.
If you have saved your report up, you will need to select "Edit report" from the hamburger menu. If you have not saved up to this point, you can proceed to enter your itemized catch information.
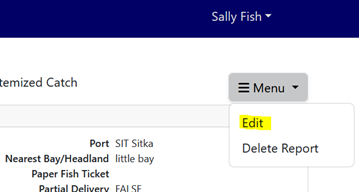
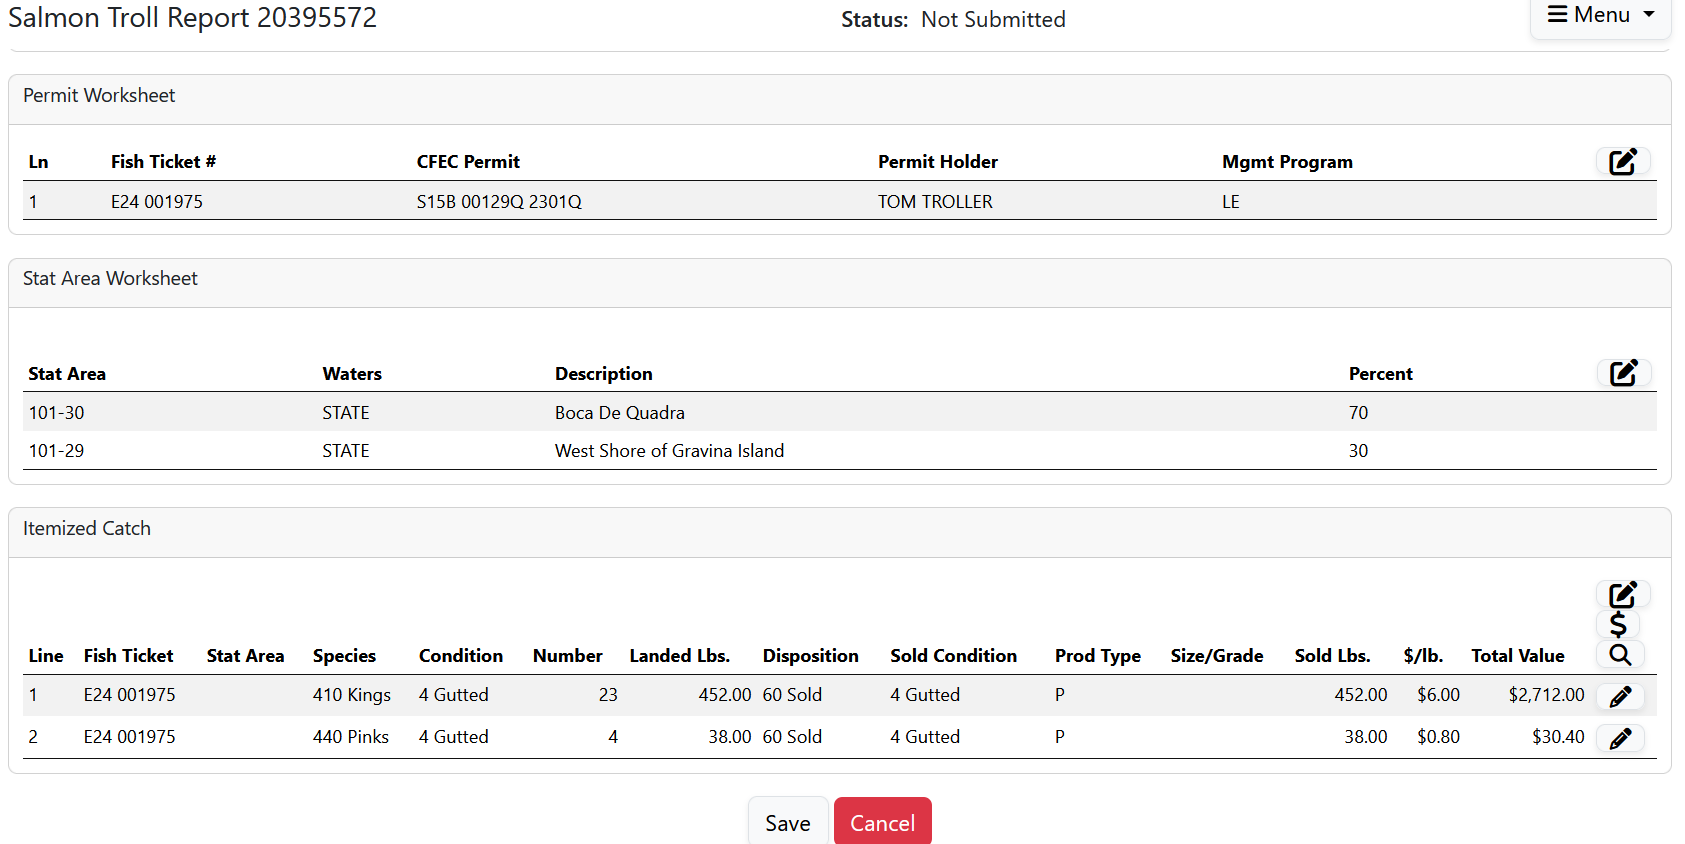
This will open the report for adding harvest details to the Salmon Troll Itemized Catch table. You must first enter itemized catch before you can enter any grading and pricing information.
- Click on the pencil icon on the right side of the itemized catch table.
Report each salmon species in the itemized catch section by species, condition, number, lbs., and disposition. If the stat area of catch for a particular species differs from that detailed in the Stat Area Worksheet, report that individual stat area with that species in the itemized catch section. All personal use harvest of salmon or steelhead must be reported on a fish ticket at the time of landing by condition, number of fish and disposition (95).
Remember: If you used the Stat Area Worksheet you do not need to complete the Stat Area for the salmon line items. Leave Stat Area blank and just fill in Species, Condition, Number, Lbs., and Disposition.
Enter Itemized Catch and click Save.

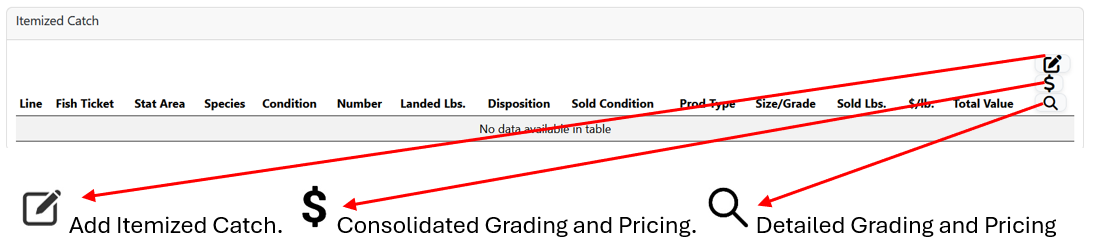
Add Grading and Pricing Information
Add grading and pricing information. Click on either Consolidated Grading and Pricing or the Detailed Grading and Pricing symbol to add pricing details to the report. Either can be used to add grading and pricing details.
- If you have determined the price of the itemized catch at the conclusion of the off-load, and have completed grading/sizing, you can complete this portion of the report.
- If you do not have this information completed, or it will occur at a later point in time, proceed with the initial submission of the landing report.
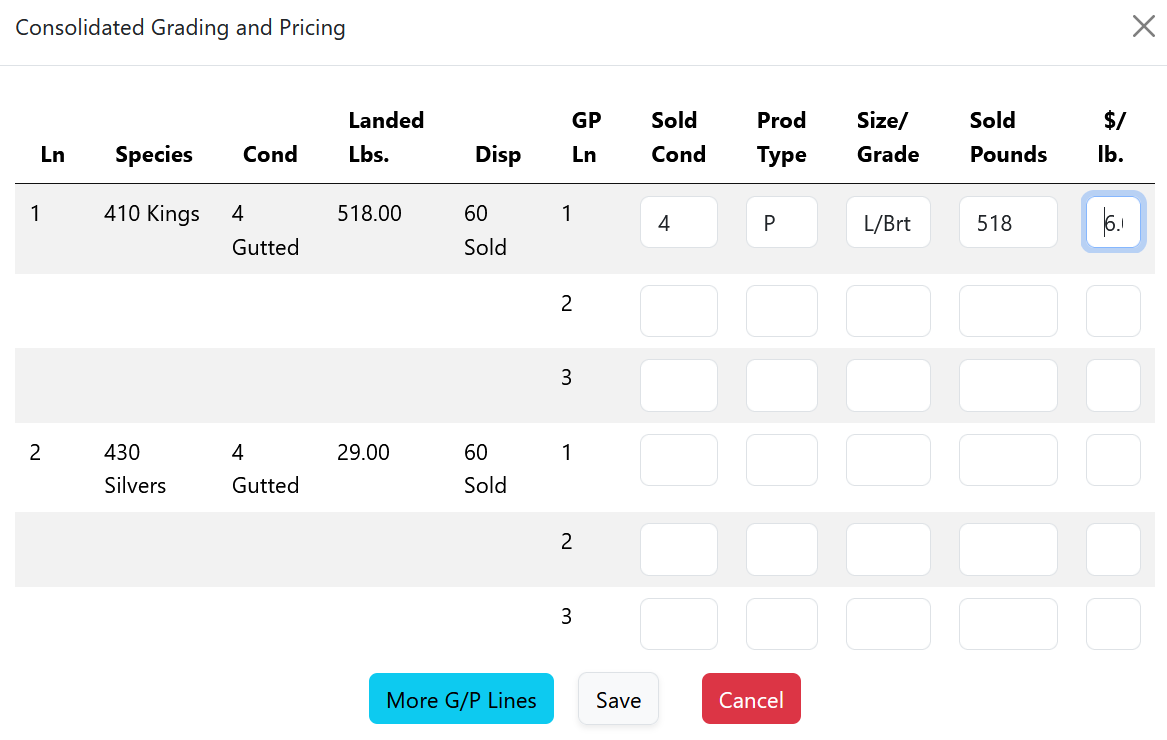
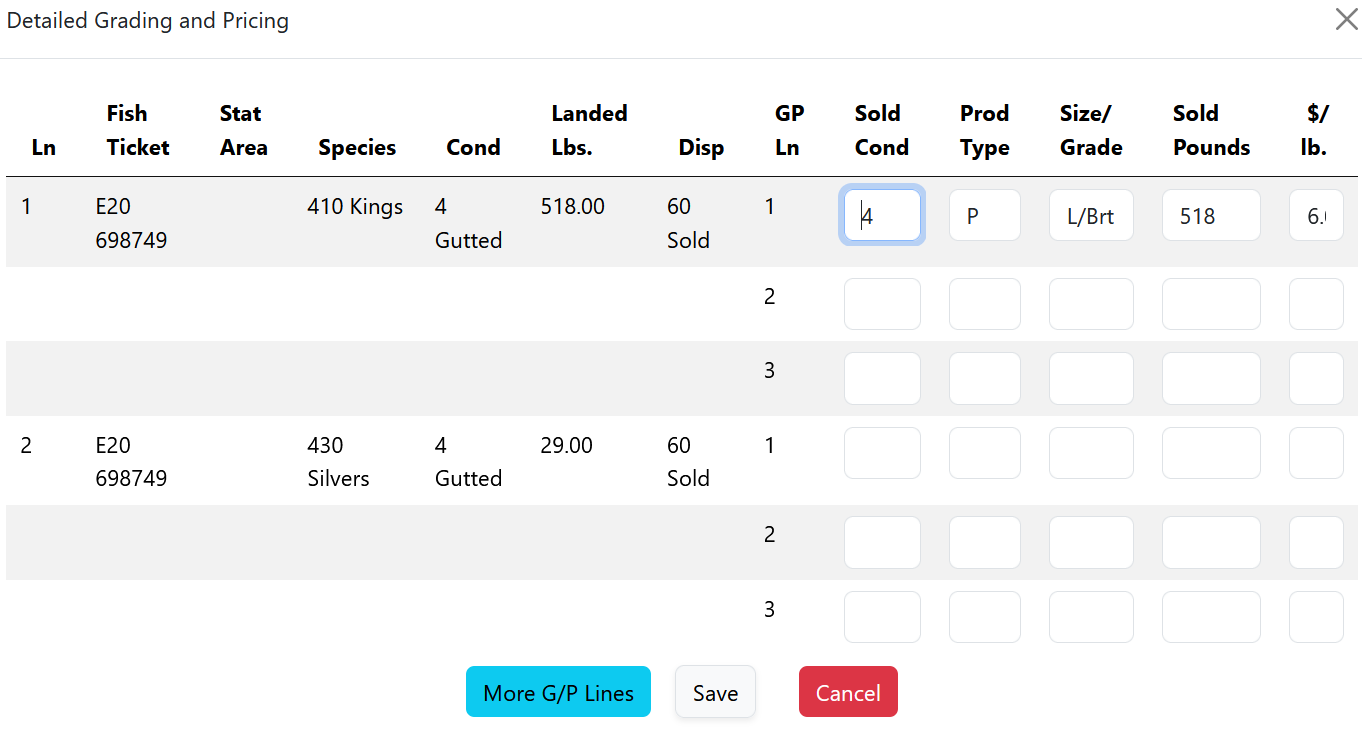
- In the illustration below, size and price information are added to the itemized catch.
- Additional grade/size lines can be added by selecting More G/P Lines.
Once you've added grading and pricing you can submit initial report. Click Save, review, and then Submit Final Report from the hamburger menu.
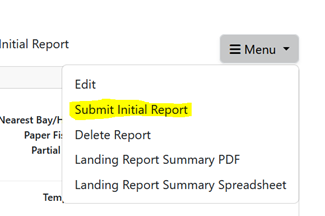
Submit Final Report
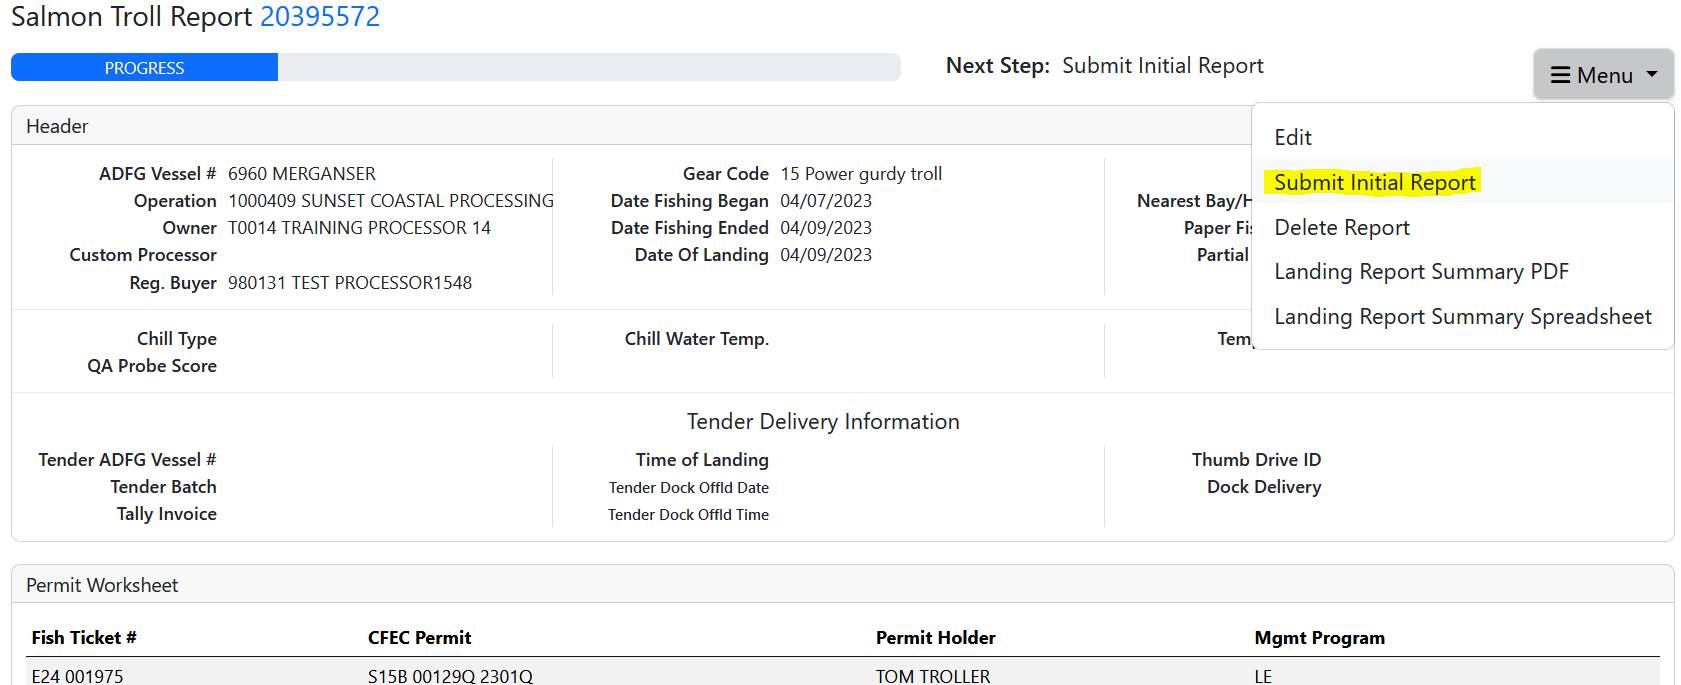
Once the report is complete, submit the final report. Also found under the hamburger menu. Please note that while tickets can be printed from an initially submitted report, the report status should ultimately be Final Report Submitted. Reports and Queries built into eLandings only search and return results for reports that are in final submitted status.
Remember: Reports can be edited for 90 days after initial report submission. This is true of finalized reports too, editable for 90 days after initial submission date. If edits are made to a landing report that would affect the pounds or numbers reported on a fish ticket, a revised ticket must be printed and submitted to the local Fish & Game office. Reports older than 90 days are locked and eLandings staff can unlock them for editing.
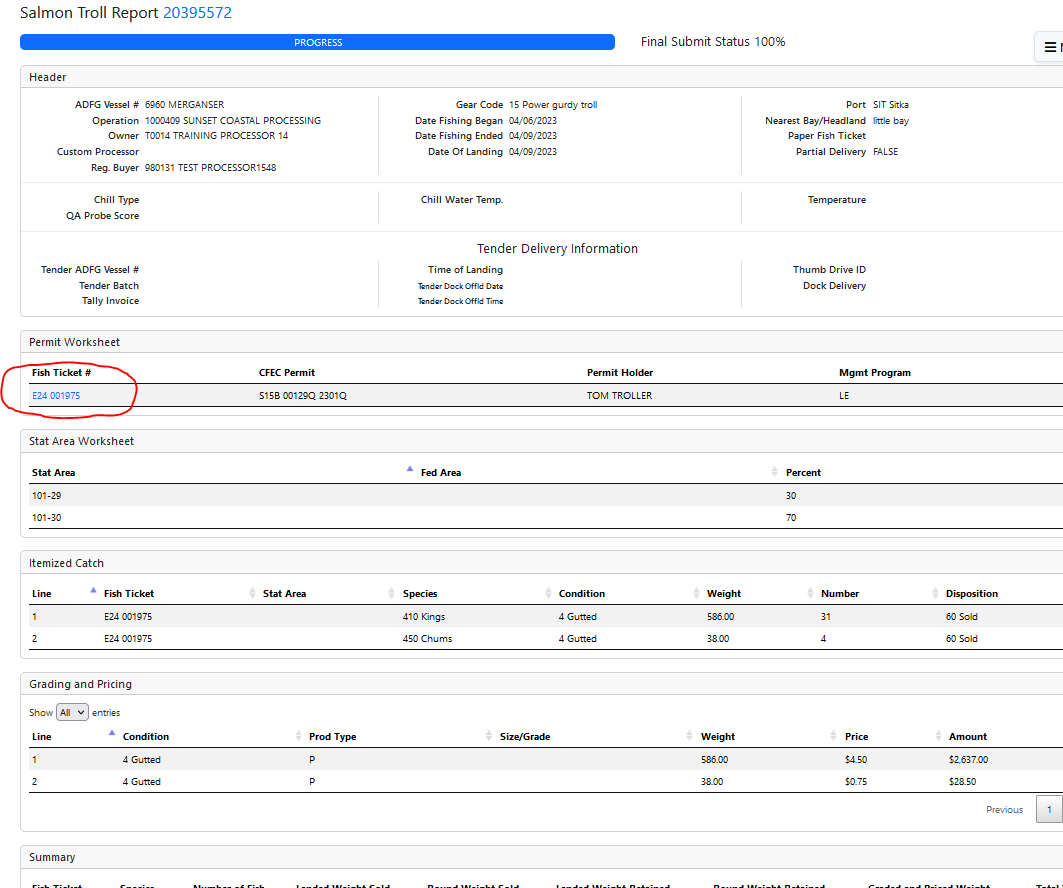
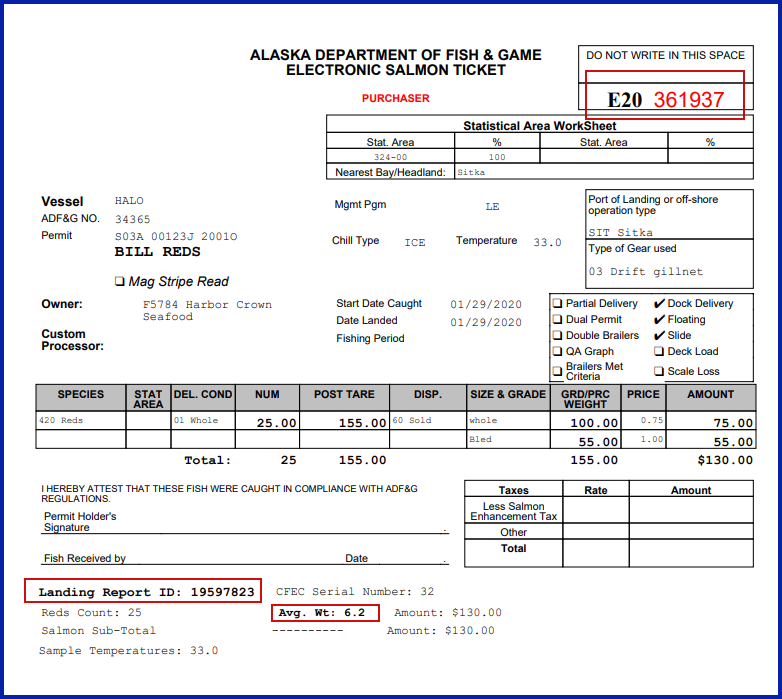
Print the Paper Ticket!
Print paper ticket. Click on the blue fish ticket number to print the ticket. Imprint or legibly handwrite the S15B or S05B CFEC card if a magnetic stripe reader was not used.
Sign the fish ticket. If the permit holder’s signature has been obtained on an Interim Salmon Ticket or conventional paper ticket and it is attached to this fish ticket copy, an additional permit holder signature is not required.
Related: Printing Labeled and Colored Copies of Fish Tickets
Imprint the CFEC card if a magnetic stripe reader was not used. It is also legal to legibly handwrite the CFEC permit info.
Sign the fish ticket. If the permit holder’s signature has been obtained on an Interim Salmon Ticket and it is attached to this fish ticket copy, an additional permit holder signature is not required.
Related: Printing Labeled and Colored Copies of Fish Tickets
Download PDF Link: Creating a Salmon Landing Report in eLandings
How to Download and Print this Article as a PDF
Download:
Click the 3 dots (...) at the top right of the article
Click Export
Click Export to PDF
Wait for the PDF to load, and click Download PDF
Print:
Open the PDF
Print the PDF


Support Contact:
If you have any questions or concerns, please contact elandings@alaska.gov