eLandings User Manual
Managing Operations And Users
- Chris Keller (Unlicensed)
- Susan Hall - NOAA Federal (Unlicensed)
- Former user (Deleted)
- Former user (Deleted)
The operations management page allows adminstrative users to view and manage their operations and users.
Administer Operations Page
The operations management page can be accessed while logged into eLandings from the main Reports Menu page.
- Locate the Administer Operations link at the top of the page.. This is only visible if a user has administrative rights to an operation.
- Click on the Administer Operations link and you will be taken to the Operations and Users page. It may take a moment for your operations to be visible as the system is retrieving all of your operation information.

Operations and Users Page
The Operations and Users page shows all of your operations, users, and grading and pricing information in a table.
- Operations are sorted by operation name.
- By default, child operations for tenders and buying stations, and custom processing operations are hidden.
- Clicking the "Show Dependent Operations" checkbox will display those operations, or will hide them if unchecking the box.
- When dependent operations are displayed they are sorted directly below their parent operation.
The Operations table provides the following data:
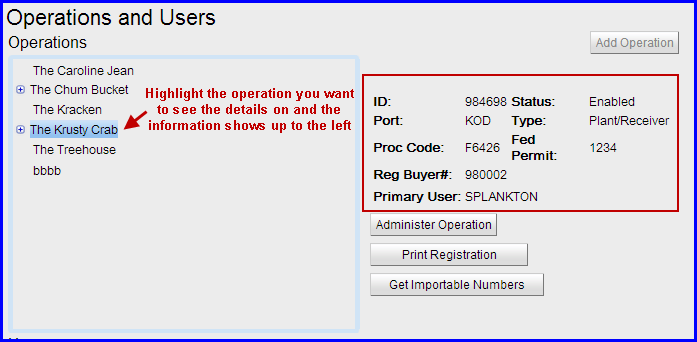
- Operation ID - the numeric ID that identifies the operation in the system. This ID is a useful shorthand when identifying operation while talking to eLandings support personnel, and coordinating with business partners in setting up custom processing operations.
- Port - the physical location of the operation
- Proc Code - the ADF&G processor code or intent to operate license, often referred to as the metal code plate
- Registered Buyer# - the registered buyer permit number which authorizes the person on the permit to receive and make an IFQ landing by an IFQ or CDQ permit holder
- Primary User - each operation has a primary user, this status is assigned to the user that initially created a new operation.
- Status - the status of the operation. Operation statuses you will see are:
- Pending - this status means the operation has been created but has not been approved by the overseeing agencies.
- Enabled - the normal status for operations that are in use and are able to submit reports.
Superseded- Operations are defined by the specific permit combinations entered when registering in the eLandings system. If any permits related to your operation change, this signifies the need to supersede previous operations. This function will enable users to view all reports made by an operation despite any changes in the pieces that define a specific operation.
The capability to supersede an operation is new function that is not currently available. It will be available in a future release.
- Closed - the status indicating that an operation is no longer active, and cannot submit new reports.
- Type - the type of the operation, as specified when it was setup.
- Fed Permit - required permit for processors that receive or process groundfish harvested in the GOA or BSAI.
Operation Functions
There are several Operations functions available to the user. These include:
- Adding a new operation
- Administering to an existing operation
- Printing operation registration forms
- Getting Importable numbers.
Add Operation
The Add Operation button opens a dialog box where you can enter data to create an entirely new operation.
Specific operation types that can be added here are:
- Plant/Receivers
- At-Sea Processors
- Buyer/Exporters
- Catcher Sellers.
You will need to add the following information: - Operation Name - the name that identifies the operation. This is a required field and has a maximum length of 32 characters.
- ADF&G Processor Code - the processor code (intent to operate license), sometimes called the F-code , is usually required.
- Federal Permit Number - the Federal Processor Permit (FPP) for shoreside plants or Federal Fisheries Permit (FFP) for at-sea processors. This is required if receiving or processing Federally managed groundfish or CR crab.
- Registered Buyer Number - the registered buyer permit number for IFQ Sablefish and Halibut. This is not required if no IFQ groundfish will be received or processed.
- RCR Number - the registered crab receiver permit number is required for CR crab.
- Vessel ADF&G Number - only required if you are an at-sea catcher processor.
- Port- the port location of the operation.
- For at-sea catcher processors enter FCP
- If acting as a mothership enter FLD
- If you are a stationary floating processor enter IFP
- For catcher/sellers enter your home port, this can be changed at the time of landing if selling in different location

Click on the Save button, print, sign and fax the registration to agency staff. Until an agency staff person enables the operation, it will remain in pending status.
If you feel you've made a mistake you can always click on the Cancel button.
Administer Operation
If you want to view details of a specific operation you would highlight it and then click on the Administer Operation button. This is also where you would add a child operation such as a buying station or tender.
Child Operations
Child operations indicate ties to a parent operation. Examples of a child operation would be a tender or buying station. If there are multiple child operations connected to the parent, they will be displayed in the Child Operations table. If you highlight the child operation and select the View Operation button, the details of the operation will be displayed.
Parent Operation
A parent operation can be described as a primary operation under which child operations can be added and viewed. For example, you have a shoreside processing plant called Fish Sticks Inc. You also have a few tenders which take fish from vessels who don't want to make the long trip to port. The tender operations would be created under the Fish Sticks plant as child operations. If you are looking at a parent operation on the Administer Operation page, you will also see any child operations associated with it.

Tender Operation
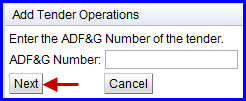
To add a tender operation you need to highlight the _parent_operation you want to add it under, and click on the Administer Operation button.
- On the Administer Operation page click on the Add Tender button
- A dialog box will pop up asking you to select the Mode in which you want to add the tender operation, Prompted Mode or Expert Mode.

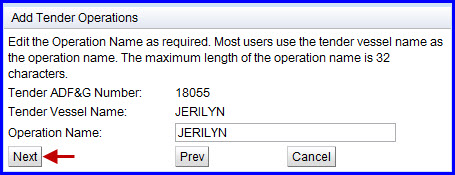
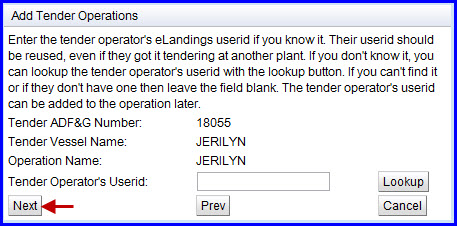
- If you select Prompted Mode the following dialog boxes will pop up requiring you enter specific pieces of information pertaining to the tender.
- ADF&G Number: enter the vessel ADF&G number
- Edit Operation name: verify that the vessel number and name are correct, edit if necessary
- Add tender operator UserID: enter the UserID of the authorized person, if unknown you can look up existing users, if not, the user can be added at a later time
If you select "Expert Mode" the following dialog box will pop up
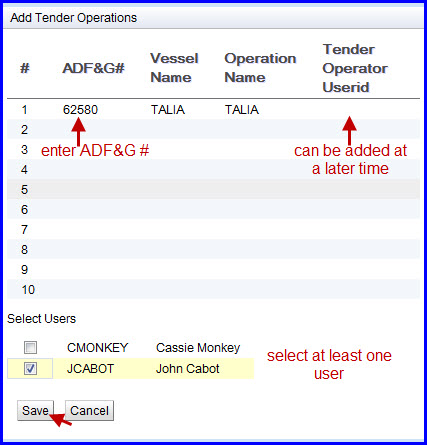
- Click in the space under ADF&G # and then enter the vessel number.
- Tab over and the vessel name will auto fill
- If you know the UserID of the person who will be doing the tender reporting enter it under Tender Operator UserID. If not leave it blank and continue adding more tenders.
- Select at least one of the Users at the bottom of the dialog box
- Click Save
Custom Processing Operation
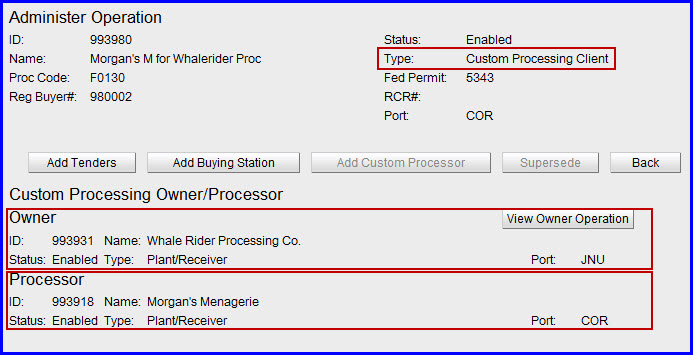
This is a special operation type that involves an "owner" of fish in conjunction with a fish "processor". This type of operation must be setup in eLandings by the "owner" of the fish and requires permits from both operations involved, this specifically defines it in the system.
- On the Administer Operations page of a custom processing operation, at the top of the page you will see detailed information about the Custom Processing Client operation.
- Below that you will see the details of both the "owner" operation and the "processing" operation. If you want to see the details of the "owner" operation, click on the View Owner Operation button.
Print Registration
Operations
- If you highlight the operation you want to print the registration for, the Print Registration button will be enabled.
- Click on the Print Registration button to bring up a PDF of the registration form in a new browser window.
- Print, sign, and scan/email or fax the form to the number listed on the form so that the operation can be enabled.
Users For Selected Operation
When you highlight an operation, the authorized users appear below the Operations table
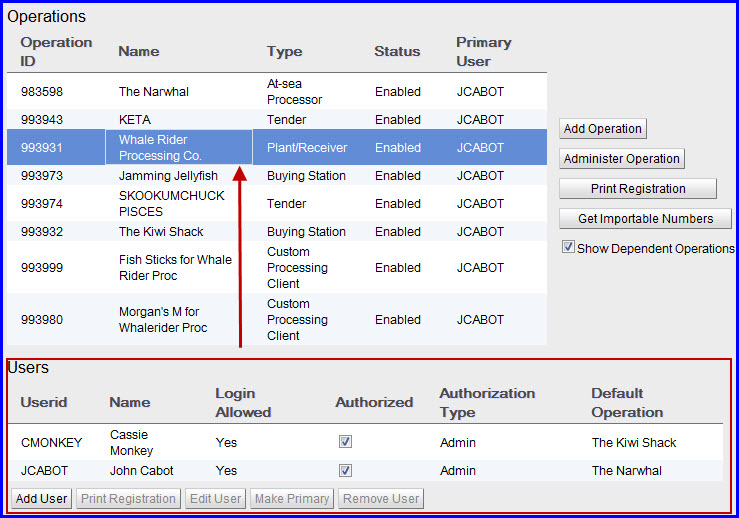
- Userid - the authorized user name for the selected operation
- Name - the user's full name
- Login Allowed - yes indicates they are authorized to make reports, no indicates they have not been authorized. The signed user registration must be sent to the number indicated on the form in order to be enabled.
- Authorized - the authorized checkbox indicates whether or not the user is authorized to view, and in some cases edit, reports for the operation.
- Authorization Type- the privileges the user has for their authorization for the selected operation. Authorization types are:
- Read-only - the user is allowed to view all reports for the operation, but is not allowed to make edits.
- Limited - limited users are allowed to create landing and production reports, and to edit those reports as long as they have not been edited by another user.
- Normal - normal users are typical office staff who need to view and edit all reports.
- Admin - admin users are users who have the same privileges as normal users, but who also have the ability to administer operations and users.
- Default Operation - the operation that is selected in the dropdown on the Reports Menu page when the user logs in. The default operation allows the user to go immediately to the operation where they most commonly make reports without having to select it in the dropdown.
User Administration Functions
The Users table provides several functions to the administrator.
- Select User*
- You can click on a user in the Users table which enables the buttons that provide other user functions.
- Add User
- This button displays a dialog where you can add a user to the operation.
- You can add an existing user to the operation, or create a brand new user and add them to the operation.
The Add User dialog has two sets of input fields. The first two fields are always required:
- Userid - the userid of the person you want authorized to report in elandings
- Authorization Type - the authorization that should be given to the user for the selected operation.
- Add Existing User button -\ if the user you are adding already has a UserID in the system click this button.
If adding a brand new user, the rest of the fields on the Add User dialog must be filled in: - Password - the password the user will use to authenticate themself.
- Password Again - the password must be input again in this field.
- User Name - the full name of the user.
- Company Name - the name of the company the user works for.
- City - the city where the user is primarily located when doing elandings work.
- State - the state where the user is primarily located when doing eLandings work.
- Telephone Number - the user's main contact phone number.
- Fax Number - the user's fax number, if they have one. Fax Number is not required.
- Email - the user's email address - required.
- Security Question - if the user forgets their password they can call the overseeing agencies to have it reset. The question should be easy for them to answer, but difficult for anyone else to answer or guess.
- Secret Answer - the answer to the security question.
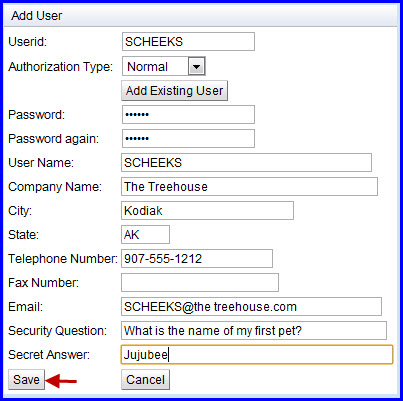
The Save button will validate the entered data and save the new user account in the database. The Cancel button will dismiss the dialog without saving.
Print Registration
The Print Registration button will display the User Agreement PDF for the user. It can then be printed, signed by the user, and submitted to the overseeing agencies for approval.
Edit User
The Edit User button will be enabled when a user is selected in the Users table.
- Clicking the Edit User button will display a dialog where the user authorization data can be edited.
- The Authorization Type for the user can be changed by selecting a new value in the dropdown.
- The user's authorization can be enabled and disabled by checking and unchecking the Authorized checkbox. This is the same as checking and unchecking the Authorized checkbox on the Users table.
- The user's default operation can be set, but only to one of the operations that you can administer.
Clicking the OK button will save the changes to the Users table, but not to the database. To save to the database requires clicking the Save button on the main Operations Management page after the dialog is dismissed. This allows you to make changes to several users and operations before saving to the database, which can save time if you have a slow Internet connection.
Clicking the Cancel button dismisses the dialog without saving the changes.
Make Primary
The Make Primary button will make the selected user the primary user for the selected operation. In order to be a primary user, the user must have the admin authorization type, and must be able to login.
Remove User
The Remove User button will remove the selected user from the operation. This should be used when the user is not expected to do any work for the operation in the future, for example when an employee is fired. The Remove User button does not update the database, the main Save button on the Operations management page must be clicked to save the change to the database.
Grading/Pricing Template Administration Functions
The Operations Management page formerly showed Grading/pricing templates for the selected operation, and allows admin users to create and edit templates. This capability has been moved to another page, so that non-admin users can create and edit grades and prices.
Save Button
The Operations Management page Save button saves changes made on the page to the database. Some dialogs also have a Save button, which saves the data for the dialog to the database. The reason for the Save button on the page is to allow edits without having to return to the database for each item. This increases performance when using the system on a slow Internet connection. However, users must remember to save when they are done making edits.
The Save button will give a warning if a save is requested and no data changes have been made that need saving.
When the Save button completes a save it will display a message box indicating that data has been saved successfully.
Return to Reports Menu Button
The Operations Management page Return to Reports Menu button takes you back to the Reports Menu page. If you have made changes and have not saved the Return to Reports Menu button will warn you about the unsaved changes, and will allow you to stay on the page to save them. Leaving the page by other means, such as the browser back button or closing the browser will not give this warning, so you should always leave the page using the Return to Reports Menu button, or click the Save button before leaving the page.