eLandings User Manual
TWS Scenario 1: Create a Landing Report – Simple Default Entries
UserID and Password
UserID: Autofilled as TENDERMAN
Password: sockeye123
Create Landing Report using Simple Default Entries
To complete this exercise, you will need:
- A thumb drive
- A valid training magnetic stripe CFEC permit card, and
- A working mag stripe reader connected to your computer.
Note: If you do not have either a mag card or reader available, go to the second training scenario titled Create a Landing Report–Manual Entries and practice entering CFEC permit information manually.
Scenario
You are the skipper of a tender buying salmon for King Crab Processing. You will create a landing report for a relatively simple delivery from one vessel fishing in one stat area. Species defaults (species-condition-grading/pricing) were supplied by the processor during thumb drive setup. If you have a CFEC permit holder’s card it should be readable using a mag stripe reader.
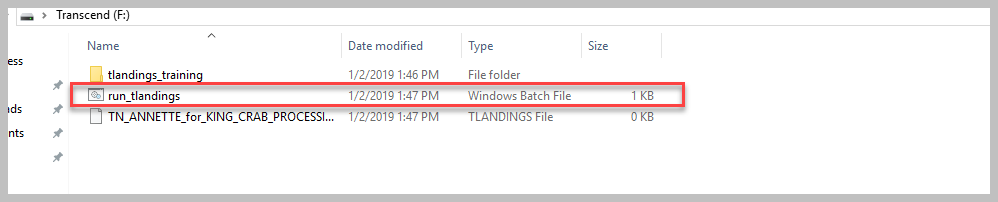
Insert the thumb drive in a USB port, and note the drive letter assigned to it using My Computer or other file Explorer window.
Double click the thumb drive to open it, and double click the file named “run_tlandings” (Note: You may see the .bat file extension, depending on how your computer is set up).
 | |||
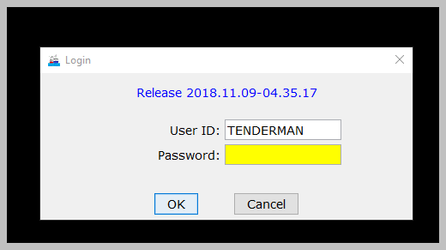
Log into tLandings
the UserID will always default to TENDERMAN, which you should not change. The password sockeye123, and click OK.
Click the “Create a new report” button in the upper left corner.
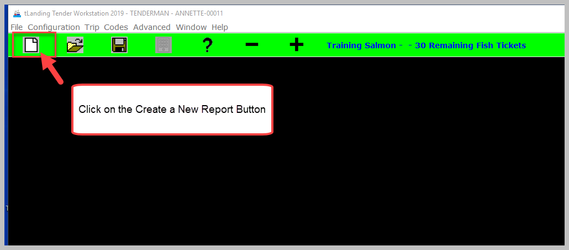
This will bring up the New Report window.
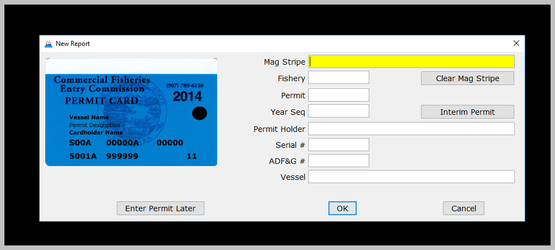
Note that the field, Mag Stripe, is highlighted in yellow. This yellow highlight is a navigation tool that is used throughout the tLandings application. It will help you identify where to enter information next. This yellow highlight is telling you to swipe the CFEC permit card.
Using a valid training CFEC permit card, swipe the card smoothly and quickly (but not too fast) through a magnetic stripe card reader. If the read is good, it will automatically enter the permit holder’s information and the vessel information associated with this permit in the appropriate fields.
If you do not have a valid CFEC permit card, enter the following information into the New Report Window.
| Field | Value |
|---|---|
| Fishery | S03T |
| Permit | 00122A |
| Year Seq | 1901O |
| Permit Holder | BLUSH REDS |
| Serial | 31 |
| ADF&G # | 69715 |
| Vessel | CREDENCE |
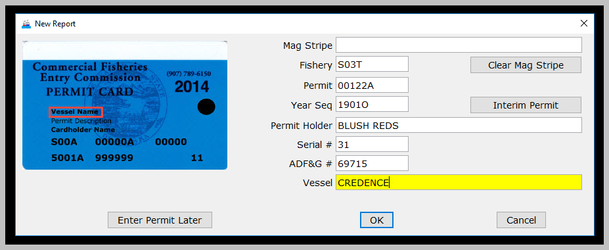
Please review the information, especially the vessel name and ADF&G number to make certain it is correct. The fishing vessel may be different from the vessel that was documented when the permit application was submitted.
If the permit is not available when you start the report, you can click the Enter Permit Later button in the lower left hand corner of the New Report
If the information captured from the CFEC permit card is correct, click OK. This action opens the tlandings vessel page, ready for data entry.
NOTE: You may have configured the thumb drive with a profile that does not include all of the fields displayed below. If so, just enter the fields displayed in your tLandings application as the display of fields has been customized. Fields that are not used in the fishery you tender can be hidden to simply reporting.
The Vessel Tab

Please notice the two tabs in the upper left hand corner – the Vessel and the Tally tabs. The Vessel page opens first. The Tally tab opens when you click on that tab and is designed to document itemized catch.
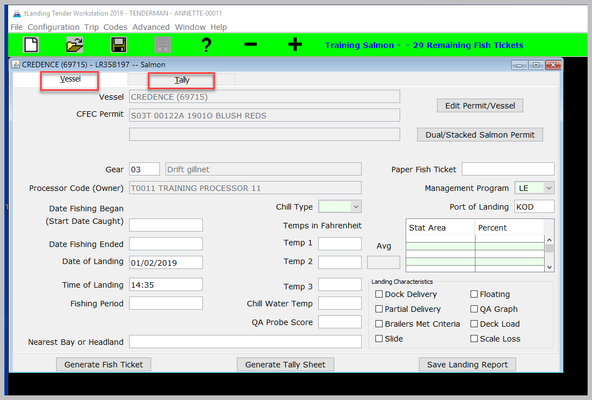
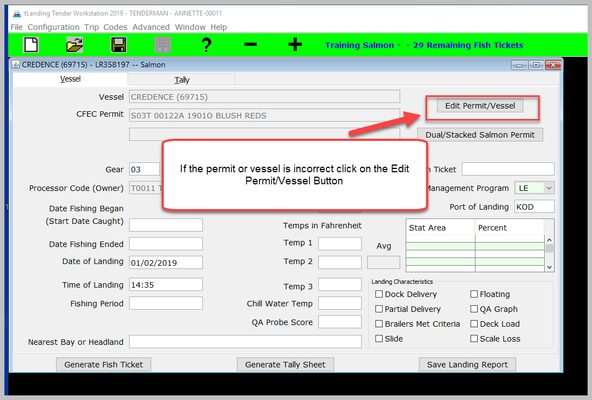
If the catcher vessel name and/or ADF&G vessel number are incorrect, click the Edit Permit/Vessel button and you will return to the CFEC permit dialog box to correct this information.
The yellow highlight indicates that the field needing information is the Date Fishing Began. Note that Date of Landing and Time of Landings are auto-filled to the current date and time, as recorded on the computer you are using to create this report.
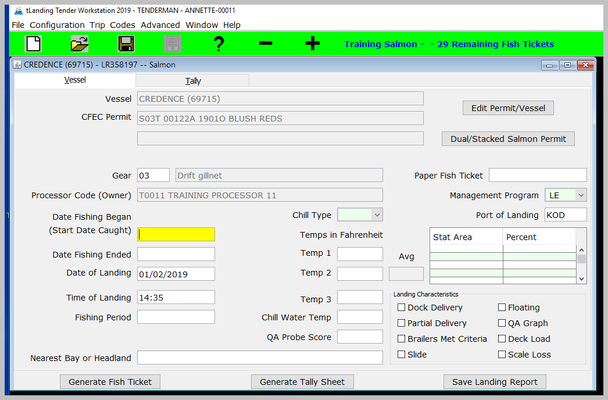
The easiest method to navigate through the application and review or fill in information is using the TAB key. This is especially true on the Tally page. Note on your keyboard that the TAB key is located on the left hand side of the board.
CFEC Permit information, Vessel information, Date Fishing Began, Stat Area and Percent are the only other rigidly required fields on this page. The application will not allow you to save the landing report without correct information in these fields.
Enter Date Fishing Began as the beginning of the current opener, or the date that the fisherman indicates as the start of this trip. Date Fishing Ended is required only in the troll fishery. The tLandings application has logic to message a warning if the date fishing began to the date of landing is more than 3 days. This is a warning and does not stop the reporting process.
Nearest Bay or Headland may be required by Area Managers for some fisheries, but whenever left blank, will always generate a warning when the landing is saved. Enter an appropriate geographic reference (e.g. Rocky Bay) if required by the area management biologist.
For this exercise, enter Rocky Bay.
Enter “32100” in the Stat Area field, hit Tab or Enter to move to the next field, and enter “100” for Percent. (You do not need to enter the dash). If you only have one stat area, the program will assume that percent of time fished is 100%.
Please be aware that the application includes logic to provide a warning if the statarea entered is not allowable for the CFEC fishery area and the gear. In the example above, the CFEC permit fishery area is “T”, Bristol Bay. If a statarea reported is not within area T is entered, or if the gear for the statarea reported is not allowed, you will receive an error message.
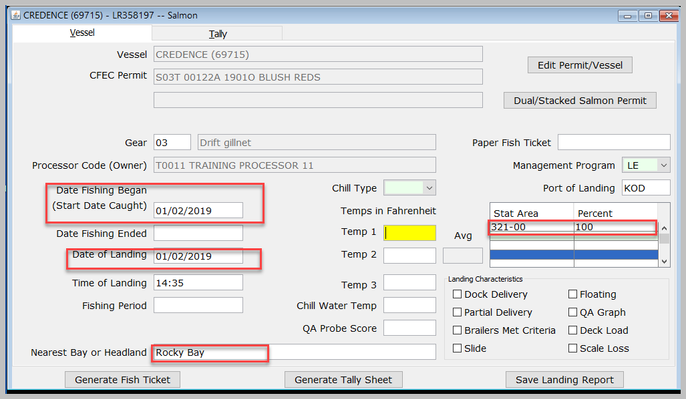
Before you leave this page, please notice the Landings Characteristics section in the lower right hand corner.These are characteristics of the landing requested by seafood processors, not ADF&G. Please check with your seafood office staff to determine if you need to evaluate the landing based on any of these characteristics. To click the box, please use the mouse, clicking in the box. These can be hidden if you do not need them, review PTI Scenario 1–Configure Thumb Drives Overview - 2019 for more information.

The Tally Tab
Click the Tally tab at the upper left to move to the next screen.
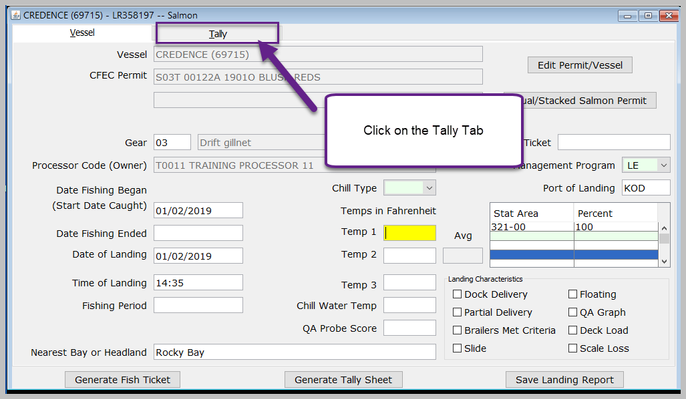
Note that the application is requesting entry of Species – Condition – Grading information, as indicated from the yellow highlight.
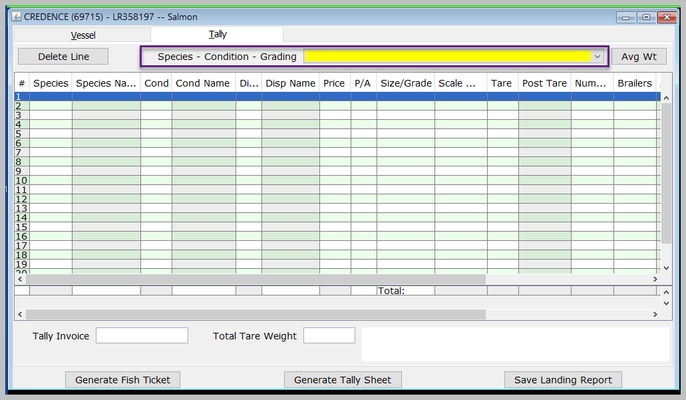
If you click the highlighted yellow field a dropdown list of species and conditions, and in some cases, grading will appear.
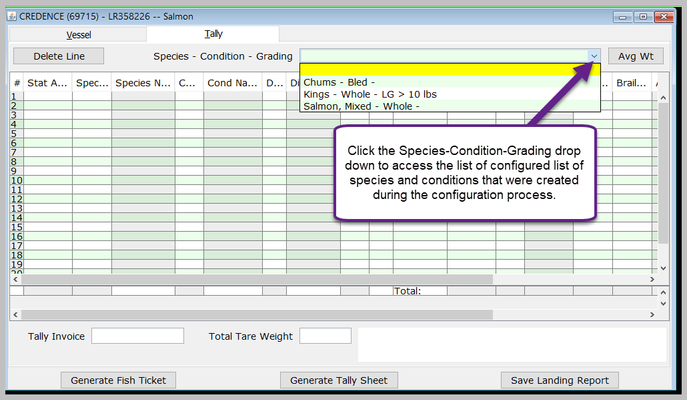
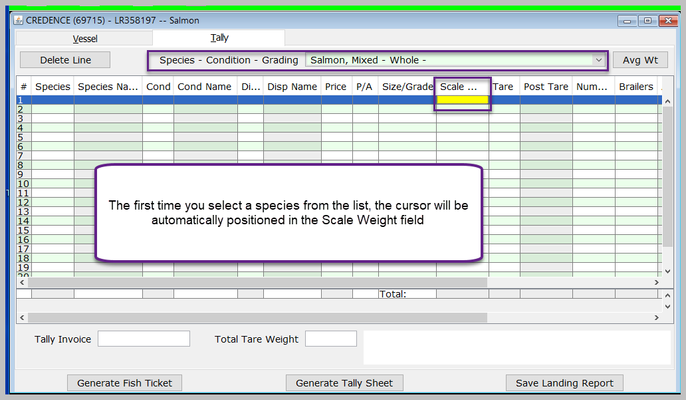
Using your mouse or the down arrow key, scroll down and select “Salmon, Mixed- Whole-” from the Species-Condition-Grading drop down.
The first time you select a species from the list, the cursor will be automatically positioned in the Scale Weight field (don’t worry about the other fields on this line yet).
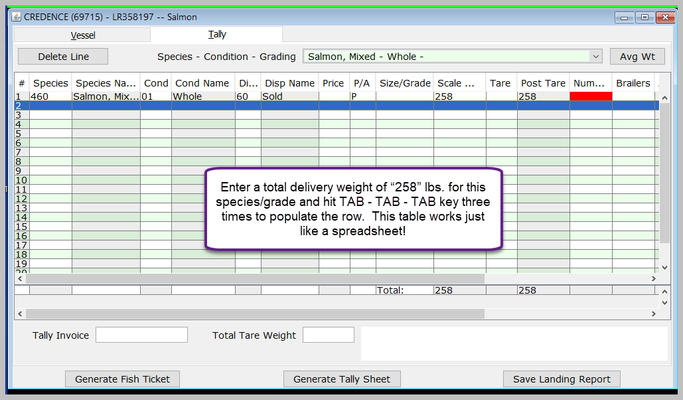
Enter a total delivery weight of “258” lbs. for this species/grade and hit TAB – TAB – TAB key three times to populate the row. This table works just like a spreadsheet.
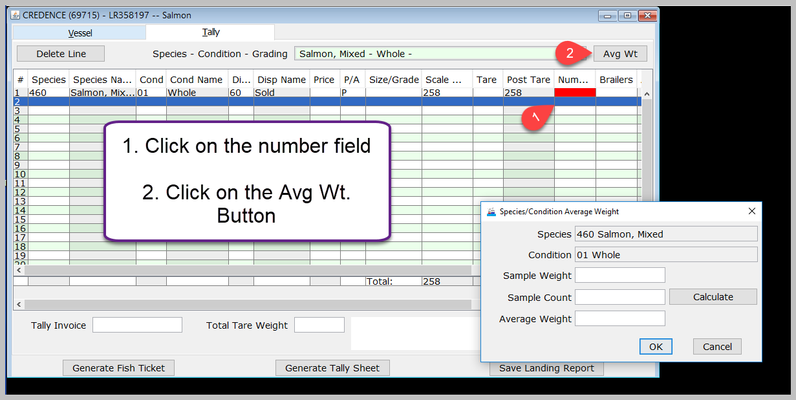
Establishing an Average Weight
You do not have an average weight for the mixed salmon– whole category established. It is easy to do. First, click on the red cell, Number. Then click the AVG WT button.
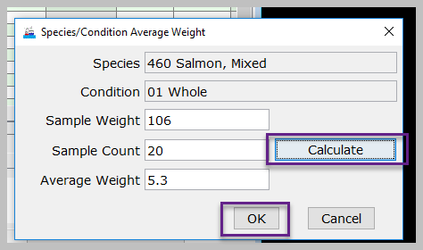
This will bring up the Species/Condition Average Weight dialogue box. Enter the sample weight and count for this species. Here we will enter "106" for Sample Weight and "20" for Sample and then Click the Calculate button (you will get an Average Weight of 5.3) and then the OK button. The Species/Condition Average Weight dialog box closes.
Click back into the red colored number cell and tab through unit the next line Scale Weight.
Notice that the number of fish for this brailer weight has now been recorded! You should now see 49 in the Number field.
You are now ready to record another brailer weight for Chums-Bled, or select a different species and delivery condition.
To select a new Species – Condition, using your mouse, just click into the Species – Condition – Grading field again and choose Chums – Bled. This time just click the keyboard letter “C” and chums will be selected. You can use the down arrow to locate Chums – Bled. This method of using the first letter of the species can speed up location of a specific species.
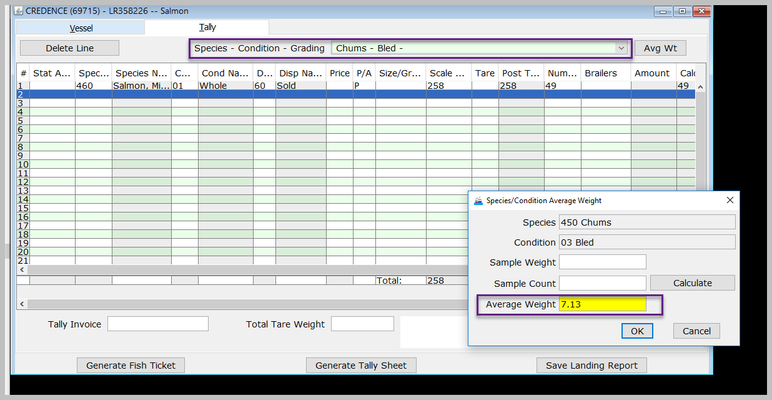
An average weight for Chums – Bled has not been established. With the Chums line item highlighted, click on the Avg Wt button. The average weight was already determined by the tender also in your area, 7.13. Enter this value and click OK and then tab thru the row, past brailer number.
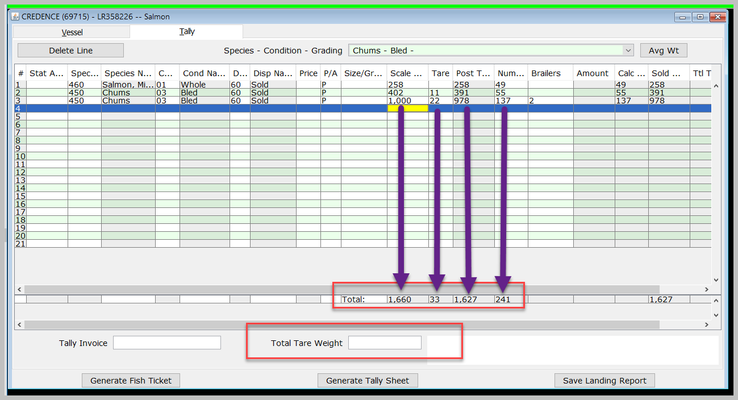
As you enter the individual line item weights and then the Scale Wgt., Tare weights, the Post Tare weights, and the Number of fish are totaled and displayed at the bottom of the report. The Post Tare weight reflects a deduction in the weight to be sold.
Also look at line item 3. Two brailer bags were weighted at once and are reported in the Brailer column.
In the Bristol Bay fisheries, if you enter Mixed Salmon line items you can use the Total Tare Weight box at the bottom center of the reporting screen. The Total Tare Weight feature is ONLY available with mixed salmon species and only in Bristol Bay salmon fisheries.
Let’s add one more line item to this landing report, Kings – Whole – LG > 10 lbs.
Click into the Species – Condition – Grading field and then hit the “K” key on your keyboard. Once you have identified Kings – Whole – LG > 10 lbs hit enter.
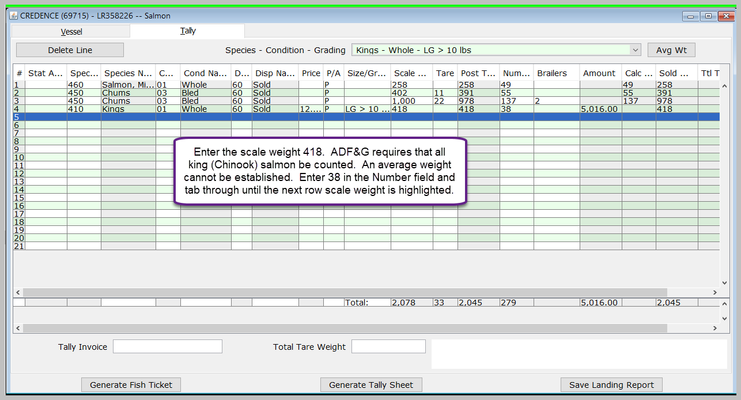
Enter the scale weight 418. ADF&G requires that all king (Chinook) salmon be counted. An average weight cannot be established. Enter 38 in the Number field and tab thru until the next row scale weight is highlighted.
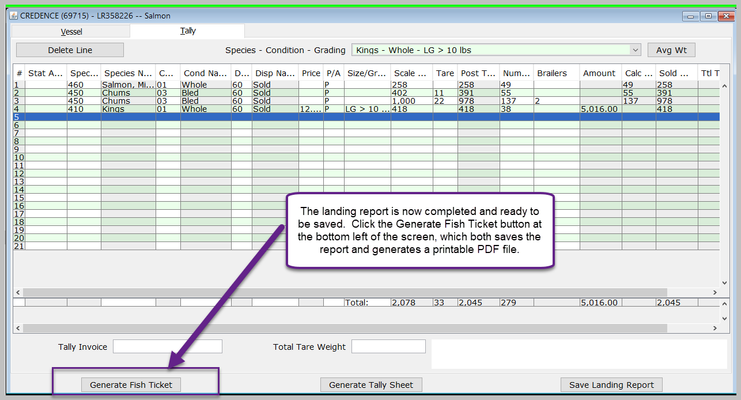
The landing report is now completed and ready to be saved. Click the Generate Fish Ticket button at the bottom left of the screen, which both saves the report and generates a printable PDF file.
When you click on Generate Fish Ticket, tLandings will automatically save the landing report, but before it does, the information you have entered goes thru a series of validations. You may receive a warning message or an error message.
The warning message is just that, it asks you to review and potentially correct the information you have entered. An error message MUST be corrected before you can print the fish ticket. Error and warning messages both provide information to correct the problem.
The tLandings application automatically creates a .PDF file of the fish ticket, and opens it in an Adobe Acrobat Reader window. Two tickets will automatically be created ready for printing. You can print or review this fish ticket, and even generate it again after editing the landing if needed.
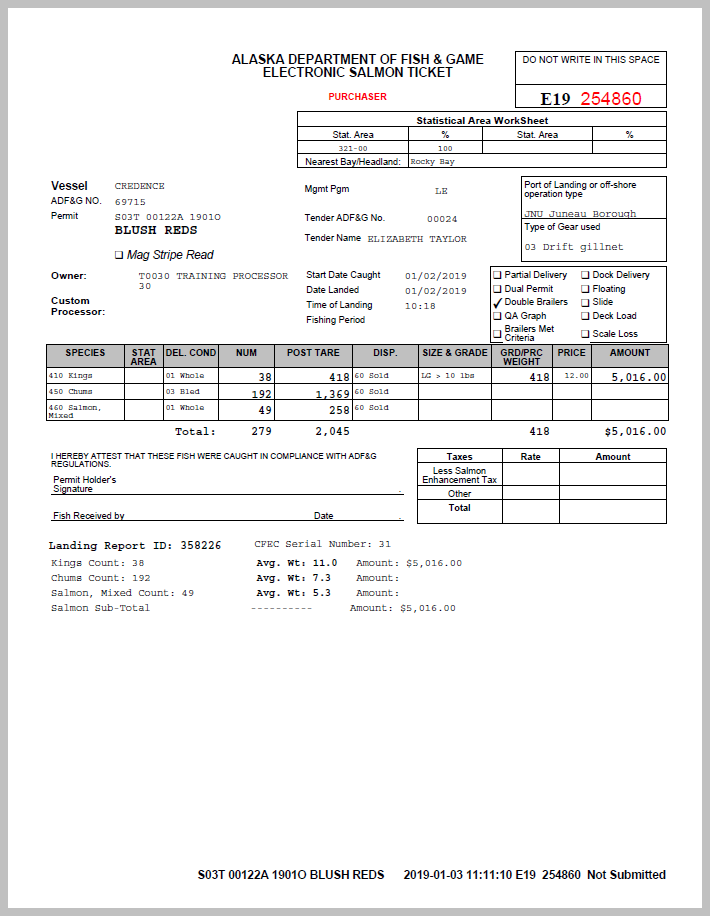
This fish ticket copy indicates the following:
- The magnetic card reader was successfully used and the CFEC permit does not need to be embossed.
- The totals for Number of fish, Post Tare weight and Sold Weight are summarized below the species and delivery condition items. The sold category weights (in the example above, 418 lb.) are carried over to this column. Only the weights of those species/conditions with grading information are displayed and summed in the Sold Weight column.
- The sample temperatures are listed individually and the Averaged temperature is listed in the body of the fish ticket.
- The Average Weight by species is listed on the ticket. Please review these weights. ADF&G manages our salmon fisheries by number of fish. Accurate average weights are important to the effective management of our fishery resource.
If your seafood processor provides the vessel skipper with a tally sheet, this can be printed, as well.
Review the fish ticket and the tally sheet. If changes need to be made, it is simply to do. With the landing report still open, change any field needing to be corrected, save the report and re-print the fish ticket.
You are now ready for your next landing.
If you have completed the landing report, please do not minimize the report (s) – just close. When you minimize a large number of reports, the application performance is slowed.
Once a landing report is saved, it can always be reopened and edited using the Open An Existing Report icon.
How to Download and Print this Article as a PDF
Download:
Click the 3 dots (...) at the top right of the article
Click Export
Click Export to PDF
Wait for the PDF to load, and click Download PDF
Print:
Open the PDF
Print the PDF


Support Contact:
If you have any questions or concerns, please contact elandings@alaska.gov