eLandings User Manual
TWS Scenario 2: Create a Landing Report – Manual Entries
- Jennifer Womack - NOAA Affiliate (Unlicensed)
- Anthony Naciuk
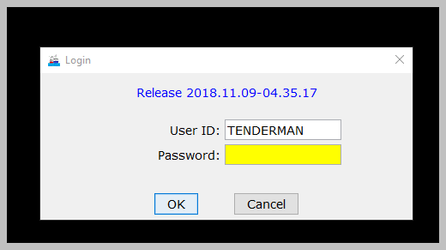
UserID and Password
UserID: Autofilled as TENDERMAN
Password: sockeye123
To complete this exercise, you will need:
- A thumb drive previously prepared for one of the Sunrise Processing tenders using the Processor Tender Interface.
Scenario
You are the skipper of a tender buying salmon for King Crab Processing. You will create a slightly more complex landing report for a delivery from a fishing vessel that fished in multiple stat areas. For this exercise, the CFEC permit holder’s card is not readable using a mag stripe reader, so you will also need to manually enter that information. In addition, the processor wants you to add pricing and grading information, so you will need to edit the processor’s species defaults (species-condition-grading/pricing) installed when the thumb drive was configured.
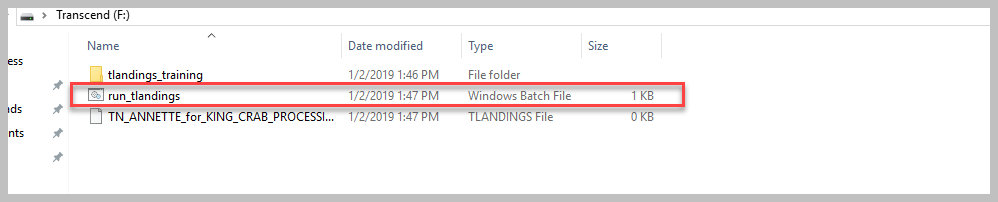
Insert the thumb drive in a USB port, and note the drive letter assigned to it using My Computer or other file Explorer window.
Double click the thumb drive to open it, and double click the file named “run_tlandings.bat” (Note: You may not see the .bat file extension, depending on how your computer is set up).
The Userid is autofilled as TENDERMAN. Enter the password sockeye123, and click the OK button.
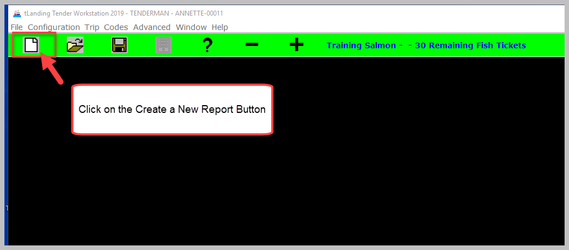
Click the “Create a new report” icon in the upper left corner.
This will open the New Report dialog box. If the CFEC permit is available, swipe the card with the magnetic card swipe reader.
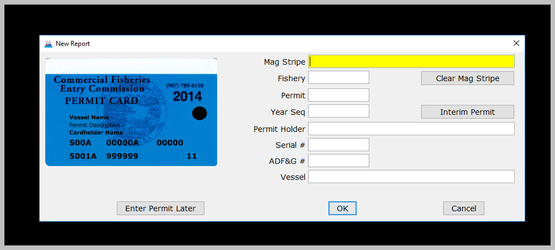
MANUAL ENTRY OF THE CFEC PERMIT
Do not swipe the CFEC Permit Card if you have one. Instead, we want you to manually enter the information.
In this instance you need to enter the CFEC permit holder’s information manually. Examples would be when they have no valid mag stripe card (such as a paper emergency transfer), your mag stripe reader quit working, or cleaning the card stripe doesn’t produce a good read.
| Field | Value |
|---|---|
| Fishery | S01K |
| Permit | 00119P |
| Year Seq | 1901M |
| Permit Holder | ROCKY COHO |
| Serial | 28 |
| ADF&G # | 01893 |
| Vessel | SHEARWATER |
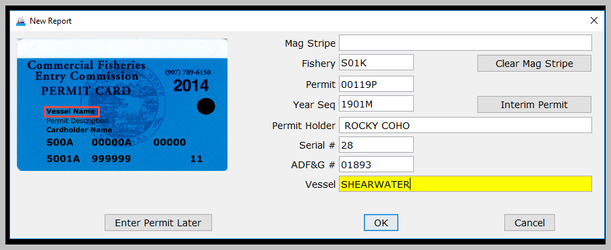
When this information is entered, click the OK button. The vessel tab page will automatically open.
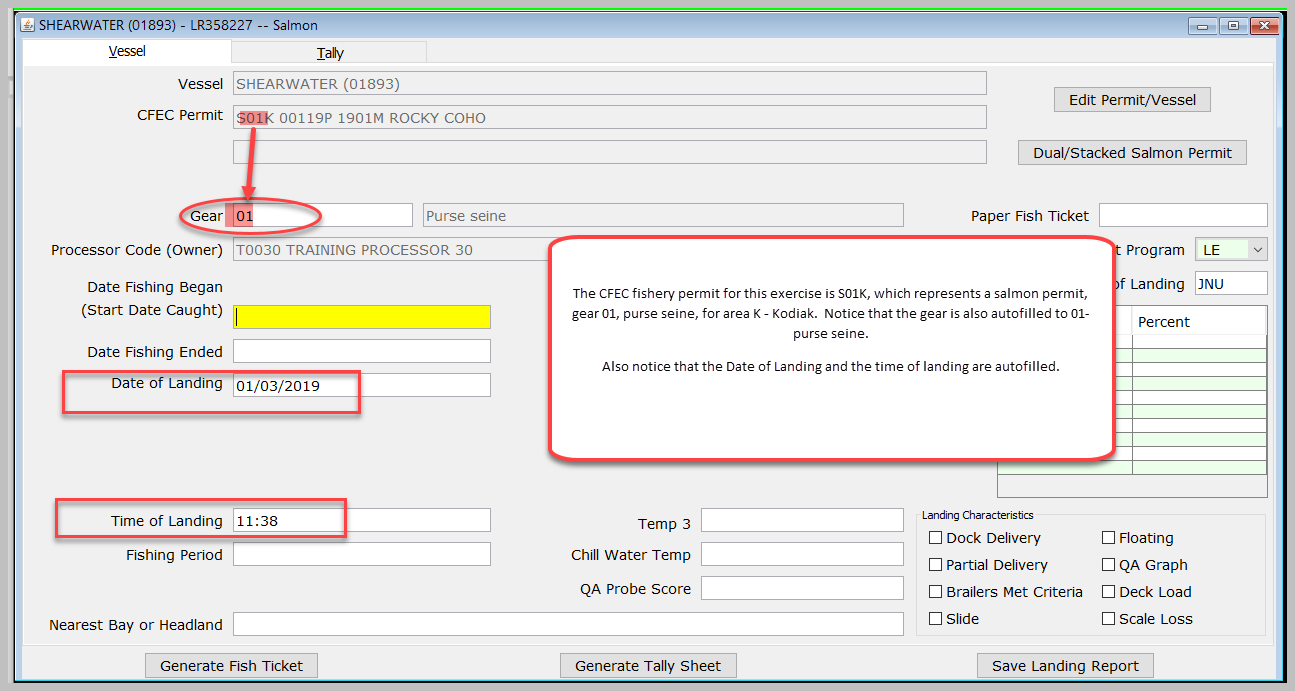
The CFEC fishery permit for this exercise is S01K, which represents a salmon permit, gear 01, purse seine, for area K – Kodiak. Notice that the gear is also autofilled to 01- purse seine.
Also notice that the Date of Landing and the time of landing are autofilled.
If any aspect of the Vessel or CFEC permit was entered incorrectly, click on the Edit Permit/Vessel button. The New Report CFEC permit dialog box will reopen, ready for edits.
The Vessel Tab may not look exactly like the display above. We now have the ability to customize this display of fields to better meet your reporting requirements. The Landing Characteristics, temperature information, and the QA Probe Score are all data collection elements that may or may not be displayed on your tLandings application.

The Date Fishing Began, Stat Area and Percent are the only other rigidly required fields on the vessel tab that are not already autofilled. The program will not allow you to save the landing report without providing correct information in these fields.
Enter Date Fishing Began as the beginning of the current opener, or the date that the fisherman indicates as the start of this trip.
Although Date Fishing Ended may be required for some fisheries, it will not generate warnings if left blank except with troll gear. Follow local Area Manager’s guidelines on what to enter for your fisheries.
To indicate that the permit holder fished half the time in Olga Bay North and half in Olga Bay South, you can enter multiple Stat Areas. Enter “25110” in the first Stat Area field, hit Tab key to move to the next field, and enter “40” for Percent. Tab to the next row, and enter “25111” for Stat Area, hit Tab, and again enter “60” for Percent. You do NOT need to enter the dash. Statistical areas reported must be within the CFEC permitted area, in this case, Kodiak area statistical areas.
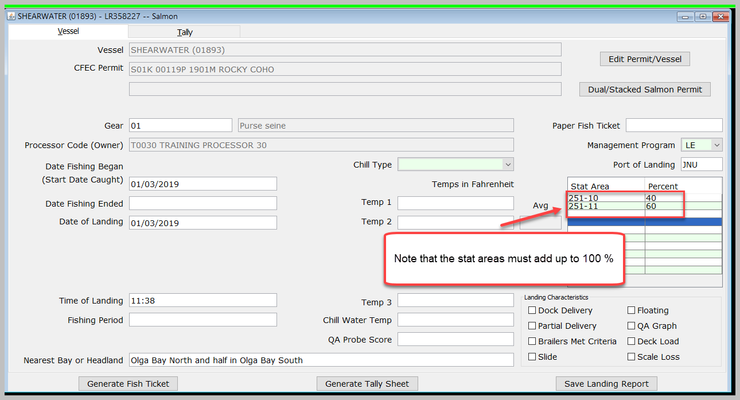
Percent values for all stat areas fished must sum to 100%.
Nearest Bay or Headland may be required by Area Managers for some fisheries, but whenever left blank, will always generate a warning when the landing is saved. Enter an appropriate geographic reference, to avoid a constant nag on saving. In this instance, the fisherman indicated he was fishing the line at Olga Bay, drifting back and forth across the line, fishing 40/60 % the time in each stat area.
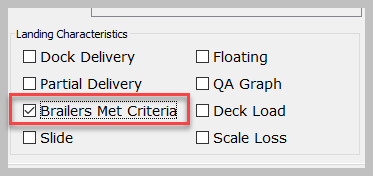
Your processor has asked you to take three temperatures and determine if the brailer poundage was under the threshold of 500 lbs. They were, so you will click the box, Brailers met Criteria.
YOU ARE NOW READY TO MOVE TO THE TALLY TAB
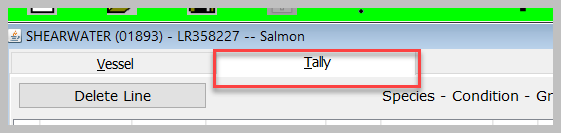
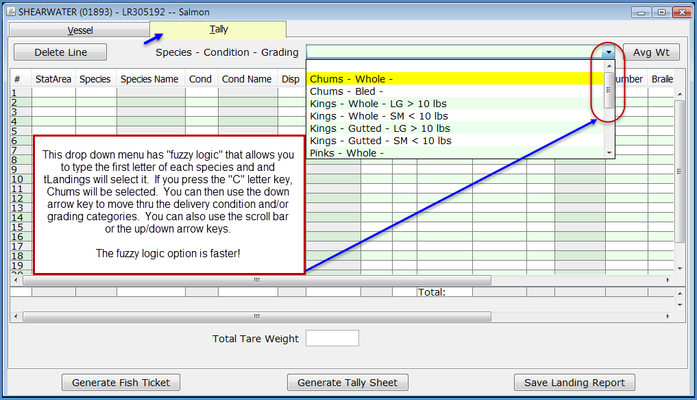
TALLY TAB. Click the Tally tab at the upper left to move to the next screen. Click the Species-Condition-Grading drop down to see the available list of species and delivery condition codes on the processor’s price list. This information was stored as Species Defaults during installation of the program on the thumb drive.
Adding Price to Species-Condition-Grading
In this scenario, you need to add the sample count and weight for bled chum salmon. The processor has called to tell you to add the Price for Chums, whole to $ .50 and Chums, bled to $ .65; lg kings > 10 lb, gutted to $3.75; and smaller kings are priced at $2.85. Price silvers delivered in a gutted condition $2.50 for large 7 lb or over, and $1.85 for smaller than 7 lb.
Before we changes prices, let’s start with adding the average weight sample to the Bled Chums. To enter, calculate and save the average weight of a species, first select the species, Chums – Bled from the pick list and then click the average weight button to open the Species/Condition Average Weight dialog box.
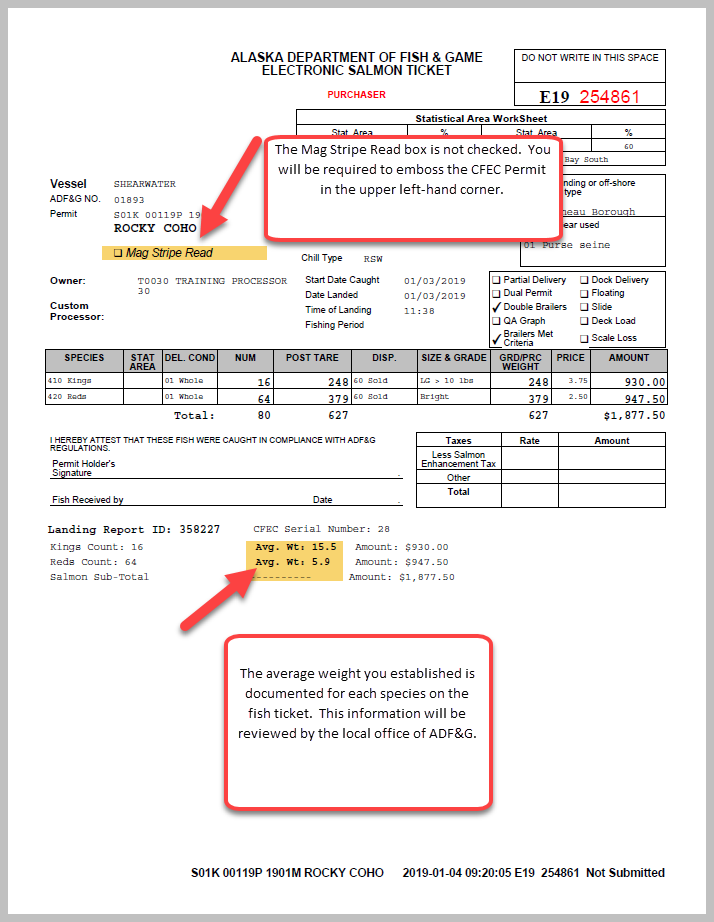
Enter the sample weight, sample count and click Calculate. The average weight is 6.92 lbs. Click OK to save. Once saved, the number of fish is automatically calculated for this species/condition each time it is selected while using this thumb drive. Average weights are stored only on the individual thumb drives as area management biologists want tender operators to establish an average weight by species and delivery condition at the beginning of each opener.
Your configured species defaults may be different from this example, so just follow along with an appropriate species from your list. Please remember that the local area management biologist may provide specific directions on how often you need to sample a specific species to determine the average weight.
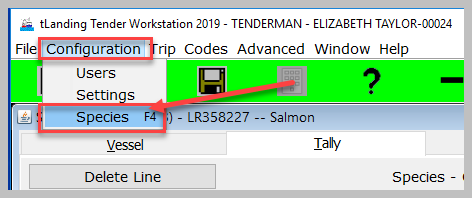
To add a species/condition or change a price, you will need to move to the Configuration menu located in the upper left hand corner of tLandings. Under the Configuration menu, select Species.
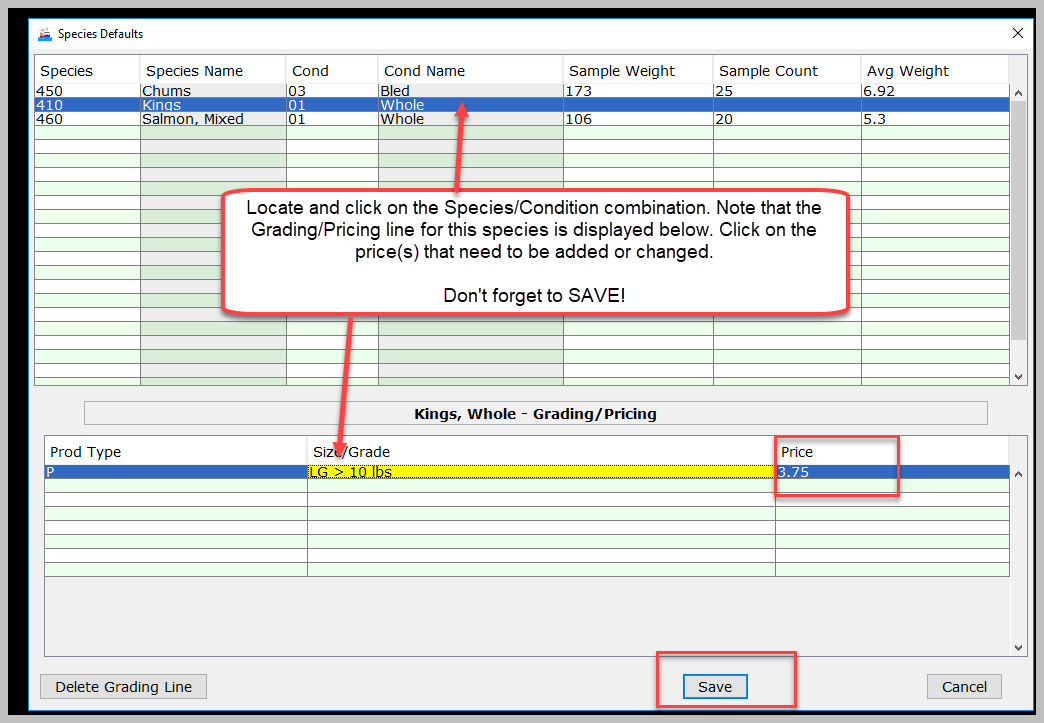
Select the appropriate single Species row from the upper table to see the Grading/Pricing items for that species in the lower table (e.g. Kings in the screen shot below). In the lower table, click on the Price field for large fish over 10 lbs (Lb 10+), and enter “3.75” and click SAVE.
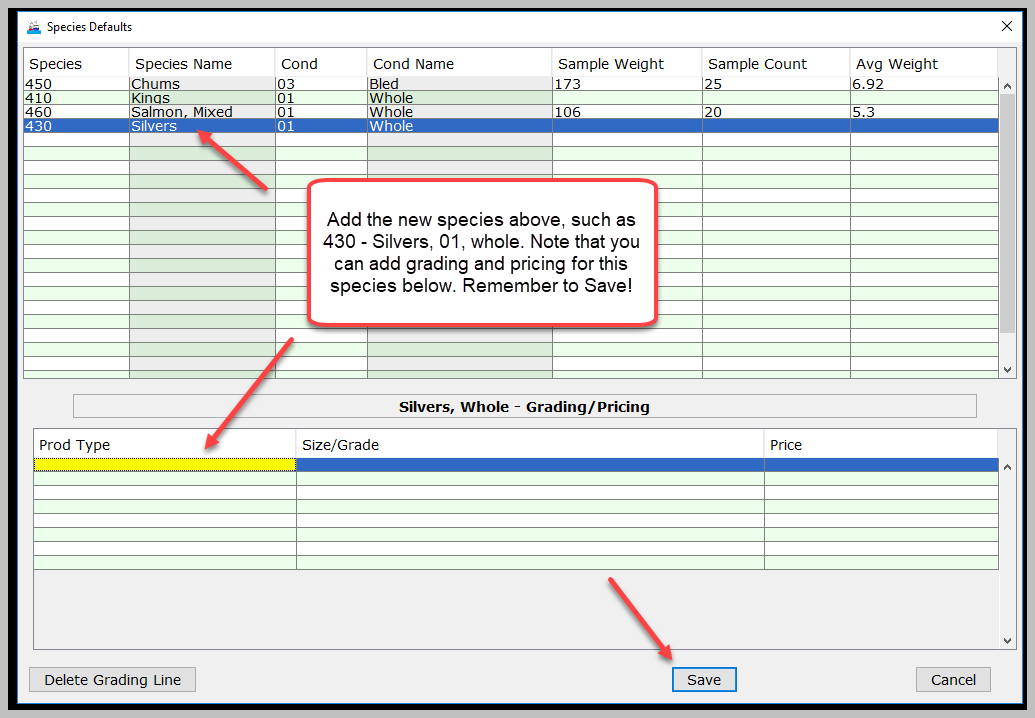
To add a new Species and Grading/Pricing for silvers, enter the species code (430 for silvers) in the next blank row for Species and hit Tab or Enter. This will automatically look up the Species Name and move the cursor to the Cond (Condition code) field. Enter “1” for whole fish and hit Tab or Enter to look up the Condition Name.
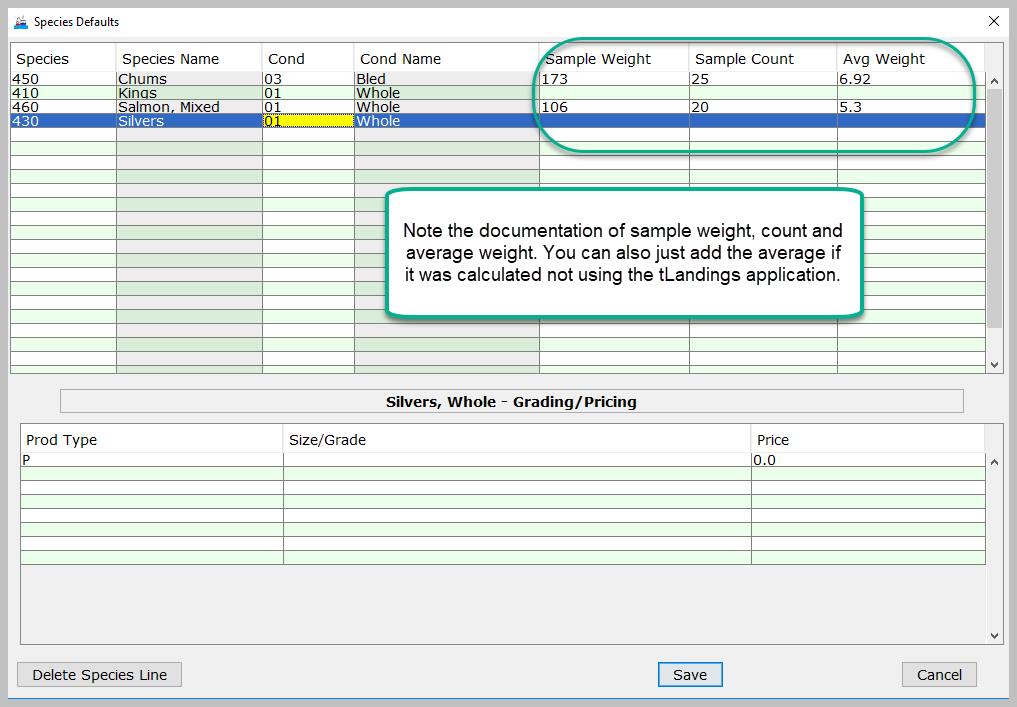
Average Weight is Documented in the Species Defaults!
Note the documentation of sample weight, count, and average weight. You can also just add the average weight if it was calculated not using the tLandings application.
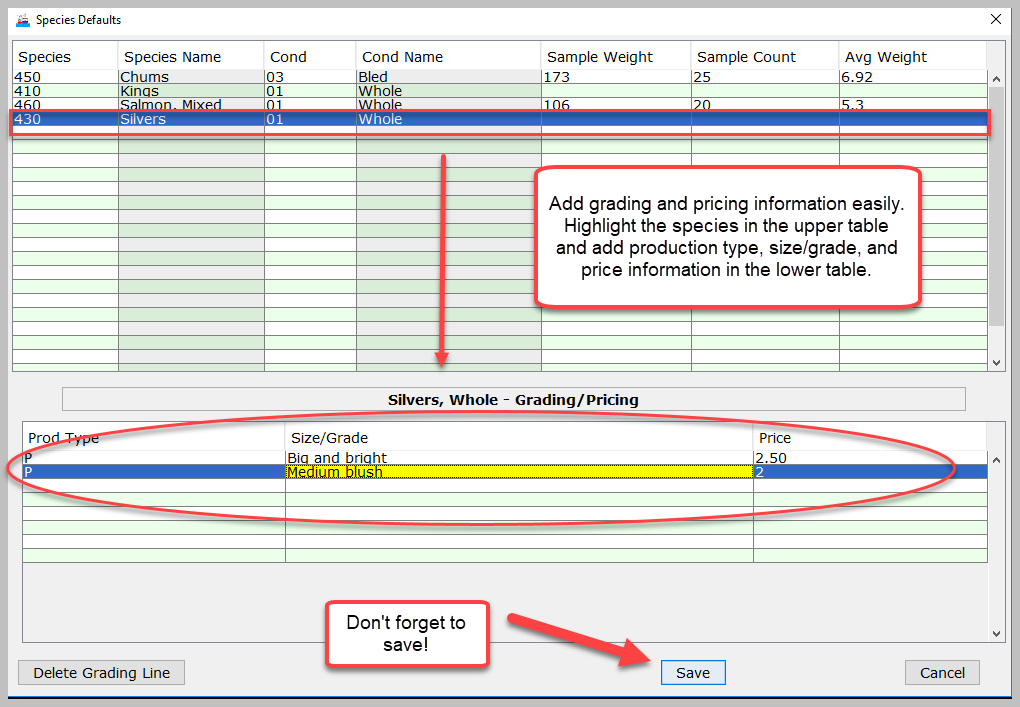
Add Grading and Pricing Information in tLandings
Add grading and pricing information easily. Highlight the species in the upper table and add production type, size/grade, and price information in the lower table. Don't forget to save! When you hit the save button, the Species Defaults will close.
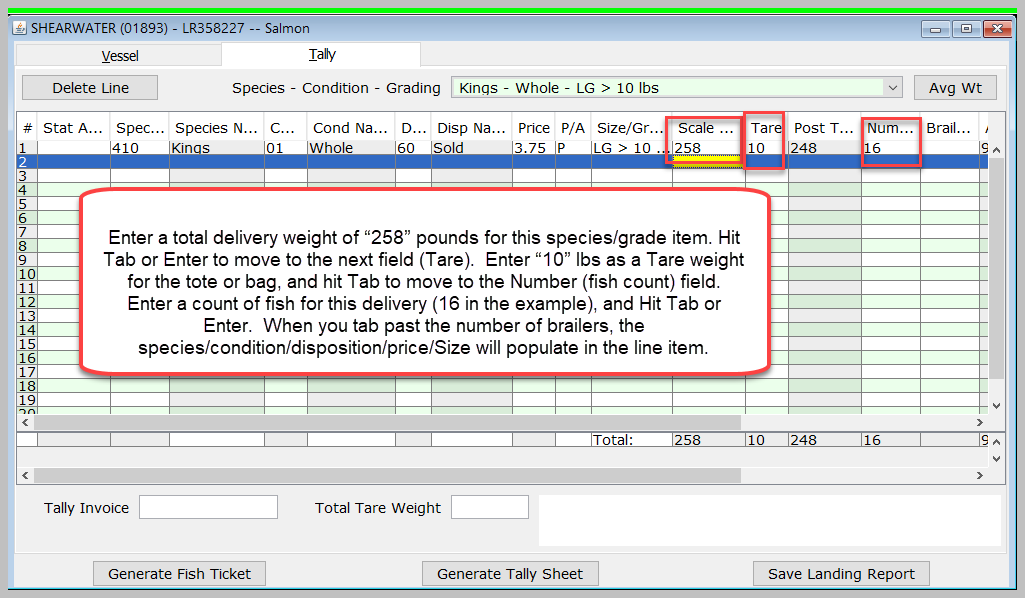
Now let’s buy some fish. Click the Species-Condition-Grading drop down and select an item from the list (in this case, whole kings). To select the king species just click on the “K” key, as this drop down selection box has “fuzzy logic” also. You can use the up and down arrow to scroll thru the species/condition selections, or click on the down arrow to display the entire list. Once you have selected Kings – whole-LG > 10 lbs., the cursor will automatically position to the Scale Weight field. (Note: Don’t worry about other blank fields at this point.)
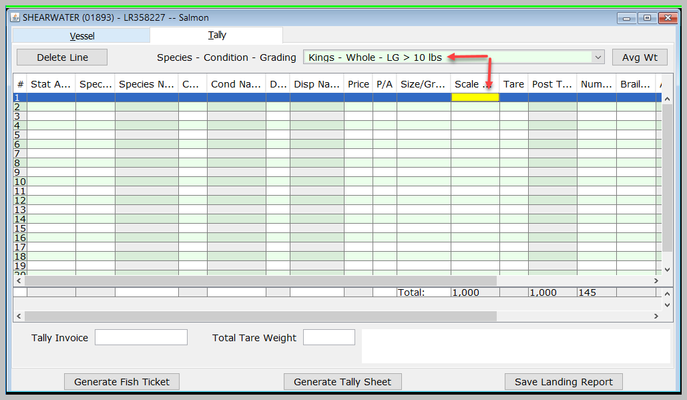
Enter a total delivery weight of “258” pounds for this species/grade item. Hit Tab or Enter to move to the next field (Tare). Enter “10” lbs as a Tare weight for the tote or bag, and hit Tab to move to the Number (fish count) field. Enter a count of fish for this delivery (16 in the example), and Hit Tab or Enter. When you tab past the number of brailers, the species/condition/disposition/price/Size will populate in the line item.
Notice also that the cursor is now positioned in the Scale Weight field for the next tally row.
Please remember when tendering fish, all King salmon must be counted. No average weight can be established.
Always use the “TAB” or “ENTER” key in the tally page. Enter the scale weight and simply tab through each additional field. Once you have tabbed through the number field the Species and Condition Codes will populate. The tally page works like a spreadsheet when you move through the field the behind-the-scenes calculations will populate. To proceed to each subsequent field on the tally line beginning with Scale Weight, you MUST hit the TAB or ENTER key three times total: i.e. “TAB,TAB, TAB” - once each for Scale Wt./Tare/Number-and enter a value at each stop if not automatically calculated . The last “Tab” will automatically place the cursor on the Scale Weight field for the next line item.
If you fail to use the tab key to move thru the table, using the mouse or finger pad to click into the scale weight, the table will display as shown below.

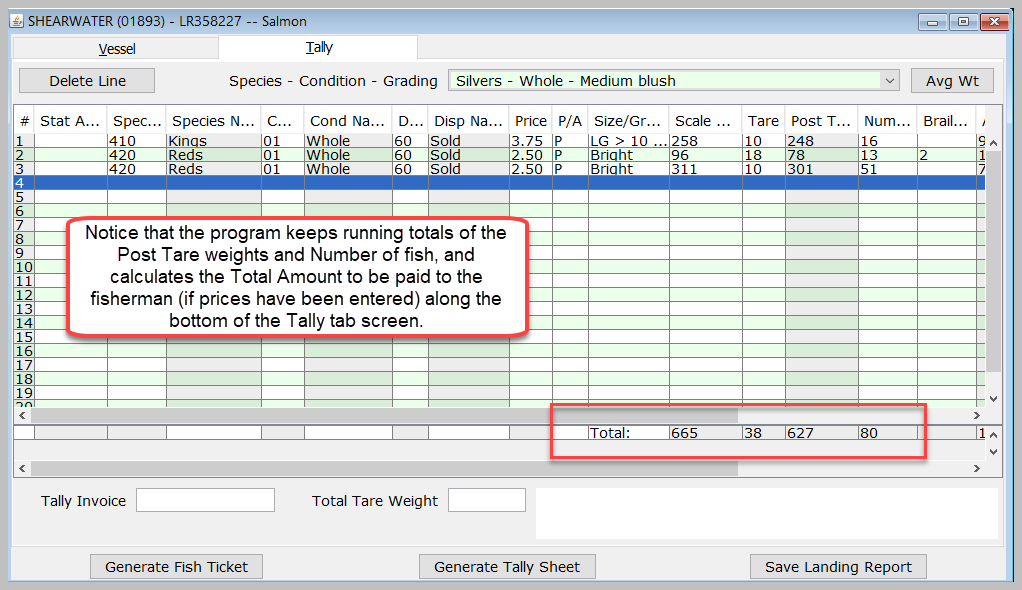
Now let’s buy some reds. Click on the Species-Condition-Grading drop down, and click the “R” key/ Reds – Whole – Brite will display from the list. Enter a Scale Weight and Tare weight (“696” and “18” in the example), then hit Tab or Enter to move the cursor to the Number field and the number may be calculated from the saved average weight. Two brailers were weighed together, so enter "2" in the brailers field.
If there is NOT an average weight entered for species in the Species Defaults table, the weight and tare and then click the average weight button. Enter the species sample and calculate the average weight or if already determined, just enter the Average Weight in the dialog box and click OK.
Next, just click Tab or Enter without entering a count in the Number field and the number of fish will automatically be calculated.
Add one additional weight for Reds – Whole – Brite, 311, with a brailer weight of 10.
Notice that the program keeps running totals of the Post Tare weights and Number of fish, and calculates the Total Amount to be paid to the fisherman (if prices have been entered) along the bottom of the Tally tab screen.
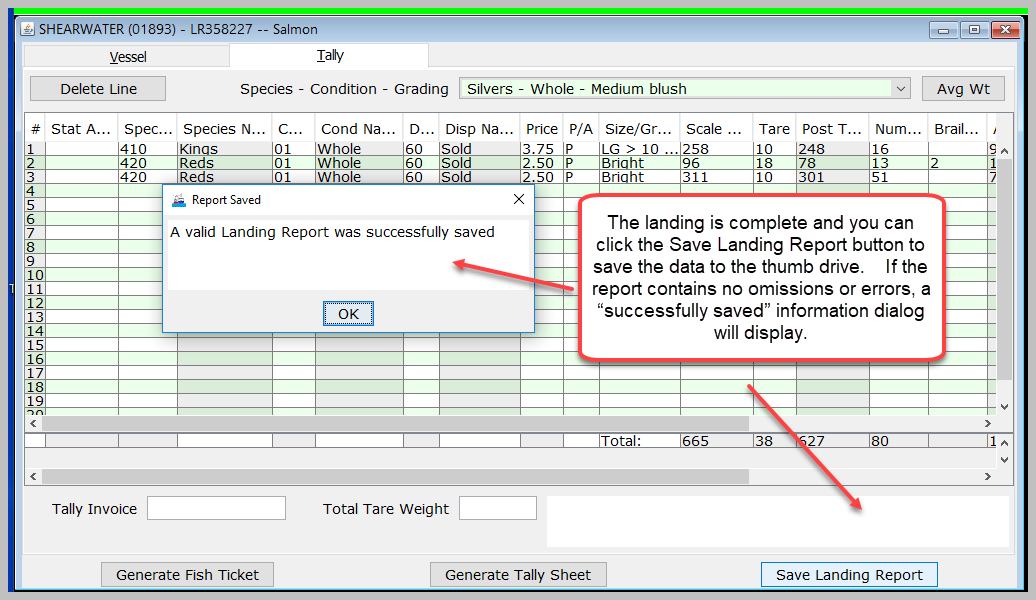
The landing is complete and you can click the Save Landing Report button to save the data to the thumb drive. If the report contains no omissions or errors, a “successfully saved” information dialog will display.
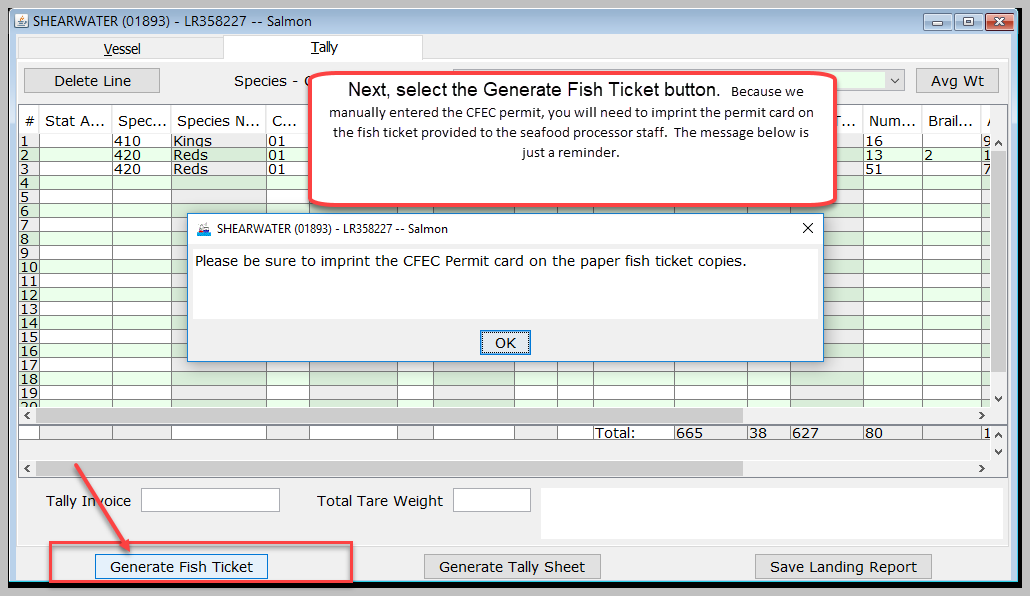
Next, select the Generate Fish Ticket button. Because we manually entered the CFEC permit, you will need to imprint the permit card on the fish ticket provided to the seafood processor staff. The message below is just a reminder
Once the Valid Landing Report message is received, two fish tickets will automatically be generated and (if selected) two tally sheets. The PDF will open in an Adobe Acrobat Reader window. You can print or review this fish ticket, and even generate it again after editing the landing if needed.
Print the fish ticket copies, sign (TENDER OPERATOR AND SKIPPER), and close the landing report.
YOU ARE READY FOR YOUR NEXT LANDING REPORT.
How to Download and Print this Article as a PDF
Download:
Click the 3 dots (...) at the top right of the article
Click Export
Click Export to PDF
Wait for the PDF to load, and click Download PDF
Print:
Open the PDF
Print the PDF


Support Contact:
If you have any questions or concerns, please contact elandings@alaska.gov